- Removal of the wood trim to polish and remove scratches. This area usually takes the most abuse from items getting placed on top of it.
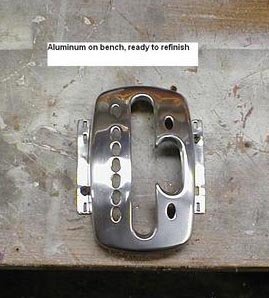
- Removal of the aluminum shifter trim for polishing.
- Repairing /replacing LED backlighting for the shift indicator lights.
- As part of doing a Tiptronic upgrade on a 1997 US bound A8.
- Cleaning of the rubber “tractor” shift guide. If your shifter is getting harder to move through the gears, cleaning might help. In my case, this was necessary due to a spilled drink, but I'm sure they all get a gunk build up over time.
Time
Varies widely depending on what you do. Figure 45 minutes or so to get it opened up.
Tools Required
- “T” handle 6mm hex works best although an Allen wrench would work too
- Trim removal tools
You can find the instructions on how to remove and reinstall the side panels here. If you have a facelift car, you'll need a 5mm allen wrench to remove the switch under the gas pedal.
Remove both the driver and passenger floor mats AND the sound insulation underneath. The sound insulation is the same shape as the floor mat only it's much thicker and heavier.
On the driver's side, remove the two plastic inserts in the knee bolster below the steering wheel. They pop right out and will expose 6mm hex screws. Remove those screws and the whole piece will tilt down out of the way. Carefully prop it against the floor. You don't really need to remove it entirely for this project. Don't break the OBD harness, it will still be attached. Pictures and detailed description can be found here.
On the passenger side, look for a rectangular Velcro section on the transmission hump carpeting. It's around ankle height on the left side as you are sitting in the seat. Pull that back, remove the small plastic cover (pry off with a screwdriver) and remove the Philips screw.
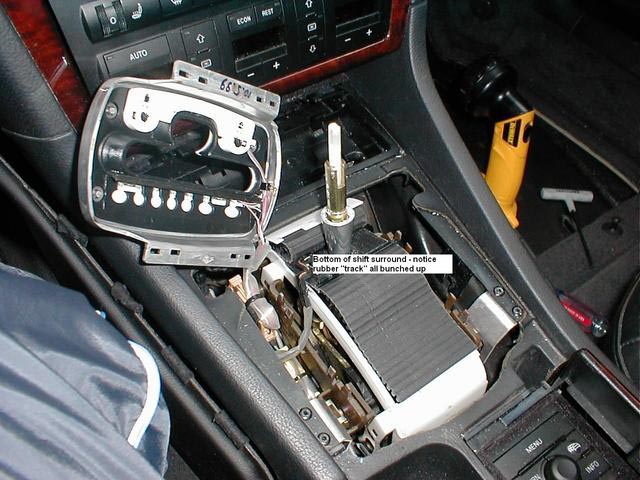
In order to get the shifter assembly apart, you now need to remove the side panels to expose 6mm hex screws. Two of them secure the wood trim and two secure the aluminum shifter piece. Pull the side panels down and out on both the driver and passenger sides. They have tabs that catch behind the center console.
Once the side panels are out of the way (get them out of the car), look on each side, behind where the side panels were installed, for the 6mm hex screws and remove them. If you are taking out BOTH the shifter and wood trim, remove all four.
Once the screws are removed, you can pry up on the wood trim and remove it. There will be some friction from the rubber gasket but it will come straight up and out.
If you have removed the screws for the aluminum shifter, it will pull straight up as well but will NOT come out until you do two more things. Depending on what you're doing, this might be far enough do get what you need done. If you want to completely remove it, go to the step below.
Completely Removing the Shifter
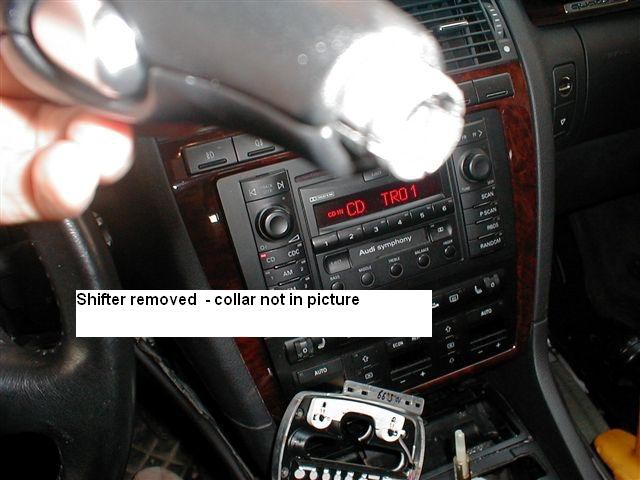
If you are at this step, the wood trim has been removed and the aluminum shifter should be loose but still connected. If you want to remove it completely, do the following.
Disconnect the two wiring harnesses on the left hand side. You'll probably need to cut the zip ties that hold the connectors in place.
Remove the shifter. This can be a little tricky but let me explain. Just below the leather part of the shift knob, there is an aluminum collar that you need to loosen. Carefully wedge a screwdriver between the bottom of the leather and the top of the collar and press down. It's pretty tight but mine came off right away. I don't think you can “pull” it down with your hands so I came up with the screwdriver method. It goes without saying to do this carefully in case the screwdriver slips. I did it in one shot so hopefully it's no big deal.
Once that's done, pull the shift button OUT and pull UP to remove the shifter. Just to clarify, the shift selector button is the one you push in with your thumb before selecting the gear. Note when reinstalling: you will need to use a pair of needle nose pliers to “grab” the shift button in order to pull it back out so you can reinstall it.
At this point the disassembly is complete and you can access pretty much everything related to the center console and shifter. Assembly is the reverse for all steps.
A couple of notes that might be helpful:
- I used a combination of wet sanding and 3 grits of polish on the wood trim. If yours is in pretty good shape you might be able to just polish or use Meguairs scratch remover. This is probably trial and error until you are happy with the results. The clearcoat looks pretty thick so there's a lot of material to work with. Reinstalling with the 6mm screws is optional. The rubber surround holds it tightly in place. This also means you'll be able to pop it right back out without all of the disassembly the next time.
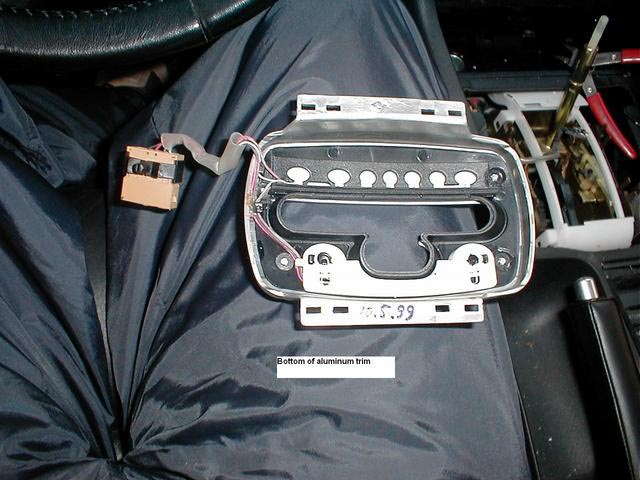
- If you're polishing the aluminum trim, I would recommend removing the shift indicator buttons by peeling off the white tape and pushing them out. You will also need to remove the white plastic piece on the back by prying out the four circle clips that hold it on. If you got this far, you won't get stumped with these details. At this point, you be left with just a machined piece of aluminum. I started with 240 grit sandpaper (deep scratches), 320, 400, 500 and then #00, #000, #0000 steel wool. There's either an anodized coating or clearcoat that you will need to get through before you hit the aluminum. I think any of the grits of sandpaper will get through this pretty fast. I did mine in more of a brushed aluminum look by making the #000 steel wool the last step. If you want to get back to a highly polished finish, you will need to do some buffing too. I replaced these screws but you will notice that this piece is keyed when you reinstall it. You could probably get away without these too, which would eliminate most of this procedure if you wanted to this again.
- The rubber “tractor” looking piece has a pretty tight tolerance and needs to be clean in order to work smoothly. While you have everything opened up, clean it well and use some armor all so that it's slippery. I had to do a more extensive cleaning on the plastic guides as it kept getting stuck. Unfortunately, you can't really “test” it until the shifter is reassembled. It needs to be held down in order to work correctly.
No comments:
Post a Comment