The following procedure is to be used on the A8 4.2 32 Valve (ABZ) motor. This engine was found on the 1997 to 1999 U.S. bound A8's. This procedure might also be used for the 3.7 V8 engines, and may be applicable to other 4.2 motors as well.
Please consult the Bently manual before using this procedure.
Determining if You Need this Procedure
The oil cooler has a plastic pipe with o-rings that carries coolant into the oil cooler, as well as a special "figure 8" oil seal to carry oil in & out of the cooler. The plastic pipe, o-rings, and oil seal degrade over time and begin to leak. Symptoms of a leak are an unexplainable coolant leak (normally resulting in a low coolant warning on the dash) or a small oil leak normally noticed when taking the plastic belly pan off during an oil change. It leaks a small amount of oil, but it can appear to seem like a lot. A small amount of oil looks like a large problem when leaking.
This leak can be found of the front quarter of the engine on the passenger side.
Approximate parts cost: $90.00, including oil filter kit & oil.
Approximate time needed: 7 hours or less.
Approximate money saved doing it yourself: $1,000.00 US. (Including oil change.)
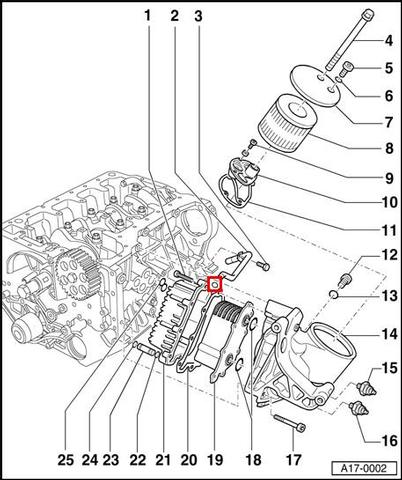
Oil Cooler and Filter Exploded View. Engine block shown upside down with oil filter pointing up. Item 23 is the plastic coolant pipe that will be replaced along with 22, 24 and 25. The third o-ring that is replaced is circled in red, the Bently manual does not number it.
*Information Required*
- Your Radio security code. You can obtain this from a dealer, or you can borrow/purchase the radio removal tools. If you do not have your radio security code, you will need to obtain it for your radio to work again.
- A printed copy of Ti Kan's Audi Radio Page, includes Delta, Concert and Symphony programming guides.
(Also required are the tools listed on the Coolant Expansion Tank Replacement page.)
- Standard 3/8" drive short socket set, 3/8" to 13/16".
- Metric 3/8" drive short socket set, 8mm to 17mm.
- Metric 3/8" drive Allen set, 4mm to 10mm.
- 3/8" drive universal drive adapter. (Crucial)
- 3/8" drive breaker bar.
- 3/8" drive ratchet.
- 3/8" drive (or 1/2" drive, with adaptor), 0 - 50 ft/lbs torque wrench.
- 3/8" drive 3" extension.
- 3/8" drive 9" extension.
- Small 2" by 3" mirror. (Crucial)
- 10mm open end wrench.
- Torx bit, #25, approx 1 inch long. (Crucial)
- Number 2 Phillips screwdriver
- Number 2 Flat-tip screwdriver
- Floor Jack and jackstands, or lift .
- Bottle Jack. (Extremely helpful)
- Approx 12" long of 1" ID Conduit pipe.
(same pipe used as a cheater for tranny service.) - 3/8" ID hose, approx 1.5 - 2 feet long
- Extremely clean 5 gallon bucket.
- Gallon milk jug, rinsed out, with the bottom cut off. (funnel)
- Oil drain pan, large enough to hold 8 quarts.
- Access to a VAG-COM, or VAG 1551 tool. You can try Steve Hall's VAG Locator
- 8 - pack Guinness, for after.
Parts Required
- Oil Filter kit
- 8 quarts oil.
- 3 each O rings, part #077-121-437.
- 1 each oil seal/gasket, part #077-117-411-A.
- 1 plastic coolant pipe, part #077-115-441.
- 1 gallon G12 coolant. You can also buy this at a VW dealer.
- 1 can brake cleaner.
- 1 roll paper towels.
- The first part required is to drain the coolant out of the engine. For this,
follow steps 1 - 5 outlined in Coolant Expansion Tank Replacement.
- Additionally, remove the expansion tank fill cap.
- After you have done this, drain the coolant out of the oil cooler via the 10mm bolt. If you use a peice of duct tape to act as a 'chute', you can drain it into the same bucket, without it collecting contaminants.
Oil Cooler Coolant Drain 
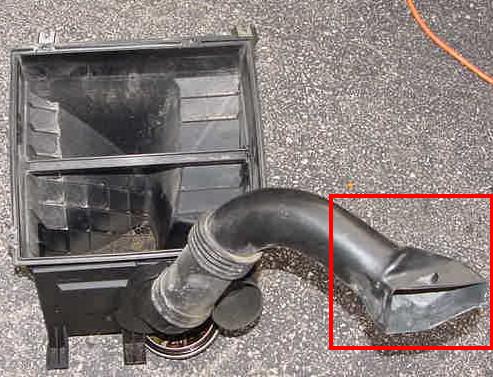
- After removing the top of the filter box and associated intake hoses, you will see 2 mounting studs holding the filter box. Remove the nuts. These are the only fasteners holding it.
Filter Box Mounting Studs 
- Using the flat-tip screw driver, press underneath each clip of the plastic air intake hold down cover to release it.
- Next, wiggle out both plastic pipes from the rest of the hold down, and remove the filter box.
(This is why you need the radio code)
- Open the trunk. On the passenger side, in the little compartment, remove the little divider by pulling gently but firmly up.
- Pop up the floor of the compartment. It's velcroed on.
- Use the 10mm wrench to disconnect the ground clamp. This is the clamp closest to the rear bumper.
- Pull down on the serpentine belt, making sure it is pulled below the tab, and use the Torx #25 to keep the tension off by placing in this hole:
Serpentine belt tensioner hold main view 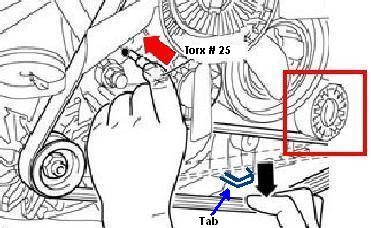
Serpentine belt tensioner hold detail view 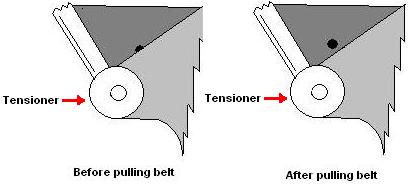

Install a allen wrench or torx 25 bit to hold tensioner to remove belt.
- Very carfully, slide the belt off the smooth pulley (not grooved) that is lowest and closest to the driver's side. (See red box above.) This will be the easiest pulley. Take care NOT to remove the whole belt.
- Delicately slide the belt off the alternator. You can keep it out of the way, yet retain the belt routing by resting it on the bracket that is used for attaching the large under-engine plastic cover.
Where to rest the belt 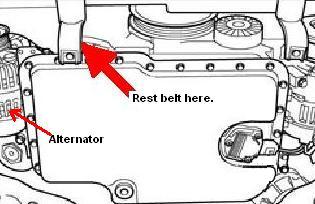
- Using the ratchet and 10mm socket, disconnect the main alternator lead.
- Using the ratchet and 5/16" socket, disconnect the secondary alternator lead.
- Using the breaker bar and a 5/8" (yes, not metric) short socket, break loose the 2 upper bolts that hold the alternator.
DO NOT BREAK LOOSE THE LOWER BOLT AT THIS TIME.Alternator mounting points 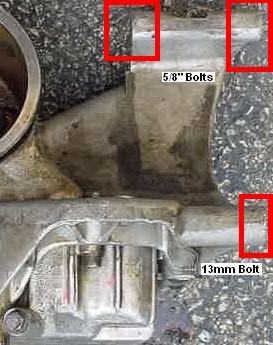
- Continue to use the breaker bar to loosen the 2 upper bolts. It is very tight clearance, but after very few turns, you will be able to unscrew them by hand. Unscrew them completely, and then turn one back in a full turn.
- Using the ratchet and 13mm socket, break loose and remove the lower bolt.
- Supporting the alternator with one hand, remove the last upper bolt.
- If the alternator doesn't drop, swing it back and forth gently until it comes free.
- Position the oil drain pan under the oil filter.
- Using the 10mm Allen drive, 3" extension and ratchet, break loose the large plug on the bottom of the oil filter. Once loose, remove the tools and unscrew by hand. Allow filter to drain completely.
- Using the 10mm Socket, 3" extension and ratchet, break loose the retaining bolt in the bottom of the oil filter. Once loose, unscrew by hand.
- Gently wiggle off the bottom of the oil filter housing, and the remove the filter itself. Allow to finish draining. Do not leave any parts or oil filter in drain pan.
- After draining, move oil drain pan.
(The meat of the problem)
- Using the breaker bar and ratchet, 3" extension, and 8mm Allen drive, remove these 2 engine mount bolts:
Engine mount bolts to remove 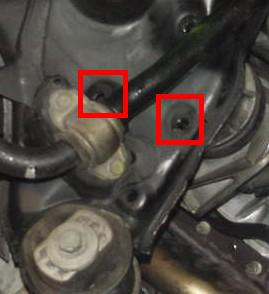
- Using the bottle jack and the conduit pipe, lift the engine by placing the pipe on top of the Bottle Jack, and the other end so it supports the large washer of the engine torque support, making sure not to lift the whole car. The most the engine should go up is 3 inches. This allows just enough clearance to remove the 3 top bolts of the oil cooler.
Placement of the bottle jack & pipe 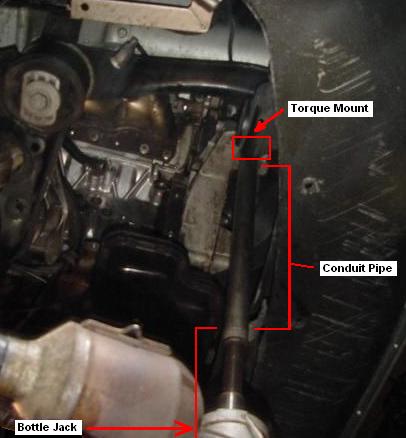
- Peel back the boot on the oil pressure switch, and pull the clip off. You may or may not have the wire tied down with a zip-strip.
- Using the 8mm Allen drive, 3" extension, universal drive adaptor, 9" extension and the breaker bar, you will remove the bolt #1. The best way I found was to put thee 8mm on the 3" extension, and then attach the universal drive to it. You will attach the 9" extension and breaker bar later.
Next, while laying under the car, pass this up through where the air filter box goes, over the large tube frame, and into your other hand. You can then manipulate it into bolt #1. It should stay there on it's own. Then you can stand up, gently attach the 9" extension and breaker bar into the end of the universal drive. After you break the bolt loose, you can easily switch to the ratchet.
Oil Cooler Bolt Locations (front view) 
Oil Cooler Bolt Locations (side view) 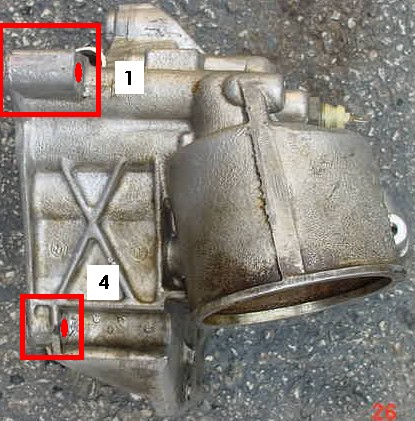
- After bolt #1 is removed, you can now remove bolts 2 & 3, and then under the car for bolts 4 & 5. As you remove bolts 4 & 5, you may have additional coolant leak out.
- Lower the bottle jack in order to lower the engine. This will give you just enough room to get oil cooler out.
- Gently wiggle the oil cooler free from the engine block. Keep in mind that there is another coolant pipe attached, as well as guide pins in bolt holes 1 & 5.
- When it's free from the block, gently wiggle the oil cooler towards the front of the car, and at the same time, pull the front away from the engine block. This is done in order to free it from the rear coolant pipe.
Rear coolant pipe hole 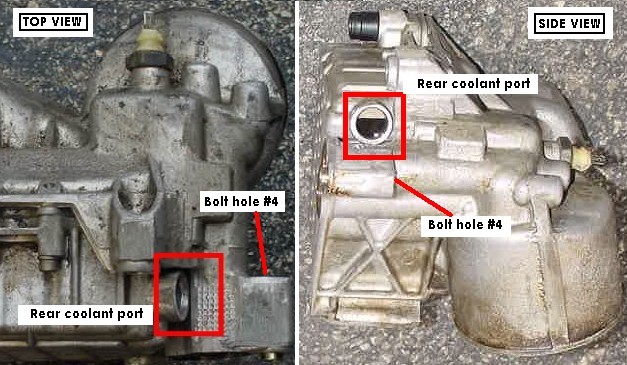
- Once it is free of the bolt hole pin guides and the rear coolant pipe, contiinue to remove from the compartment. The alternator/generator bracket area of the oil cooler will probably be the first to come free.
(Be Sure To Remember The Orientation When It Comes Out! You'll Be Putting It Back In!)
Generator Bracket Side View 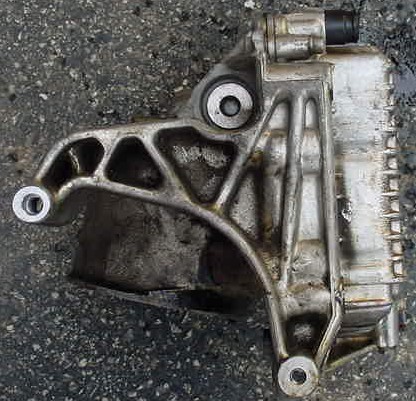
- After the Oil Cooler is removed, you will need to remove what's left of the plastic pipe from the engine block.
Broken Stub 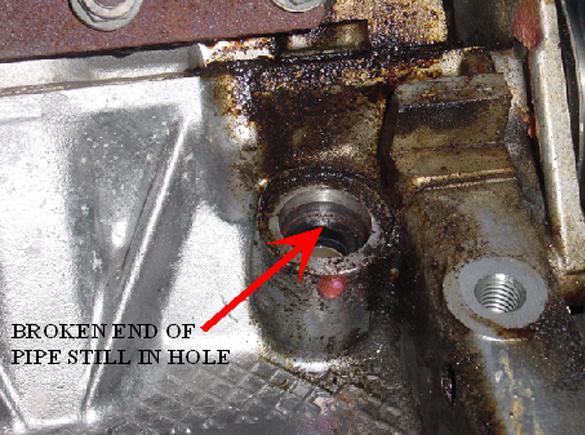
(Photo courtesy of Doug Banning)
- To remove the broken stub, find a bolt with threads that will lightly "screw into" the existing pipe still mounted on the oil cooler.
Oil Cooler Back Side 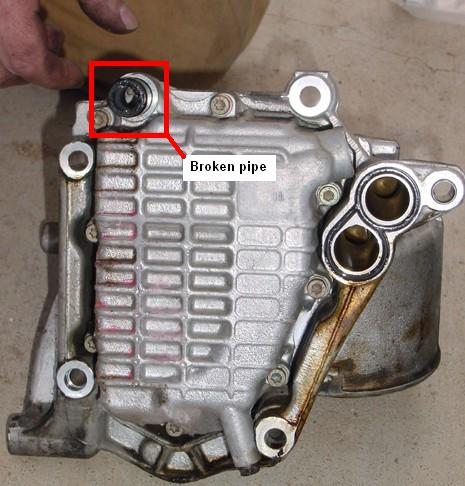
(Photo courtesy of Doug Banning)
- Use the bolt to screw lightly into the broken stub still in the engine block, and wiggle it out.
- At this point, place the oil drain pan under the engine oil pan, and using the 10mm Allen drive, removed the drain plug and drain the rest of the oil.
- Remove the old oil cooler seals and pipe. Make certian to remove the seal from the rear coolant pipe.
- Spray some brake cleaner on a folded wad of paper towels, and use it to clean the oil cooler and the rear coolant pipe.
- While you are at it, inspect the Air Filter box, and clean if necessary.
- After cleaning, install new seals & pipe.
- By now, the oil should be done draining. Wipe off the drain hole, install a new crush washer (from the oil filter kit) onto the drain plug, and install the drain plug. Torque to 26ft lbs. (35 Nm).
- Wiggle the oil cooler back into its space, reversing the way you removed it. Make certain to wiggle it onto the rear coolant pipe.
- Use the mirror and light source to double-check alignment.
- Once everything is aligned, insert bolts 4 & 5 and loosely finger tighten.
Oil Cooler Bolt Locations (front view)
- Once again, lift the engine using the bottle jack.
- Install bolts 2 & 3 by placing the bolt onto the 8mm Allen with 3" extension, and using this to insert and screw in finger tight.
- Using a paper towel, place it between the 8mm Allen drive and bolt head #1. Force the allen head through the paaper towel into the allen head opening in bolt #1. This will keep the bolt on the allen drive.
- Repeat step E- 4 to insert and finger tight bolt #1.
- Continue to tighten the bolts in a circular pattern, a little at a time, until you can see both mounting surfaces meet. You may need to repeat step E-4 1 - 2 more times to insure proper surface contact.
- Torque bolt #1 to Torque to 18 ft lbs. (25 Nm). Follow the pattern, torqueing bolts 2 & 3, and then 4 & 5.
- Lower the engine via bottle jack, but do not remove bottle jack yet.
- Install the 2 engine mount bolts, torqueing them to 37 ft lbs. (50 Nm). If needed use the bottle jack to very slightly raise the engine for alignment.
- Install new oil filter. Torque retaining bolt to 18 ft lbs. (25 Nm)
- Install a new crush washer (from the oil filter kit) onto the drain plug, and install the drain plug. Torque to 37 ft lbs. (50 Nm).
- Reinstall alternator/generator. Torque upper bolts to 33 ft lbs. (45 Nm), and the lower bolt to 15 ft lbs. (20 Nm). Torque large electric connection nut to 12 ft lbs. (16 Nm), and the smaller to 3 ft lbs. (4 Nm
- Install serpentine belt, reversing the process in step C-4 and 5 .
- Install air filter box and air intake pipes.
- Using the gallon milk jug as a funnel to refill the expansion tank (slowly) with the saved coolant. Pay attention to the bleeder screws, and tighten them down when they start to leak.
- After pouring about a gallon in, check under oil cooler for leaks.
- Continue coolant refill, periodically checking for leaks under oil cooler.
- Replace expansion tank cap.
- Refill engine with the 8 quarts of oil, if engine code is ABZ or AEW, and 7.5 quarts if it's AKB, AYZ or AUX.
- Start car, and check for leaks.
- If no leaks, install lower plastic pan under engine.
- Reconnect battery.
- Drive car up to operating temperature.
- Top off coolant as needed,
- Recode radio. (If needed).
- Set front windows back to express-up as detailed in owner's manual.
- Crack a
 Guinness or three. (I had 4! -or more...)
3 comments:
I am not quite understand your introduction, but it seems that you just did some great job.
http://www.commercialegrcooler.com/rlegr10029.html
Swastik Hydraulic is a trusted name among Shell and Tube Heat Exchanger Manufacturers In Kanpur, offering advanced Heat Exchanger systems and Hydraulic Oil Cooler solutions. With a strong focus on quality and performance, we deliver efficient cooling products designed to meet diverse industrial needs, ensuring durability and reliability in every application.
Informative post! I’ve been exploring various ways to improve machinery performance, and I discovered that aircooledoilcoolers play a crucial role in maintaining optimal temperature while reducing wear and tear. Your article provided practical insights that make it easier to understand their importance in industrial applications. Keep up the great work
Post a Comment