Location:
A-pillar is elegant if you can get the Autometer pod, but it seems to be permanently out of stock. part # 20691 for one- gauge pod, or # 20690 for double pod. Originally designed for 1993-97 supra, but heat gun will make it fit, according to many previous posts. Next choice was the left-center vent, prior posters show nice looking pictures.
Loss of air cooling? If you turn off the vent, you will feel an increase in air from the other vents, so I concluded that total air loss will be negligible if you use the vent for the gauge and lose the vent
Which gauge :
Autometer # 3401, Sport-Comp style, 2 5/8", looks a good match to original TT gauges. About $50. I put a red condom on the light, not sure I needed to
Installation technique:
1: Remove vent: ( the circular alum. ring and internal black plastic air diverter and valve.) : just slowly pull out with your fingernails. Once out, separate the alum trim ring, which will be reused, from all the black plastic. this can be done with nothing breaking, just pull slowly and carefully, it will come apart.
2: Cover the now-useless air supply tube. Visible inside the dash, thru the hole :
I cut a piece of corrugated cardboard a little bigger than the tube, punched a hole in the cardboard, tied a piece of string through the hole, (so I could retrieve it if it went in too far.) Then, just push the cardboard slowly in, forcing it a little, to make a very tight fit, and this mostly sealed off the air. For good measure, I put some caulking on the joint between the card board and the air tube, both for better sealing and better adhesion, so the cardboard would not be pushed out by the air
Physical installation of gauge:
3: The inside of the now-open hole in the dash is a little too tight for the autometer to fit, but a few small saw or knife cuts will open it up a little. Keep in mind that the friction between the gauge and the inside of the hole is all that holds up your gauge, so don't cut too much. Keep trying until you have just enough removed to leave plenty of friction. After hooking up wires and tube, You need to get the gauge in the hole and somehow hold the TT alum trim ring on. Although the autometer gauge fits right into the alum ring as if it were designed that way, it visibly looks great but there is nothing to hold it there. I put some clear caulk between the alum ring and the gauge, and pushed gauge and alum ring into place, then held the ring centered on the gauge with scotch tape while the caulk dried. The friction holds the gauge, and the caulk holds the alum ring on the gauge.
Wiring:
4: The light can be attached to the output of the dash light dimmer switch, the blue-gray wire coming out of the dimmer is the output. Just scrape off some insulation wrap your supply wire, solder, tape. For a ground you can use the factory supplied ground post that conveniently has room for other wires, (it's a 10mm nut, on a stud that faces to the
rear of the car under the dash) Brown is the ground color for all VAG cars, so you can confirm you have the right stud since only brown wires will be there, and it's visibly connected to unpainted sheet metal. The nut was surprisingly tight, I bent the support before the nut would budge,
Air hose:
5: VAG very politely put a 1/2 inch grommet above the accelerator pedal, that opens to just above the brake booster, perfect for our purposes. Push the grommet out, punch a hole, and thread the air hose through it. Where to connect air hose to intake vacuum? There are a variety of options, I think the easiest is the vac hose that goes to the fuel
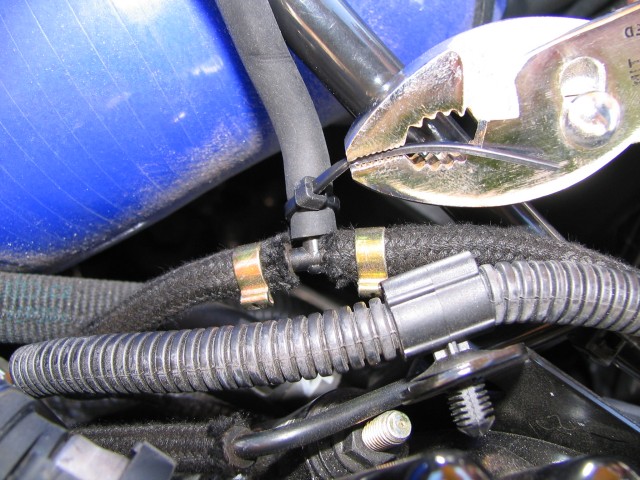
pressure regulator, at the drivers side of the pressure rail. (other options include the diverter valve) Cut the hose about an inch from the FPR, where it makes a sharp turn down, and insert a 3/16 tee. The tee fits in snugly, but I put some probably unnecessary silicone glue on it. Get a 3-6 inch piece of the same 3/16 tubing, put the 3rd opening of the tee into one end of this new hose piece. The air tube just perfectly fits inside, push it in a few inches to the other end of the new hose, and again some silicone for air tightness.
Lower dash remove and install( required for access).
Removal:
1: 2 Phillips head screws that hold the hood release knob, leave knob laying loose
2: all screws from now on are torx-25 , interchangeable, identical
3: 2 screws at bottom of lower dash, near drivers seat
4: fuse box screws; need to remove all, so that the large flat plastic fuse-holder with fuses is loose (it is possible to remove dash with only some fuse box screws out, but you'll never get it back without all screws out and plastic piece loose
5: Unclip 3 wire connectors: one at the obd port, and 2 at the light. Just squeeze the 2 plastic clips and each one comes right out. Make sure you find the right place to squeeze, no significant force is requires if squeeze right.
Reinstall: This is actually the most difficult part. Don't forget to reinstall wires first.
1: need to push lower dash piece towards front of car using horizontal movement, not upward, since the hidden, front-protruding part of the light switch fits on top of the fuse holder, and can only enter its space with horizontal approach.
2: There are the 2 white plastic holders near the firewall, also require a horizontal approach. But at least the plastic of the lower dash is flexible enough to allow some forgiveness.
3: 2 metal funny-web-shaped pieces fit into matching slots in upper edge of the lower dash.
4: Line up the left edge of the dash so it goes inside of the loosened fuse panel
5: last step: If all is lined up properly, 2 plastic captive clips on the lower dash snap-fit into holders on upper dash
Takes about 4 hands to do all this, and of course no room for more than one person to fit, anyway( you are lying on your back, head under dash looking up, feet in the air.
Next install all the torx screws Save the 2 Phillips for the hood release knob.
Audi TT DIY Defi D Boost Gauge Install
Finally installed my boost gauge over the weekend!!
I decided to place it in the left vent, using Steve Schwing's special gauge adapter.
Here are some pictures along with instructions on how I went about installing it:
Here's the gauge in the box:

In my case, HPA had already added a T-adapter (not sure where to add it for 1.8T engines though):

Attach on end of the provided tube to the T-adapter:
Locate the grommet in the firewall
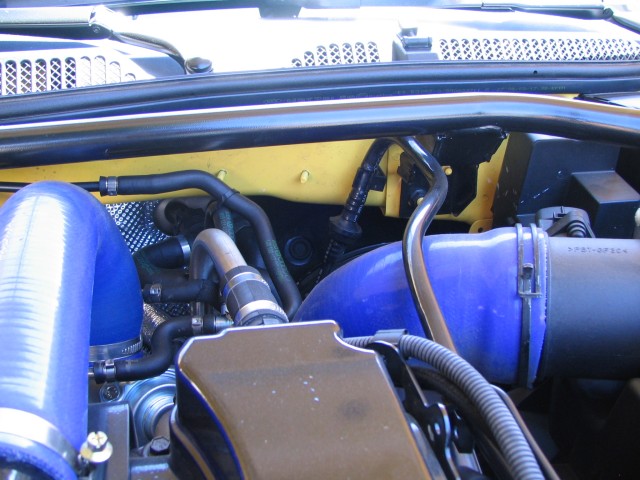
Here it is, simply remove it by pulling on its side:

Make a small hole in the grommet (little smaller than the tube's diameter):

Pass the other end of the tube through the grommet, keeping in mind which way faces "out":

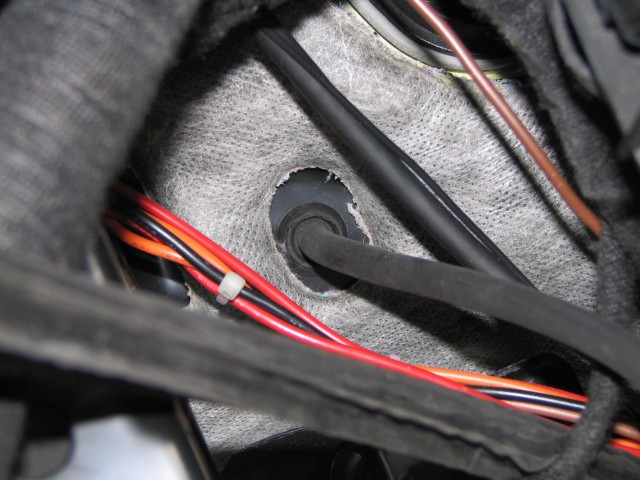
After removing the lower dash panel from under the steering wheel (check my sig for details under item 10), replace the grommet with the tube - here's the inside part of the firewall:
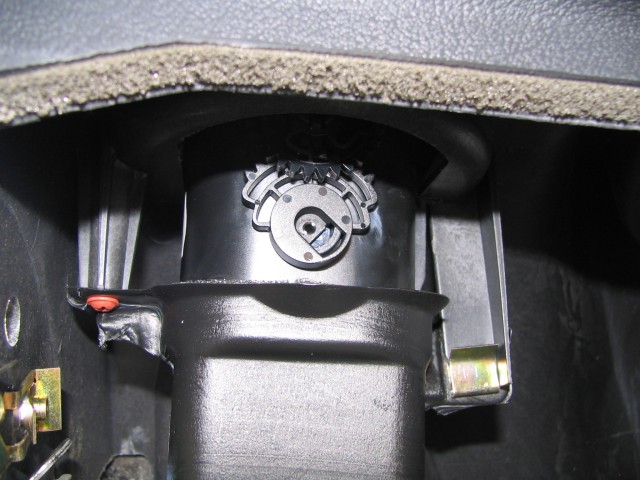
Here's a view of the vent mechanism from the underside of the dash:

Here's the left vent, you'll need to remove the top (front) half of it:
It's fairly easy to push it out by grabbing the right ends:

Keep pushing the vent until it becomes free from the tubing:

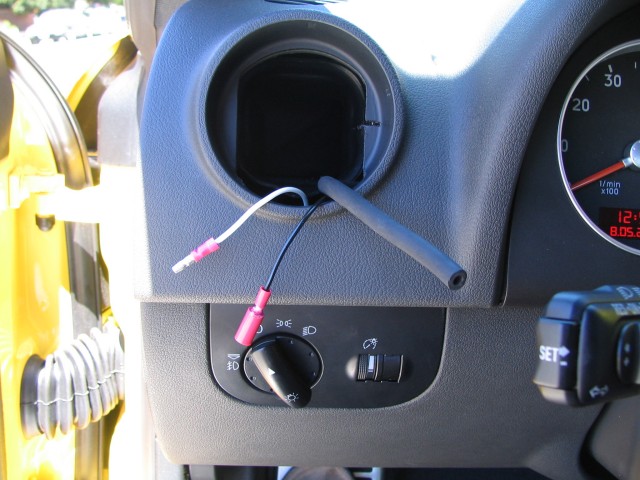
Here's the open vent hole, you'll need to pass the tube and electric wires through the top side:

Pass the tube over the pedals and through the fuse holder:

Pass it over the white vent tubing:

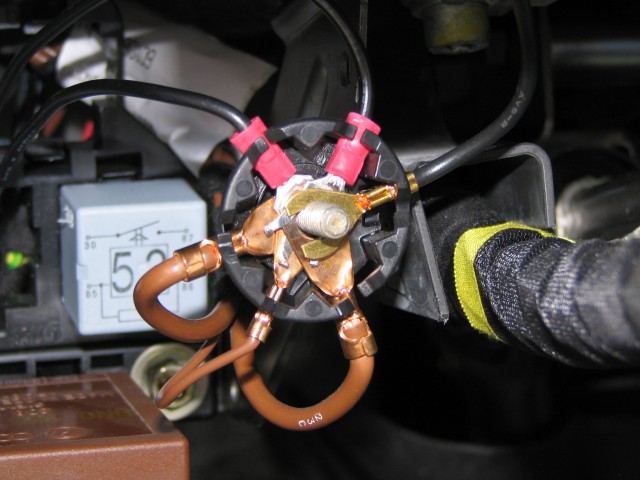
Connect the ground (black) wire to the star-shaped hub under the steering wheel:
Pass the two wires and tube through the vent:
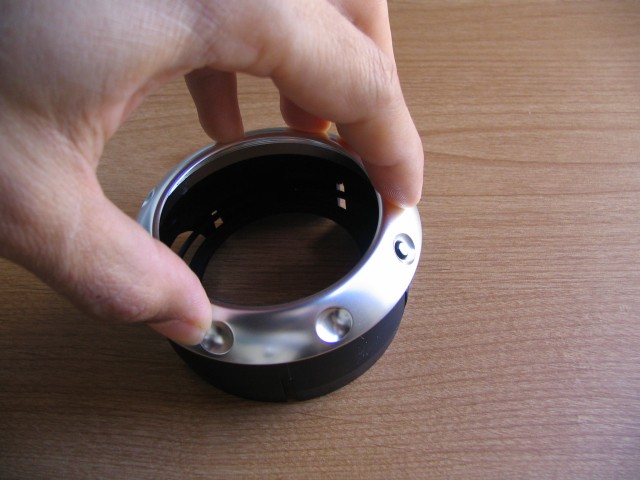
Now to the hardest part: pry the vent apart by pushing on the ribbed edges:

I found that pushing on two edges at a time makes it a lot easier.
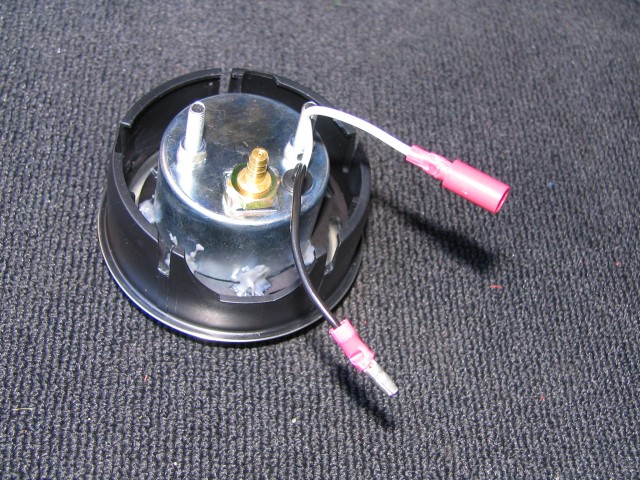
Here are the three parts you end up with after the vent is disassembled:

Disconnect these two pieces from each other, no tools required:


I decided to place it in the left vent, using Steve Schwing's special gauge adapter.
Here are some pictures along with instructions on how I went about installing it:
Here's the gauge in the box:
In my case, HPA had already added a T-adapter (not sure where to add it for 1.8T engines though):
Attach on end of the provided tube to the T-adapter:
Locate the grommet in the firewall
Here it is, simply remove it by pulling on its side:
Make a small hole in the grommet (little smaller than the tube's diameter):
Pass the other end of the tube through the grommet, keeping in mind which way faces "out":
After removing the lower dash panel from under the steering wheel (check my sig for details under item 10), replace the grommet with the tube - here's the inside part of the firewall:
Here's a view of the vent mechanism from the underside of the dash:
Here's the left vent, you'll need to remove the top (front) half of it:
It's fairly easy to push it out by grabbing the right ends:
Keep pushing the vent until it becomes free from the tubing:
Here's the open vent hole, you'll need to pass the tube and electric wires through the top side:
Pass the tube over the pedals and through the fuse holder:
Pass it over the white vent tubing:
Connect the ground (black) wire to the star-shaped hub under the steering wheel:
Pass the two wires and tube through the vent:
Now to the hardest part: pry the vent apart by pushing on the ribbed edges:
I found that pushing on two edges at a time makes it a lot easier.
Here are the three parts you end up with after the vent is disassembled:
Disconnect these two pieces from each other, no tools required:
Audi TT DIY Wiring an Aftermarket Head Unit to a Bose System
Disclaimer: I retain no responsibility for you burning up your car, frying electrical components or messing up your car. This is for informational purposes based on my personal experience wiring an aftermarket head unit into my Audi TT with a BOSE system
2001 Audi TT w/ Bose (should apply to all Bose systems if they all have this common ground feature)
Do a search for the Bose harness to get the wire assignments in the connector. I believe I used one from a FAQ in the S4 section of the tech articles
After a ton of research and not finding anything definite I decided to just dive right into the project and risk blowing up my new head unit Bose amplifier and god knows that else.
The problem with the Bose system is you only have one wire from the head unit running to each speaker and you have one common ground wire for the whole bunch. You CAN use the line out wires (the powered ones, not the RCA's) on your radio harness to run to those speakers. I read people saying that you can't because it messes with the Bose amps power and will blow it and the speakers take different OHM loads, etc. Granted it's not super clean sound but people that I asked said they couldn't hear the slight hiss in the background. Even with the volume only moderate and the sound of the motor in my TT you can't even detect the hiss unless the car is stopped and the volume is all the way down. By the way, the hiss stays the same volume whether the radio is at 0 or 25 volume level.
Wire the positive wires on the aftermarket harness to the car's speaker leads. (You will have to strip behind the factory harness and cut the wires you need to use and solder them to your aftermarket harness.)
Soldering 101:
For those of you not familiar with flux or heat shrink tubing I suggest you start now. When you dip the stripped wires in flux you can essentially suck the solder right to them. Slide a piece of heat shrink tube one on of the wires. Dip both ends of the wires in flux (it doesn't need to be gunked just coated on the wires.) Touch your solder to the end of your iron to give you a small melted bead on the tip. Hold the 2 wires side by side and touch the bead of solder to them. About a half second later the solder will be deep into both wires and have a strong bond. Slide the shrink tube over top of the solder job and feather a light flame over it to shrink the tube (don't burnt he car up doing this :) Rinse and repeat for all wire connections you need to make. Bad connections give you noise on the lines so take you time and do each wire like this that needs to be stripped and connected.
The Schosche adapter only useless the plug on the car that has the power ignition wires, etc. Take one of the negative (ground) wires on the aftermarket harness and solder it to the common ground on the car connector. (One of the wires you cut on the back of the car connector) I haven't tried to ground the rest of the negative wires on the harness to the car I just taped them up for now, but the point is I DO get sound from the speakers which are connected to a Bose amp.
I am anal about my sound so I will hook up an external amp pretty soon here but I wanted to tell people that it is for sure possible to get it to work. You don't have to wire all new stuff in the car in order to get music playing from your new head unit and existing Bose system. Ground loop isolators for speaker level noise filters can probably be used to eliminate the hiss so if anyone has tried this feel free to update this FAQ
Another option which I haven't tried but read some tidbits about is to plug in RCA's to the line out jacks on the back of your new stereo and cut the other end of the RCA cables. You should then be able to wire the positive wire to the car wires and connect one of the shield wires (essentially the negative on an RCA out) to that common ground on the car. This might eliminate the hiss since the power is only coming through the line from the Bose amplifier to the speakers.
Audi TT DIY Adjusting a Notchy Shifter
If 1st and 2nd only are notchy, then the shifter is not properly adjusted. People should stop saying that this is merely a matter of break-in. It is NOT. 1st and 2nd gear are special, and here is why:
In order to prevent you from accidentally engaging reverse at a bad time, there is a doo-dad on the shifter, just below the pivot ball, that bumps against a rail in the pivot ball housing whenever the shaft is leaned to the left. When you push it down, the doo-dad is pushed below the edge of the rail, and then it can be leaned the rest of the way.
There is a critical adjustment that must be just right, in order to have the proper amount of twist in linkage rod, for engaging 1st and 2nd, when the shifter is ALMOST touching that rail. If the degree of difficulty engaging 1st and 2nd is noticeably greater than the other four forward gears, then it is HIGHLY likely that this critical adjustment is not set properly. Here is a quote from the factory repair CDROM:
Gear shift adjustment, checking
The gear shift lever must rest in the 3rd/4th gear gate when transmission is in neutral.
- Check operation of 1st and 2nd gear stop.
- Engage 2nd gear and push gear shift to the left against the stop.
- Reduce pressure on gear shift until it moves back to pressure point.
- Spring-back measured at gear shift handle: 3-5 mm
In other words, put it in second gear, then push it to the left until it stops, then let go. It should spring back to the right by AT LEAST 1/8 OF AN INCH! If it does not spring back by at least that amount, then your shifter is not properly adjusted. It is adjusted such that when the shifter is leaned as far to the left as it can be without pushing it down, the amount of twist applied to the shaft at that point is still not the proper amount to permit 1st and 2nd to be engaged cleanly.
If you cannot confirm that there is at least 1/8 inch of play as described above, then THE ADJUSTMENT IS OUT OF SPEC. Take it to the dealer and have them correct it, or if you want to try to fix it yourself, look in the archives and find my most recent posting on installing the UUC shifter.
Note also that you may have a different problem: difficulty engaging or disengaging reverse. If this is the case, then check whether the amount of spring-back is greater than 1/5 inch. If that is the case, have your dealer adjust it.
Audi TT DIY Proper Washing Techniques
The first thing you would like to do is pick a shaded area, this will help in deterring water spotting later. Items you will need for this venture are : 2 buckets, car wash, sheepskin mitt or microfiber mitt/towels, waffle weave drying towel, wheel brush, hose nozzle, a safe wheel cleaner, maybe some tire cleaner. Some folks like to clean wheels first, so I won’t get into the particulars of that, its fairly easy, and basic. Apply a safe wheel cleaner, to one wheel at a time, clean with brush or suitable cleaning tool, rinse, and continue to the next. While your car is cool, and hopefully in the shade, start hosing the surface off with a high stream of water, start at the top so dirt and contaminants fall over non rinsed areas. Make sure to use a good stream to any side moldings and emblems, you will be amazed at the quantity of dirt hiding in there.
Continue to do this until the entire surface has been rinsed. Remember, top to bottom.....Next add a couple oz of car wash soap to bucket #1, and fill with water, add water to bucket #2. With the sheepskin in hand, or whatever you’ve selected to wash with, gently wipe the surface with suds from a front to back motion, again, your starting at the roof area, then trunk, then hood, then sides. Depending on your speed, and if it is warm and dry out, you may need to rinse each panel after washing, until you have completed the car. Keep your cars surface wet until you’re completely finished. When you find the need to redip your sheepskin in the suds, rinse it out in bucket #2, this will remove dirt and contaminants from possibly further scratching the surface. (Your going to want to make sure you have plenty of soap (lubricant) on your sheepskin all the while washing, this will help to suspend the dirt, and let it be carried off during the rinse.)Use that method throughout your washing. After the vehicle is completely finished, remove the nozzle from the hose end, and let the water exit the hose without any added pressure. Hold the hose a couple inches from the roof surface, and start at the high end of the vehicle. Chase the water across the surface with the flow exiting the hose. Run/sheet the water across the surface, and continue with the hood, and rear deck, and sides.
When all is said and done, open the hood and trunk, and let the remaining water sheet itself off while you dry the sides with a Waffle Weave drying towel. (At this point, some like to use quick detailers or Eagle One’s “Wax as u Dry”.) Start at the top, and work your way down to lower panels, refold the waffle weave as it absorbs water, a 24x30 towel is generally all that is needed. You may want to follow in your other hand with a clean and dry microfiber 16x16 towel.
You may find this technique of benefit to you, and if so, you may be able to tweak it a little to meet your specific needs. Good luck and I hope to have helped at least a few of you!
If anyone needs any additional questions answered, or some help in product selection, just PM me !
Thumbnail Image

Thumbnail Image

Audi TT DIY Proper Use Of An Instant
Proper use of an Instant Detailer
Ok, you’ve reached that point where your anal about car care. You’ve invested time and money on proper car care products. You’ve spent a day or two, here and there, getting your car looking its best, you’ve polished, and waxed or sealed, now how do you keep it looking like that throughout the week, until your next wash? Not long ago, instant detailers (id’s) came along. Mothers, and Meguiars were two of the first car care companies to introduce it, under names Showtime and Quick Detailer, respectively. These are both good products when used for light cleaning of the vehicles surface. You simply spray on the surface, and wipe clean with a soft cloth…..it can’t be that easy, or can it?
It can be! But with so many instant detailers out there, which one should you choose? You could choose from Meguiars, Mothers, Black Magic, Zymol, Eagle One, etc. These all have their place, somewhere in car care. I guess if I had to pick one of the above, I would go with either Eagle Ones, or Mothers version. They are both very good, and reliable. There are also a few products available online which in my opinion are exceptional products. Clearkote, Poorboys, Adam’s (brand new), are a few.
Lets get to basics with instant detailers, what can and can’t they do?
First off I want to make clear, that these products are not intended to replace normal washing routines. There simply designed to remove light grade contaminants from the vehicles surface, i.e. dust, fingerprints, and an occasional visit from a seagull, when you’re in a pinch (no pun intended). You should always carry at least a 4oz bottle of ID when you’re on the road for these types of emergencies.
ID’s are really great for maintaining that just washed/waxed look. Some can be used on windows (Clearkote Quikshine is even recommended for glass, matter of fact, the only thing you cant use it on is your tires). Some are difficult to get off if over sprayed on windows, so read directions on the back label.
There very easy to use, your basically going to use the same technique you do while drying your car. Spray a light mist on the surface (in shade preferably), wipe with microfiber polishing towel in the same direction as you remove your polishing and wax/sealant products (This will remove contaminants). Turn towel over, and buff to finish (This will create the shine).
Most products will have either a polymer, carnauba, or silicone content which will deter further dirt and or dust from accumulating. Truly a time saver and can really extend the life of sealant or wax currently protecting your car. Most “speed details” only cost from about $.30 to $.75 per job, so a real affordable alternative to the bucket and sponge! Just keep in mind, this is a between washes, product, not intended to replace the bucket and sheepskin wash mitt!
Audi TT DIY Black Paint Care 101
** This Works Best On Black & Red Paint, But Is Good For Taking Care Of ANY Color Paint. **
First off... NEVER wash your vehicle with the sun at high strength. Depending on where you are, this is usually the same hours that they say to wear sun protection. Best to wash around 8 AM or after 4PM.
Ok...now...your using your garden hose, correct?
Make sure you use a mist from your hose to get wet before washing... use a GOOD wash... spend the 10 bucks on a bottle of suds... such as Meguiars or anything similar.
Use a good mitt that is clean and rinsed to wash your vehicle by hand. Always the black paint first, then everything else later like the tires, bumpers... etc and above all... start from the top of the vehicle first.
Rinse... you don't want to spray or mist... NEVER do this... these are all your water spots aided by heavy calcium deposits as well.
You want to take the sprayer off your hose if you had one on, and just let the heavy pour of the water from the hose run off the paint. Carry the end of the hose over where you are rinsing and because a heavy pour of water is more prone to being pulled down by gravity, the water will just carry off your vehicle... hence, less water spots and less time to dry.
Now... many have said use a chamois or other type of cloth... I don't recommend these. Purely because they are only good at getting the water off... yet, they often carry off the wax and/or oils in the paint and over time... more swirls and more slight scratches are possible.
Use a drying blade... often found in all auto stores, these are cheap and they look like those things you use to wipe your windows off.... these blades are so soft and they just whisk the water off your vehicle and leaves everything else intact. If your really obsessed about drying, get a blower and blow the water out of your cracks and door jams.
Your towel supply should be what is called "microfiber"... and this is a word being tossed all over the net right now, but believe it or not, they are much better at removing and trapping any dust than a terry or cotton cloth. Remember, we are also trying to avoid swirls here. Microfiber towels can be found all over the net and also at bigger auto stores like Pep Boys.
Now for the detail part -
Much debate goes on and on about the "best shine" or what works best for all vehicles. We are focusing on BLACK paint here and through trials of ALL formulas... this is the best:
Klasse All-In-One Polish and Shine... and it comes in a red bottle... can be found anywhere ONLINE and many detail stores... but this is the best for black.
You want to make sure that your paint is cool to touch also.
I always recommend by hand... if you get into orbitals... they are best for vehicles that already have the swirls, and this could apply more to you. Make sure you have a microfiber bonnet on your orbital if using one... we are keeping it SMOOTH here. Using a pad, (I will just say hand from now on, if you have the orbital, which you do, just know that you can use it the same but DON'T apply pressure and you will still have to use by hand after you are done to get the places the orbital couldn't get into), apply slight pressure and work one part of the vehicle at once. Make sure you use LITTLE of the Klasse... through all tests of major detailers that use Klasse... it lasts about 5 years even on a TRUCK!
After you have done the whole vehicle... buff it off... again, a microfiber is best and make sure you have about 4 of these for the whole project. The polishing and buffing you just did will remove ALL the swirls and not just cover them up.
Now follow with Klasse Glaze... which is in a gray bottle. SO SIMPLE to use... but most effective in getting your best shine on your black paint. With another pad, you simply wipe a little of the glaze over your paint and here with your hand, you apply NO pressure... because this is not a polish... it is simply a glaze that enhances your clear coat by filling in all the pores and microscopic caverns that effect how light is reflected off your paint.
Note: Many detailers including myself, recommend using a Spray Detailer that you use between washes to remove light dust. Mist the pads you use BEFORE applying the Polish and doing your vehicle and the Glaze before doing the vehicle... this allows the pad to more evenly distribute the product and not use it over excessively like we tend to do!
Here is the trick of your shine... If you want the best shine possible, the LONGER you leave the glaze on, the better the effect will take place. Amazing huh? Well, this is a process that we are going for a KILLER WET shine visual here. But the minimum also is 1 hour after it is on... so choose what you like... then buff it off.
With Klasse Glaze, it is possible to use several coats after to continue to enhance the shine... and this is not a phrase made up... this is actually very true.... if you buffed the glaze after an hour, then you have to WAIT 4 hours for the glaze to cure before applying another coat. If you waited over night and buffed the glaze in the morning, then you can buff off the glaze and then immediately reapply another coat of glaze.
Above is the best piece of advice from how people get their vehicles at shows to look SO rich.
The glaze is your best tool. Remember, the more coats, the better the effect but remember the times in-between to making it work. In addition, Klasse Glaze can be applied to all the taillights, headlights, foglights as well... just make sure you rub it off after it's left on for a little.
Now don't mistake me here... because many will read through this and think. DAMN... that's a lot of work! Well, not when you do it right the first time. This is a method that will allow you to keep the shine for up to 10 to 12 months typically... and can go longer if you glaze your vehicle every 2 weeks or so.
Now... after the glazing...
Use a good wax... Meguairs is recommended again.
This seals in your perfection... and if you wash your vehicle ONCE a week, which is recommended, follow with a wax.
Again, USE MICROFIBER towels and pads... they are the best and you will love how these towels suck up the white dust left from chemicals and wax.
You can use a Spray detailer like Eagle One or Black Magic to keep the dust off during the week and take off with a clean microfiber towel (keep a bottle and a few towels in your vehicle).
And always, if you have the time. GLAZE your ride every 2 weeks or 4 weeks and follow with a wax.
AND ABOVE ALL - NEVER use dirty towels or cheap terrycloth towels on DARK PAINT!
Then after following all this, you will NOT have swirls and your BLACK paint will be ultra buttery smooth and wet for the 10-12 months I said at which time you will need to REPEAT from the top.
Now... all of you who read this... it works best on RED also... or any DARK Color. All other colors will benefit as well... enjoy a swirl free buttery smooth wet world!
Chrome Detailing
For those with the love of chrome on their vehicles there is only one product I can recommend to treat your shiny chrome. The product is Wenol and you can find it at a find detailing store and also at any Mercedez Benz dealership.
With a soft cloth or pad, you apply Wenol (after you have washed and dried your vehicle first of all) and softly rub in a circular motion across all chrome... it is completely safe to rub deeply into your chrome. You can feel with your fingers if there is any overspray still on your chrome and if so, then keep rubbing until your chrome is smooth.
Now get a few soft cotton towels or Microfiber towels and rub the chrome to a crystal clear and rich shine. Turn your towels often so the excess Wemol will be removed. The more you remove, the better the deep luster of a shine you will have.
Wemol also works great on Chrome that also has vinyl or plastic decals over the chrome (such as Rear View Mirrors)... guaranteed to make all eyes turn as you pull the sun away from their dullness.
Installing Stage III HID Headlights
I first have to say that at the time of this article HID4LESS's Stage III HIDs are not out yet. I am the first TT to test them. I was given a great opportunity to test them so I took it.
Lets start off and discuss a few factors that are important regarding HID's.
1. Projector-lenses are a vital factor for proper HID conversion. Projectors give the xenon light that bluish-white color when viewing them slightly off axis. Audi makes the
best projectors in the industry. This is why so many boy-racers are buying up wrecked Audi headlights. If you have factory projector-lenses your half way there, If not you
can get them from HID4LESS.
2. Quality of xenon bulb. The rule here is if the bulb isn't German (ie. Philips/Sylvania) pass them up. German bulbs have a much higher standard of quality.
3. Quality of Ballast. German ballast are a must. Hella makes a good ballast for stage1 and stage2 (35Watt). Auerswald is the only company (as of now) that makes a stage III 50Watt ballast. Auerswald is a German company that makes ballast for Submarines, Race-cars, etc.. Their Ballast are extremely durable.
4. Color of xenon bulb. Regardless what anyone claims, 4300K Philips bulb is the BRIGHTEST bulb available. It burns a bluish-white color when used with a projector-lens. Pure white without projector-lenses.
6000k Philips Ultinon bulb has a slightly less output and burns a Bluish-purple, with or without projector-lenses. This bulb was designed for cars without projectors. It gives that projector light-show to cars without projectors. Any bulb higher in color temp is not a German bulb and will cause glare and diminished output.
This is Important. True bulb color is achieved after a burn in time of 100 hours. Philip 4300k bulb makes the most change from whitish-blue to a more bluish-white color.
Many people put in a 4300k Philips bulb and are un happy with the color. They don't give the bulb time enough to burn-in to the Bluish-white everyone wants.
There are other factors like bulb placement etc.. but better companies like HID4LESS
takes care of those issues.
Now that I got that out of the way I will explain what HID4LESS's Stage III HIDs are.
Stage III use a 50W Auerswald ballast and a 4300k Philips bulb. (without any decrease in bulb life) The factory HIDs use a 35Watt ballast and a 4300k Philips bulb.
Output of the Stage III is around 5200 Lumens. (Lumens is a true measure of light output) AWESOME! Output of the factory HID is around 3200 Lumens.
This photo shows a pre burn-in comparison
The TT Roadster quattro Twin-Intercooled Turbo is tight to work in but it can be done without taking the bumper off.
Step1. Open hood and take the battery and coolant cover off.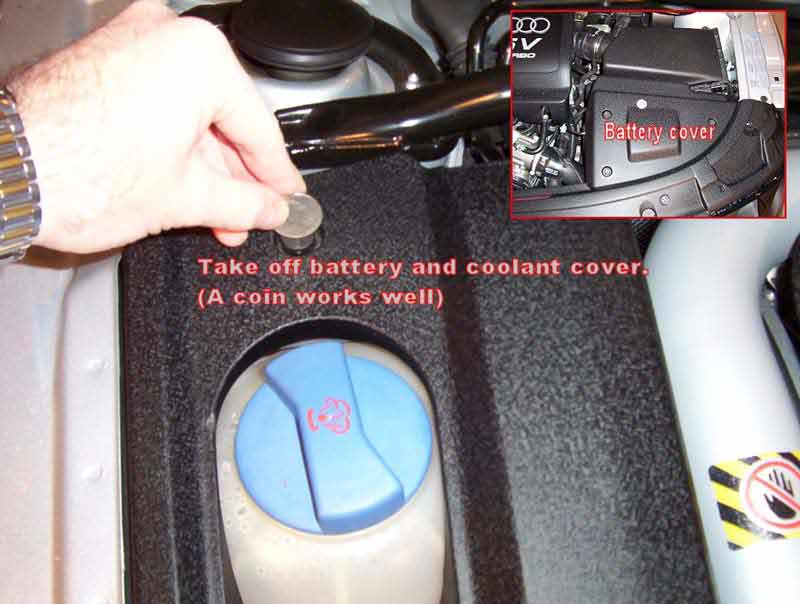
Step 2. Take the dust-covers off by snapping the wire retaining clip off. Remove H1 or H7 bulb by unsnapping bulb-wire clip.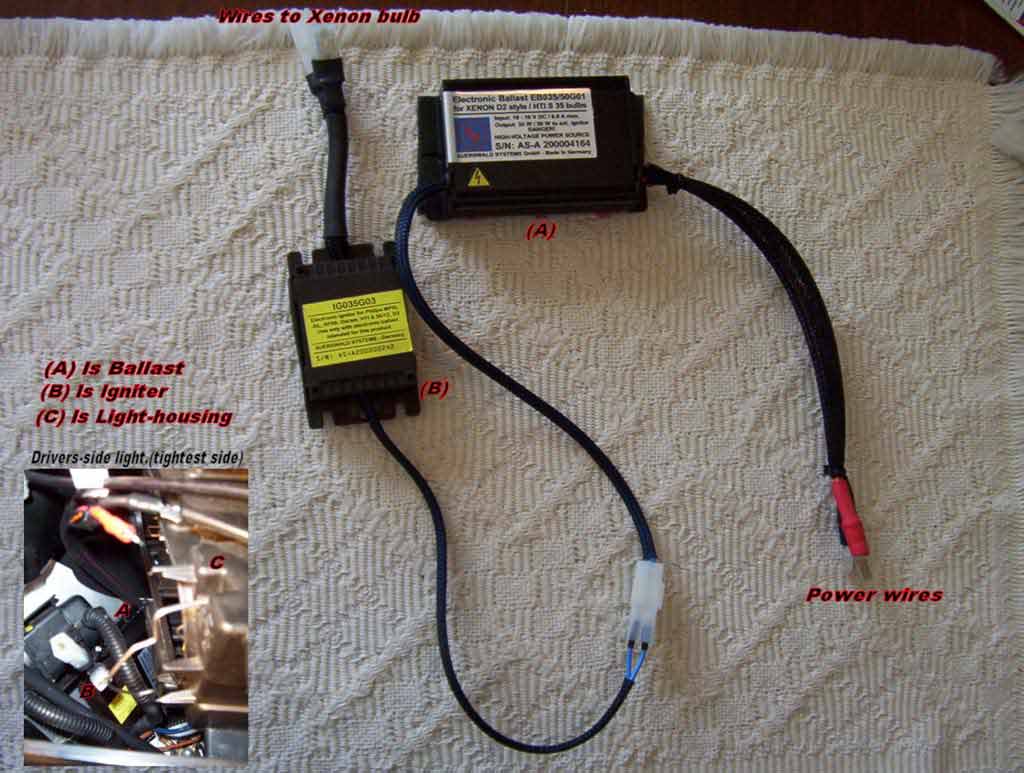
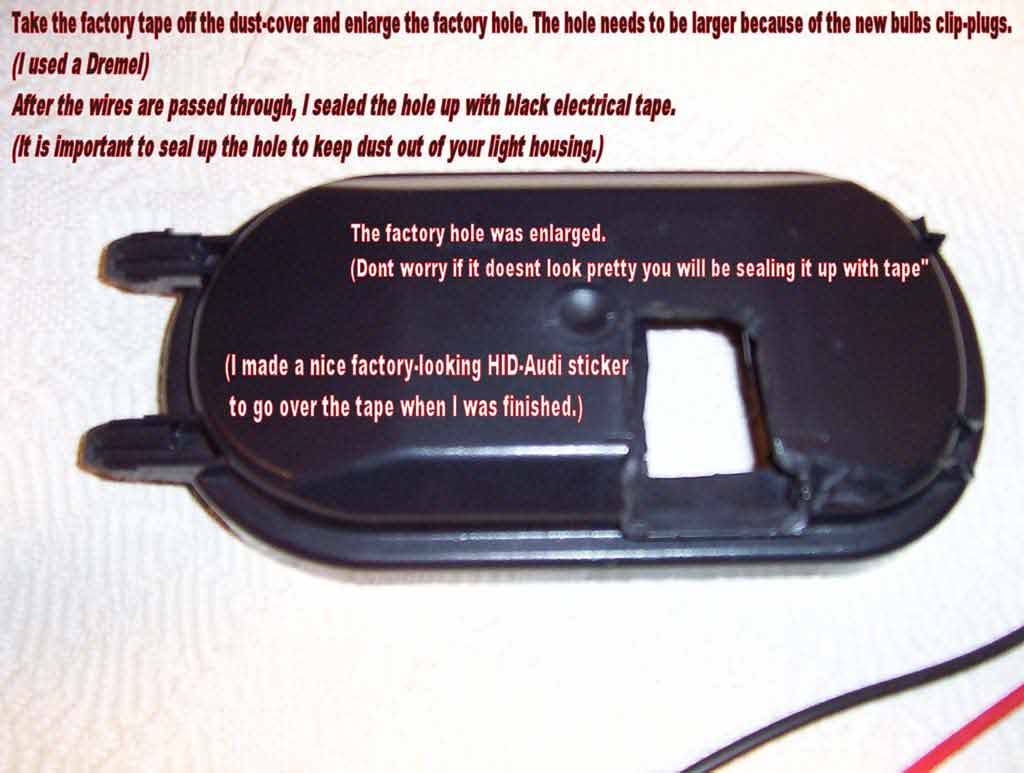
Step 3. Cut larger holes in dust-cover.
Step 4. Install xenon bulb carefully in light housing. (make sure wire on bulb faces down.) There should be little indents in the base of the bulb that should fit into the factory housing. This insures proper bulb alignment. 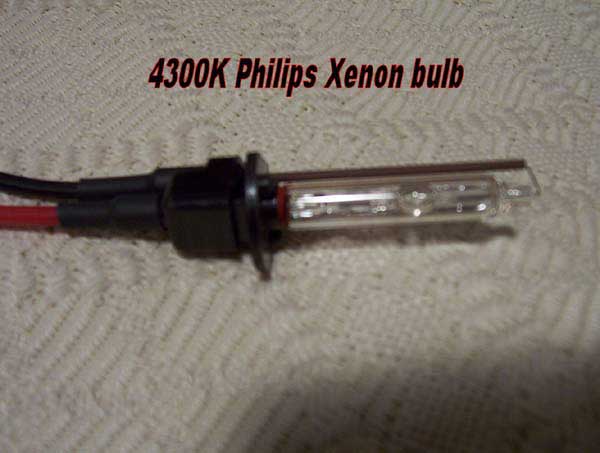
Step 5. Bend bulb retaining wires so the new xenon bulb fits snug. I wont lie to you, this take some effort to bend it just right. I used needle-nose pliers. Have a little patients and don't brake the wire retaining clip. The TT Twin-intercooled motor is real snug under the hood and the driver side light does not give you much room to work. Any other model should be easier.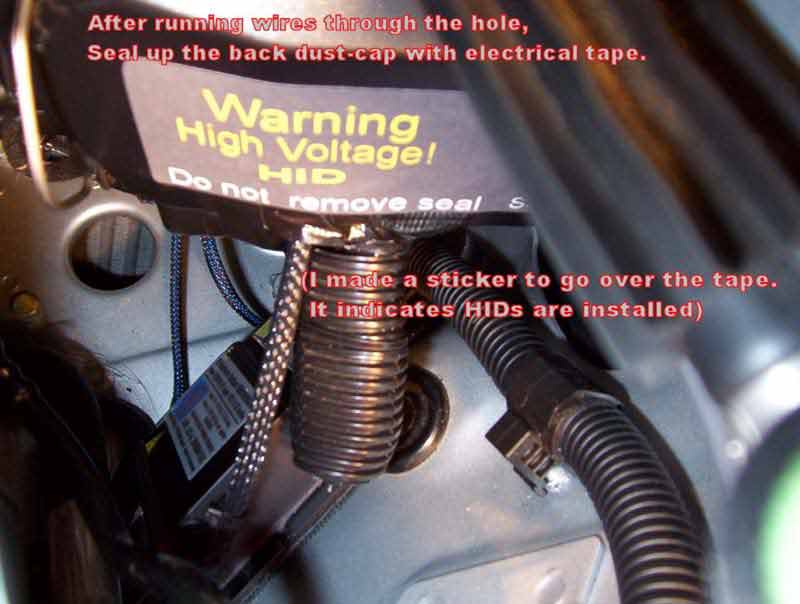
Step 6. mount the ballast and igniter near the light with Velcro. I mounted it on the fender-well.
Step 7. Run your wires through dust-cap and snap bulb and power wires to the new harness. HID4LESS suggest taping all wire-connections with black electrical tape.
Some cars might have to bend the factory female -neg. power supply a bit larger to
accept the new HID male spade.
Step 8. Tape up dust-cap as good as you can and reinstall battery and coolant covers.
Adjust your new STAGE III HIDs.
I found taking photos of the STAGE III HIDs hard to do. Its like taking a picture of the sun.

The photos don't do the new STAGE III justice. The are much, much brighter in person.
ALL HID PHOTOS ARE PRE-BURN-IN COLOR
The new output of these lights is much greater than the factory HIDs. The light is crisp and bluish-white. with 4300 Philips bulbs. The draw rate to start the new 50w ballast is only 6.8amps and 3.3amps to run. It does not set off the "bulb out" light either. HID4LESS uses heavy gauge wires. They are the industry leaders in my opinion.
The cost of the new STAGE III isn't yet determined but they are the ultimate HID system.
If your after greatest light output with the factory bluish color. Use the 4300k Philips bulb.
If your looking for a cosmetic look of purple, use the 6000k Philip Ultinon bulb.
This lighting system makes a great impression on the road. Everyone moves out of your way when passing. (and I'm sure that's often for most of us!)
Audi TT DIY ALL: Painting Stock Calipers
Painting Stock Calipers
Things You Will Need: Caliper Paint Kit (or Paint, Brake Cleaner, and Bushes), Masking Tape, Wire brush and/or Sandpaper, Rag, Jack and Jack stands, Socket Wrench, Decal (if desired)
Mod Time: 3 hours
Difficulty (1 to 5, 5 being the most difficult): 1 – Very easy, takes a bit of time but straight forward.
Step 1 – Preparation
Loosen the bolts off and proceed to jack up every corner of the car.

Once the car is off the ground, remove all four rims.
In order for the paint to last, you must thoroughly clean the calipers.
Spray the calipers with the cleaner, allowing it to air dry. Use the wire brush and sandpaper to clean off the rust.
Then respray the calipers with the cleaner and wipe them down with a rag.
Using the masking tape, cover all areas you do not plan on painting. It is important to cover all rubber parts and the brake bleeder screw.
Step 2 – Painting
Stir the paint real well. Brush on thin coats.
Wait 10-15 minutes before applying subsequent coats.
Repeat this process until you have consistent coverage and are happy with the look.
Step 3 – Waiting
The paint requires a curing time, and this will vary by what you use. Check the can for specific information.
Move onto the next caliper as the one you just completed dries.
Once you have painted all four calipers, you can remove the masking tape.

Step 4 – Decals (If Desired)
Some like to place a decal on the caliper to give that special look.
Once the paint is dry, line up the decal and place it on the freshly painted caliper.

You may want to coat the edges in clear coating to help hold it on, but this is not necessary. Covering the whole sticker may cause damage to it, so be careful.
Step 5 – Waiting
You can now replace the rims and lower the car.
Make sure you re-torque the bolts to their proper specifications.
Be careful when replacing the rims to not hit the calipers. The paint has not fully cured so it may be fragile.

Stand back and enjoy the new look, no longer will you see rusted calipers behind your rims. When cleaning your ride make sure to spray and wipe them down to maintain that high-gloss finish.
Things You Will Need: Caliper Paint Kit (or Paint, Brake Cleaner, and Bushes), Masking Tape, Wire brush and/or Sandpaper, Rag, Jack and Jack stands, Socket Wrench, Decal (if desired)
Mod Time: 3 hours
Difficulty (1 to 5, 5 being the most difficult): 1 – Very easy, takes a bit of time but straight forward.
Step 1 – Preparation
Loosen the bolts off and proceed to jack up every corner of the car.
Once the car is off the ground, remove all four rims.
In order for the paint to last, you must thoroughly clean the calipers.
Spray the calipers with the cleaner, allowing it to air dry. Use the wire brush and sandpaper to clean off the rust.
Then respray the calipers with the cleaner and wipe them down with a rag.
Using the masking tape, cover all areas you do not plan on painting. It is important to cover all rubber parts and the brake bleeder screw.
Step 2 – Painting
Stir the paint real well. Brush on thin coats.
Wait 10-15 minutes before applying subsequent coats.
Repeat this process until you have consistent coverage and are happy with the look.
Step 3 – Waiting
The paint requires a curing time, and this will vary by what you use. Check the can for specific information.
Move onto the next caliper as the one you just completed dries.
Once you have painted all four calipers, you can remove the masking tape.
Step 4 – Decals (If Desired)
Some like to place a decal on the caliper to give that special look.
Once the paint is dry, line up the decal and place it on the freshly painted caliper.
You may want to coat the edges in clear coating to help hold it on, but this is not necessary. Covering the whole sticker may cause damage to it, so be careful.
Step 5 – Waiting
You can now replace the rims and lower the car.
Make sure you re-torque the bolts to their proper specifications.
Be careful when replacing the rims to not hit the calipers. The paint has not fully cured so it may be fragile.
Stand back and enjoy the new look, no longer will you see rusted calipers behind your rims. When cleaning your ride make sure to spray and wipe them down to maintain that high-gloss finish.
Subscribe to:
Posts (Atom)