Parts:
I picked up a used 42DD set.
Included were:
VDO Boost Gauge
Tubing Kit
Wiring Kit
Perfect Match LEDs.
Tools:
Nothing special, you will need things to cut, drill, file, and punch holes with. As well as an 8mm socket wrench.
Prepare the gauge and vent.
1. Decide which vent you want to install the boost gauge and remove it by pulling it out. In my case it was the leftmost center vent. Also I had to remove the rear flap as that got in the way of the gauge.
2. Using a dremel or any other tool (I used wire cutters and some files), cut out the vent so that your gauge will fit in it nicely. Take your time, the plastic is soft and if you make the hole too small and force the gauge in, the sides of the vent will warp and look like ass.

3. Give your kids/pets entertainment so they leave you alone.

4. I didn’t like the outside of the gauge being silver so I painted it black. Cover up the face, and the back with masking tape and spray paint it. Pretty straight forward and a bit more time consuming but definitely looks better black.


5. Test fit the finished product. (You can see in this picture the warping, some filing took care of that)

Run tubing:
1. Remove the lower trim that is below the steering wheel, above the pedals. There are three 8mm bolts holding it. One in the fuse box, one on the left hand side of the wheel and one on the right, both behind small rectangular covers. You will also need to disconnect the wire running to the light bulb, and pop out the OBDII com port.
2. Drill or puncture a hole on the left hand side of the vent, and try to make it just big enough for the hose to fit through it.

3. Run your hose through it, you may need to guide it with your other hand so it goes towards the ground, leave your self a few inches in the vent.

4. Pop open the hood, remove the rubber seal that runs in front of the battery, and remove the top cover.
5. To the left of the brake fluid reservoir you will notice two rubber seals (circled in red, rear one already removed), one on the front fire wall, and one on the rear. Remove them both.

6. Now get down under the steering wheel, locate the opening and run your hose through it. The hole should be on the right hand side, near the very top. If you’re having problems finding it, run some string through it from the engine side so you can see where it comes out from.
7. Puncture a whole in the rubber seals, run the hose through them and put them back where they were.

8. Now you have two options for tapping into the manifold pressure to get the reading. One is the Fuel Pressure regulator, the other is the hose that runs to the N249 located at the very front of the intake manifold. This is the method I went with. On my other car I tapped into the FPR with out any problems, so either way is fine.

9. Connect the gauge to the tubing, different ways of doing this depending on what came with your kit, and then test it out.

Hooking up the electrical connection.
1. On newer B5s, the vents had electricity running through them to illuminate the vent switch, perfect spot to tap in. (On older ones your on your own, Id go for the light switch.) Red = positive, Black = Ground. Tap into those, and use electrical tape to cover it up after to prevent a short.

2. Enjoy your newly installed boost gauge: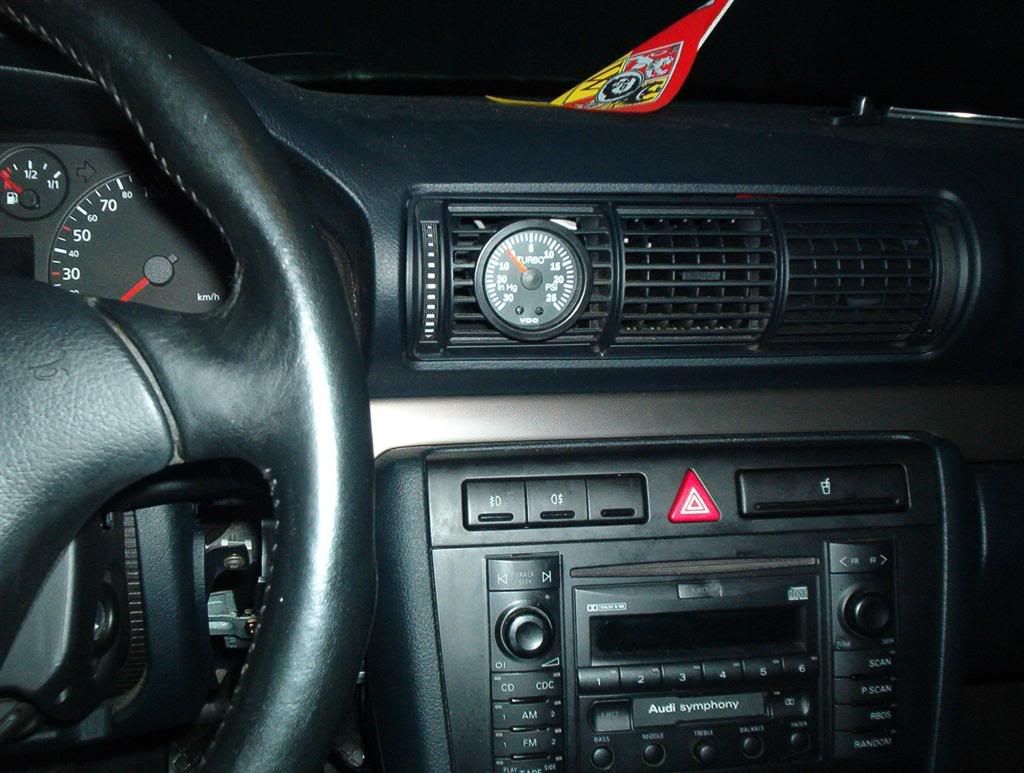


1 comment:
Perfect perfect write up :)
Post a Comment