I spend a lot of time in the car and for those times I'm stuck sitting in traffic it's nice to have music to keep me occupied. I have a 6-disc changer loaded up with music which I use but I always forget to swap out CD's. Local radio pretty much sucks and I hate hearing commercials every 7 minutes. And, since I'm a Jazz fan I'm pretty much out of luck as there are no commercial Jazz stations in my area. Enter XM radio. XM radio is a satellite based system that offers 100 channels of music/news etc, many of which are commercial free. I've lucked out as all the channels I listen to so far are commercial free. :) Unfortunately, you have to subscribe to the service for $9 per month but I've found it to be $9 well spent. XM touts the music as "digital quality" (whatever that means). Compression artifacts are audible on some types of music with the artifacts most audible on stuff like cymbals or the like which sound a bit shimmery instead of solid. I should mention I'm very picky about compression artifacts... even when I've pointed it out to some passengers they can't hear it but trust me, it's there. That said, I'm still very happy with the service--I've found no reason to listen to regular broadcast radio or CDs for several months. The programming has been excellent, sound quality is good--two thumbs up.
I was worried that since the service requires line of sight to one of the two satellites for operation that I'd experience frequent service drop-outs. In the two months I've had it up and running I've had a glitch or two but no significant service problems and even sitting stopped under an overpass hasn't posed a problem (quite suprisingly). Rain and cloud cover have not been an issue either. Of course, it does not work in parking garages but that's a minor inconvenience.
I decided to leave the existing stereo in place and use an RF modulator based unit that hooks into the car radio antenna. With this type of unit you simply tune the radio of the car to a specific station (which you choose) and the XM radio plays over that station. I opted for a Pioneer GEX-FM903XM. Cost for the radio and antenna were right at $300.
I should mention that the installation of the RF modulator had a dramatic effect on FM radio reception--it's very weak. I'm told I need to get different antenna cable since the factory antenna is amplified. I'll be getting one of these amplified adapter cables which is supposed to solve the problem. I'm in no big hurry though... I never listen to broadcast radio anymore.
Thanks to hakamarob for his assistance on this install.
The Install
I mounted the XM decoder on the underside of the deck in the trunk. The decoder requires 12V+, a switched 12V+ and ground. My car is equipped with a Bose radio so all the power requirements were available at the Bose amp on the left side of the trunk. If you don't have Bose you'd need to run the power lines from the front of the car.

To gain access to the power connector for the Bose, remove the trim across the rear of the trunk (philips screws) and pull the carpet side panel loose a bit (it's just snapped in with metal clips).

Look in front of the CD changer behind the carpet--the brown connector is plugged into the Bose amp. Pin out for the connector. If you unhook the connector from the amp the harness is long enough to pull out so you can work on it. Use the Red/Blue for main power and the small white for switched power. Attach the ground to the body.

I used the Terk SR-2 roof-mount XM antenna and put it on the deck lid. The instructions for the antenna say it should be 6" from the edge but for me it just looked too weird sitting out in the middle of nowhere. I temporarily mounted the antenna where I thought it looked best and used the radio for a few days to make sure I didn't have any reception problems. Reception was fine so I mounted it centered and close to the leading edge of the deck lid. The antenna doesn't block the high-mount brake light as much as the picture would suggest.

For the antenna wiring I routed it to the underside of the deck lid and put the wiring under the deck lid trim (the hazard triangle is sure a pain to put back!!). The path for trunk lock vacuum line near the hinge offers a clean way to get the wiring routed inside the trunk (I hate drilling holes in the body). I made a small cut in the rubber grommet near the tail light (bottom of the picture below), inserted the wire then sealed the cut with silicone to ensure no future water leaks then routed the two antenna wires to the decoder. The antenna has 2 wires, one for satellite signal and one for terrestrial signal if you're in an area that has ground repeaters. Connect the leads to the decoder. Speaking of the antenna wire, sheesh what a pain. The wire lives to tangle about itself and anything it gets near... it twists and tangles around like a snake poked with a sharp stick at every turn. Nasty stuff.

Note: Route the remote display wire and the RF modulator wire from the front to the back. If you start in the rear you'll find there is not enough space to get the RF modulator box into the dash (ask me how I know this little tidbit).
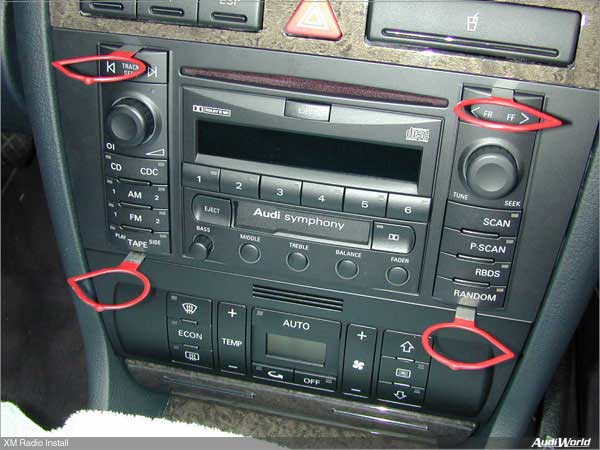
Remove the radio. If you choose to disconnect the radio power be sure you have the radio unlock code or you'll have no way to unlock the radio from SAFE mode without a trip to the dealer. The factory harness has plenty of wire so you really don't need to disconnect it.
To remove the radio Audi offers a special tool to unlock the radio. I've found that jigsaw blades (with the teeth filed off) also work. Slide the tools into the slots on the radio face then pull the radio straight out. The slanted edge of the tools must be long side to the outside edge of the radio. The removal tools are available from any Audi dealer parts department for about $8

Put a towel or something over your console and A/C controls to keep the radio from scratching things up.
Remove the kick panel by removing the plug for access to the screw. Also remove the screw near the top of the panel. Then, slide the panel back slightly to release a tab near the door sill joint then lift up and out.
Route the wire for the FM modulator through the radio opening in the dash, under the dash, behind the kick panel then under the door sill panels. Route the wire for the remote display as appropriate for your mounting location. The wires are thin so I didn't bother to remove the sill trim but just tucked them underneath.

Tuck the wiring behind the seat then route to the decoder.

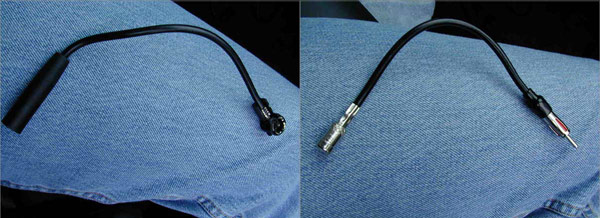
To hook up the RF modulator you'll need special cables to connect to the RF modulator box. Audi uses a small flat connector instead of the standard RCAish-looking type connector. The antenna cable set I got from Mobile One audio was labeled specifically for VW/Audi. You'll note that there are two antenna connectors on the back of the radio. We're only interested in the one near the outside edge of the radio.

The Audi specific cables.

Neatly stuff all the wiring in the dash. I wrapped the modulator box in foam to prevent it from rattling around and making noise. Re-install the radio.
I placed the remote display just under the center vents. Double sided tape holds it in position. My original plan was to put it down in front of the ashtray but it was too hard to read so high up on the dash is it's home for now. I have ideas of how to integrate it better into the dash but that may come later if I have the time.

Overall, a very nice addition. I've heard music I haven't heard in years and I often find myself sitting and listening after arriving at my destination. Highly recommend.
No comments:
Post a Comment