So now you're reserching Metra, Scosche, Best Kit, etc., and NOBODY makes a dash kit for your car. Let's add salt to the wound by taking away the convienience of a wire harness too. What do you do?!? Well, I decided to modify my factory Audi H/U for a digital mod on the transport, and later stumbled on the preamp outputs for the analog section (radio/iPod/nav.). While the Audi's H/U was out for mods, and I had the AMAZING Panasonic tube H/U on the shelf, why not put it to good use?!?
The Audi's H/U is held in by the quick release tabs on the sides, close to the face of the radio. There's NO place to attach some bendable straps to help support the back of the radio. The double DIN Panasonic (like most radios) comes with some mounting tabs on the side of the radio.

Even with all the mounting options on the side of the radio, the radio was still too far out of the dash. I needed to find a way to recess the radio with bigger tabs.
Here's the tools you'll need:

1/16" Aluminum right angle stock, aviation snips, drill bits, drill, marker, wood block, oil.
1) Use the Aftermarket H/U's mounting tab to mark the length and hole locations onto the 1/16" aluminum stock. The aviation snips will cut through the aluminum.
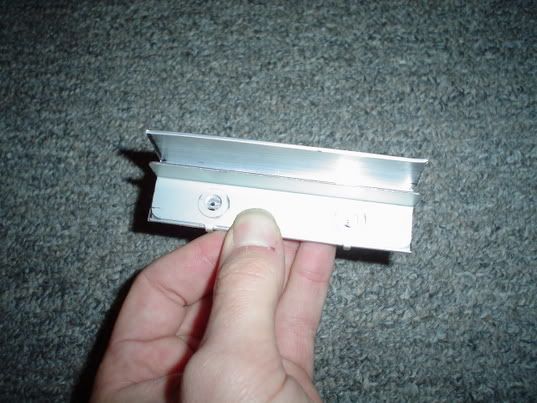
2) The DIN mounting hole marks will be used only as a guide. Depending on where you drill the new holes will determine the depth or extention of the new radio (in/out of the dash).

3) Match up the radio in the dash, and check for correct depth/angle, etc. Secure the radio by drilling holes LARGER than your screws, then pilot holes into the factory radio mounting area.

Of course, we're not done. A trim ring needs to be made.
I'll show you how I made a tight fitting trim ring with no previous template.
Tools needed:

1) Get a rough measurement of the dash opening.

2) Transfer these measurements to a piece of MDF. The Audi's top and bottom are parallel, but the sides bow. The bottom is narrower than the top. Free hand a curve of best fit, and sand 'till it fits.


3) Here's the hardest part of this process. We can't be 100% sure the radio's centered top to bottom, and side to side. Carefully measure (1/16" tolerances is what I used), and transfer these dimensions onto the MDF. Find your center line of the piece, and use a square (remember that thing in geometry you thought was useless?) to ensure you'll have a rectangular DIN cut out when we're done. Cut it TOO SMALL, staying INSIDE the measurements. This is to allow for error, and correction when we install the radio and check for changes that need to be made.

4) Once we've got a piece of MDF that we know fits the dash, and around the DIN opening, apply some double sided tape all over the MDF (or spray glue), then place the ABS over it. Use a router table and a trim bit with a bearing to trim the ABS to the exact copy of the MDF. You can also align the fence on the table to make fine adjustments to the ABS. I'd much rather have the clean edges off the router table, than to free hand sand, but either method will work.

5) Finishing touches will be different for different cars (bondo build up for curves, etc.). Use some SEM texture coat and SEM paint to match - not shown in picture.

No comments:
Post a Comment