Brake fluid is supplied to the master by a hose from the brake reservoir, which the clutch and rakes share. When you press on the clutch pedal, the master cylinder forces some of this fluid out the exit port, through a rubber hose about 2 feet long, ( by way of an aluminum "frequency modulator" -to reduce vibration, I assume) to the slave cylinder. The slave is located inside the clutch housing. And that forces out the throwout bearing, which is part of the slave cylinder (a very unusual arrangement) that actually presses on multiple steel fingers, which move the clutch pressure plate off the clutch disc. This disconnects engine from transmission so you can shift quietly.
Usual cars have a spring in the master cylinder, so no matter what happens at the clutch and slave cylinder, the pedal comes back up. Then, a pedal-on-the-floor-defect usually means master cylinder failure. In contrast, where pedal feels fine but doesn't operate the clutch usually signals a slave cylinder failure. Of course, leaking fluid either place is almost a guarantee that's where the failure is.
TT master cylinders however do not have a spring, (also very unusual), except for the over center spring pressing on the clutch pedal. So, the only force pushing the pedal back up is the pressure plate itself, pressing on the slave cylinder, pushing the fluid back upstream to the master.
So if a TT clutch pedal goes to the floor, you cannot tell where the defect. This is a problem.
This is the clutch master cylinder.

Removal of clutch master: ( which is much easier than slave, but still a tight access job) first decision is, do you disassemble the pedal from cylinder and spring while it is all in the car, or, do you remove whole pedal/cylinder. assembly and do work on your bench?
To remove the whole assembly (pedal, master cylinder, overcenter spring and black-sheet metal box-like support, about 3 inches X 2 inches by 8 inches long): you must remove 3 13mm bolts that hold it to firewall.(clutch master cylinder is inside the car, not in hood area, also unusual) . But the topmost bolt is quite inaccessible, so I chose to disassemble in place.
These pix are after it was all out.( Later on):

This is firewall from inside car, looking forward; keyhole opening is for master, see the 3 bolts:

Notes on Disassembly in place:
To remove Overcenter spring: Bentley suggests a special tool (they make special tools for everything, for no good reason, in my opinion.) This isn't needed at all; you can remove overcenter spring with blunt instrument by hand, while it's still in place. Just hold clutch pedal up in the air and press on it.

Removal of shaft of master cylinder from pedal: Bentley also suggests another silly special tool. But there is just a white plastic c-clip type of device, ( visible on 2 pix above) and you can press in each of the 2 legs of it, and then just pull shaft off pedal with your hands.
Easiest to remove the supply hose from the brake reservoir, leave it attached to Master cylinder, and take it out along w the master cylinder. That's easier access than trying to remove this short hose from the master itself while in place.
The master will not come out of the car until you remove the circular, about 1in diameter, white, "over center spring support" that is up against the firewall. It just twists out easily, 90 degree rotation, once the overcenter spring is out. You cannot remove cylinder without doing this first.
This is view while lying on floor, after overcenter spring is out. Looking upward. Sorry for poor quality pix.

To remove the pedal support box, you will remove the clutch end of this support connector, Ok to leave other side attached to break pedal:
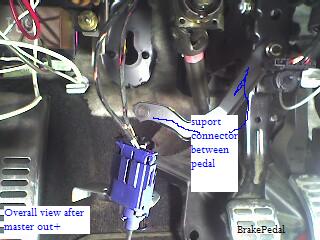
Also, will need to remove tiny metal spring clip that attaches the exit port of the master to the aluminum "frequency modulator”. The spring clip will fly off to parts unknown when you do release it. Be warned. If you don't have the modulator, then its same spring, but to a hose.

If you think this picture is hard to read, try getting your hand in there! That’s why I suggested leaving the supply hose on the master while removing it.
Another view, closer up than above, inside hood, looking down at spring clip at exit port of
master cylinder:

Then, master cylinder wiggles out. You need to lower the rear most end of cylinder, and raise the front end, to get the exit hose to clear the firewall (the exit port protrudes forward, thru the firewall, and then heads down at a 90 deg angle).
To reassemble, I decided to do it on a bench, and to reinstall as one piece. The trick was the uppermost bolt. A very very long extension with 1/4 in drive 13mm socket did the job.
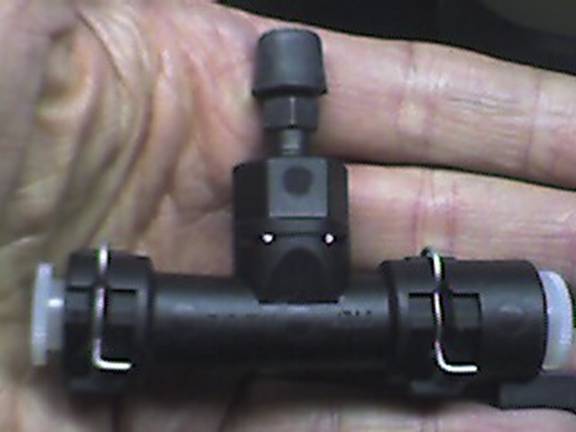
Bleeding: you have now introduced air into the system, so you must pressurize the brake reservoir, then open the bleed screw located at slave cylinder. Put hose over the bleed screw, so you don’t squirt fluid everywhere. I tried vacuum suction to bleed, but it didn't work. It's a 3way horizontal connector: top opening has the bleed screw, one opening gets the hose from master and frequency modulator, other end gets part of the actual slave cylinder. The slave is set up so that gravity will get the air to escape, so you don't actually bleed the slave itself. Pic is of new one (mine leaked badly at connector to slave), w caps on each opening.
My master looked perfect, so unfortunately, on to the slave cylinder, which means remove trans- quite a demanding job. That's the next write-up!
4 comments:
Brilliant stuff. Very well explained thank you.
From where do you disconnect the inlet and outlet pipes from?
I am trying to hook the exit port back up to the frequency modulator I can get it almost but the last tiny bit won’t pop in do you have any suggestions or did you have the same problem.
That’s an amazing write up! You warned of the clip springing off (the one that connects the exit port)... what would your advice be if the clip has gone into the abyss and can’t be retrieved?
Does it have a specific name? This is the only part that is stopping me now!
Regards
Marcus
Post a Comment