Usual disclaimer applies here, I am not responsible for any of your work. This procedure is done at your own risk, and my write-up is merely a guide to help you do it (as model years and options vary).
Big thanks to SScott for filling in all the bolt sizes. Also, I must metion my partner in crime here, JustDave did most of the replacement of the timing belt and tensioner.
And one more thing, this is not the only way to change the belt. It can be changed without removing the A/C condensor and radiator, however I wanted to have plenty of room to work....so I took it all off.
TOOLS/SUPPLIES LIST:
Metric sockets: 10mm, 13mm, 14mm, 19mm (12 point).
Allen sockets: 5mm, 6mm, 8mm
Breaker bar
Torx sockets: T45, T30
Set of metric wrenches
Timing Belt "kit" from PureMotorsports (www.pureMS.com ) ~$180
Fresh G12 Coolant (2-3 bottles if you change the coolant)
2 Buckets to catch coolant and windshield washer fluid if you want to reuse those
That's definitely not everything, but I don't think there's anything else out of the ordinary you'll need. Screwdrivers, socket wrench, extensions, etc...just normal stuff. A lift would help if you have access to one, but it's not necessary....jackstands will suffice.
FRONT BUMPER REMOVAL:
1. Remove the plastic underpan; 6 screws underneath and 2 plastic screws in each wheel well.
2. Remove two small grills and fog lights (if applicable) on front bumper; the grills come out just by pulling.
3. Disconnect the hose to the headlight washers by reaching through the hole where you removed the driver's side grill; it disconnects at the lightened area of the picture below. If you can't reach it, see step 6. Washer Fluid will SPLASH out, so catch it in a bucket in case you want to reuse that

4. Remove the two long 6mm hex bolts (see above picture).
5. Now grab the side of the bumper, almost to the wheel well and pull BACK (towards the rear of the car) and DOWN then UP. It takes a little finesse, but it's really not that hard. Have someone else hold the bumper while you do this so it doesn't come crashing down and scratch the paint. See the picture below, notice how the two clips at the top and one at the bottom grab the bumper like a claw. So if you pull it down, and then up (or vise versa), then you should be able to work it loose.

6. If you haven't disconnected the hose for the headlight washers, you'll be able to do it much easier now; have someone to hold the bumper while you do it.
A/C CONDENSOR AND RADIATOR REMOVAL:
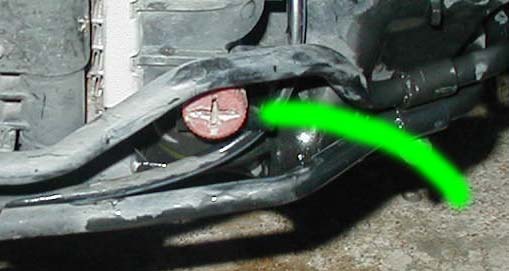
1. Drain the coolant. Loosen the cap on the filler tank in the engine compartment. See the red screw at the bottom on the driver's side of the radiator; open it just a bit and you'll see where the coolant will come out. Either connect a hose (as depicted by the green line in the picture below) or put a bucket underneath to catch the coolant. You can also remove the screw to drain the coolant out rather fast
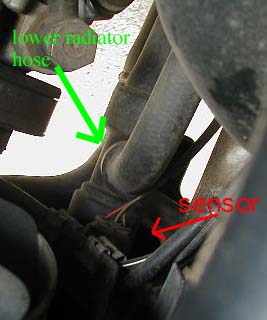
2. Disconnect the upper and lower radiator hoses, as well as the sensor just above the lower radiator hose. First, pry up the clip around the radiator fitting with a flathead screwdriver:
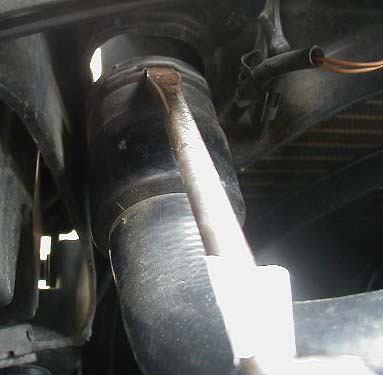
Do this for the top and bottom hoses. Now, just pull firmly (read: HARD) to get the hoses off. See the sensor above the lower radiator hose in the picture below
3. Remove the two "air guides" attached on each side of the A/C condensor. They're blocked in the picture, but the Phillips head screws would be where the green dots are in the picture.
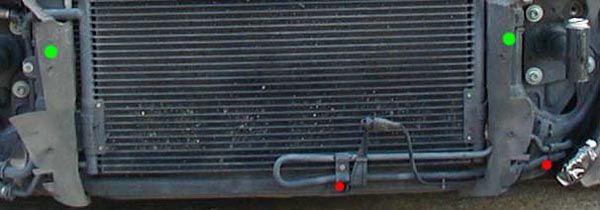
4. Now pull the P/S cooler that runs in front of the A/C condensor out of the way. The two 10 mm bolts are shown by the red dots in the picture above. Check the clamps connecting the rubber hoses to the P/S cooler while you have it loose, mine were leaking upon reinstallation of the cooler
5. Remove the two brackets that hold the A/C condensor in place, they're held by four 10 mm bolts. See the picture, where the bracket is actually already removed

6. Disconnect the sensor that connects on the passenger side of the A/C condensor (see above pic).
7. Now; pull up and then out on the condensor; "peel" the A/C condensor to the passenger side.

8. To remove the radiator, pry the small tab in the circular pin up, as shown here:
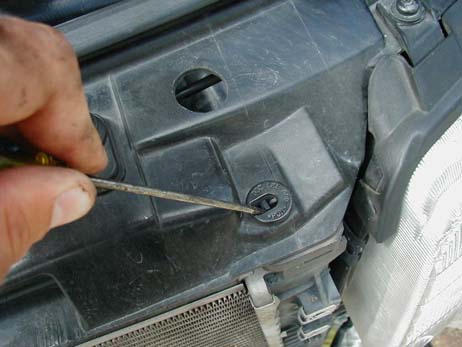
to the position shown here:
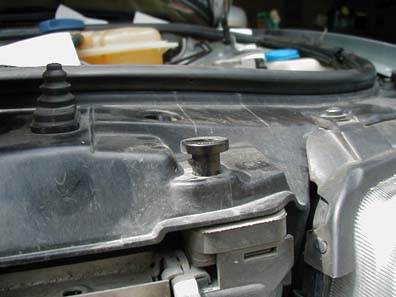
9. Now pull the top of the radiator out towards you (as if the bottom edge were a hinge), then up. The radiator is now free. Its a good idea to flush the radiator out with a garden hose at this time and let it dry while finishing up with the rest of the tbelt change
REMOVING LOCK CARRIER:
1. First unplug the horn(s) on the passenger side, as shown by the lightened ovals (on a 2000 there is one horn per side )

2. Remove the bulbs from the turn signals (see dangling bulb in above picture) and
disconnect the plugs to the headlights.
3. Remove the bumper post bolts with a Torx T45 bit. The passenger side will have 4 bolts while the drivers side will only have 3 which are holding the bumper posts

4. Remove the two Torx T30 bolts at the front edge of the hood on each side.
 .
.
5. Remove one Torx T30 bolt underneath each headlight; see green arrow.

6. Slowly slide the lock carrier out towards the front of the car; be careful it is heavy and there are still wires running to the lock carrier (around the fan shroud), as you will see. Remove the hood release. Do your best to unclip the wires routed around the fan housings, so that you can lay the lock carrier off to the driver's side.
TIMING BELT:
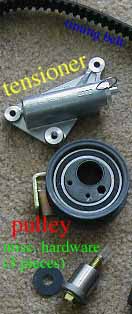
First, let's make sure we're on the same page as far as the parts in the "kit." As seen in the picture below, you should have (1) timing belt, (1) tensioner, (1) tensioner pulley, (1) bolt, (1) washer, and (1) metal collar/sleeve. By the way, DO NOT PULL THE PIN ON THE TENSIONER, until the instructions say to do so.
1. Remove the upper timing belt cover by releasing the two "clips" and moving the hose that runs in front.

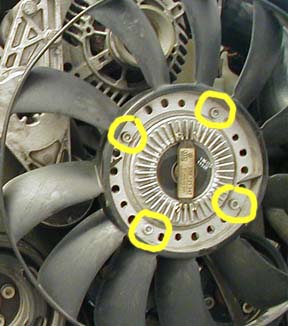
2. Remove the viscous fan; have someone hold the plastic blades firmly, while you remove the 5mm hex bolts, circled in yellow.
3. Remove the A/C compressor belt by loosening the tensioner with two 6mm hex bolts. You will later upon reinstallation use a wrench attached to the red circle to tension the new belt back up
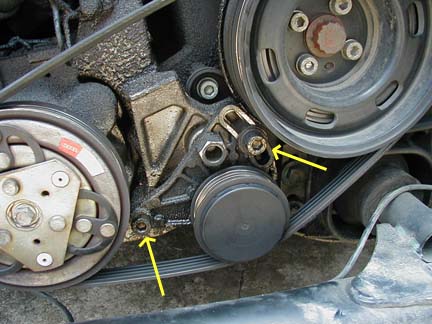
4. Remove the main serpentine belt by rotating the spring-loaded tensioner; use a crescent wrench and rotate clockwise, hold it while you remove the belt. If needed, remove this tensioner--three 13 mm bolts. You like my yellow crescent wrench? :-)

5. Remove the dampner pulley; have someone hold the pulley with a 19mm 12pt. socket on a breaker bar, while you remove the four 6mm hex bolts (allen keys won't cut it here, you'll need a socketed hex).

6. Remove the lower timing belt cover; there are two hex bolts the top: one is a 6 mm and the bottom one is a 5 mm (green arrows), a 10 mm bolt (red arrow), and a 10 mm nut (black arrow).

7. This step is the very critical. Carefully align the 2 timing marks (one on the cam sprocket, the other on the edge of the valve cove) by turning the engine by hand, clockwise, using the 19mm bolt on the crank (where you removed the dampner pulley from earlier). While you have the belt off, you must make sure that these marks remain perfectly aligned. DO NOT use the top cam to turn the engine, always turn at the crank when the tbelt is installed!

Also make your own mark the lower toothed sprocket on the crank, just for your
own comfort of knowing that the sprocket remained in the same position throughout the
install. We scratched an arrow on the sprocket; as you can see in the picture that our arrow aligns with the tip of that protrusion in the metal above it. So after you have marked the top cam and the bottom crank continue to the next step you will also notice that the top cam is very hard to turn by hand so it wont most likely not move but marks are critical!

8. Remove the old tensioner and pulley. First remove 13mm the bolt holding the "guide pulley" (that's what we'll call it) on to the tensioner (green arrow); remove this pulley--save it. Now remove the two 10mm bolts holding the tensioner to the block (red arrows). Remove the 10mm nut holding the pulley on (as circled in yellow, partially hidden from view). The pulley/tensioner complex should now be free.
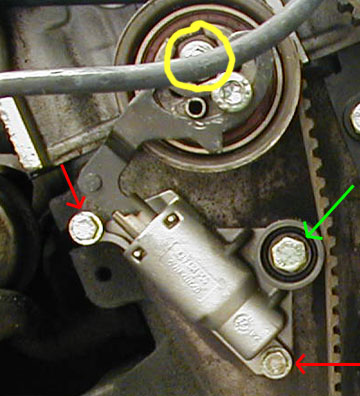
9. Remove the old pulley "stud" from the block; you won't need it with the new tensioner/pulley. It's 17mm.

WATER PUMP and THERMOSTAT change (5 steps total)
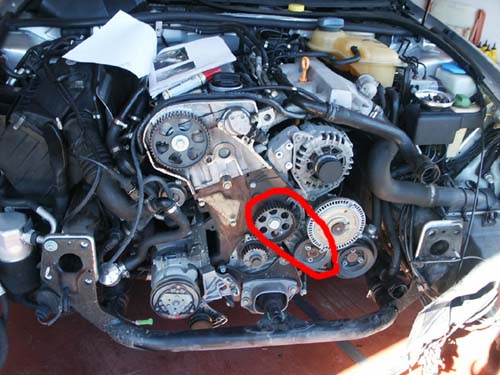
10. The engine should look like this now, the tensioner and timing belt had been removed. The water pump sits in the red area circled in the picture. Its not that hard to change so do it while you are in there, if you dont want to do this step skip to step # 16 and continue with the Tbelt change instructions

11. Use a screw drive and go through the whole in the P/S pulley there is a perfect crack that the screwdriver fits into so you can remove the 3 hex bolts that are attached to the waterpump. You might need to slightly hold against the belt so it doesnt slip on the pulley itself. The pulley attached to the waterpump is shaped like 2 plates against each other )( and will come off after the hex bolts are removed.

12. Now you need to use your screwdriver again and pry it in the whole of the other pulley for the oilpump and remove the red bolt circled in red. You dont have to worry if this pulley spins, it runs the pump and it very easy to turn. After you have removed that one you will have full access to the waterpump. The green dots indicate 10mm bolts that are holding the pump inside the housing, you will remove those after the next step.

13. The engine will still have coolant in it, so get your bucket from earlier ready again and remove the red waterpump drain plug. The coolant will drain out, now remove the 2 green 10mm bolts that are holding that black hose in the picture that is allready bended away in mine. This hose houses the thermostat and there will still be some coolant left splashing out so be prepared. Remove the old thermostat and remember that the spring part goes inside the pump housing then you reinstall it, the gasket comes in between the thermostat and the hose not the housing!
14. Bolt the hose back to the housing and remove the 10 bolts that are holding the waterpump to the housing, the pump should drop right out, now remove the old metal gasket and clean around the gasket area. Install the new gasket and pump in the same order as you removed it and reinstall the drain plug as well. Make sure that the gasket has a good seat and is not kinked anywere.
15. Reinstall the big pulley that you had taken off earlier in order to remove the bolts that were holding the pump in and where unreachable before. Tighten that one back up and move down to the newly installed waterpump. I hope you ordered new belts as well, use the new P/S belt and slide it over the P/S pulley and attach your )( plate pulleys with the belt. The new belt should be tight on those when you are tightening the pulley back onto the waterpump. You should now have a brand new thermostat and brand new pump installed with a brand new belt that powers both, arent those new belts nice looking compared to the old ones? You are now ready to continue with the timing belt install
16. Time to assemble and install the tensioner and pulley. First, attach the "guide pulley" to the new tensioner--hand tighten for now. Now install the new tensioner to the block. See below for assembly of the pulley and the misc. hardware. I forgot to snap a pic during the installation process, thus you get this VERY crude attempt at a 3D rendering.

Using a 14mm socket in your hand, slowly tighten the center bolt attaching the pulley to the block (careful not to cross-thread, if you feel resistance back it out and try again). The pulley setup should look like it does below. Now remove the brass-colored piece that hangs off the pulley; one bolt (blue arrow) attaches it to the pulley. The pulley should now be free to rotate, more on that later. You will need to remove this one so you can slide the new belt on and will reinstall it later on
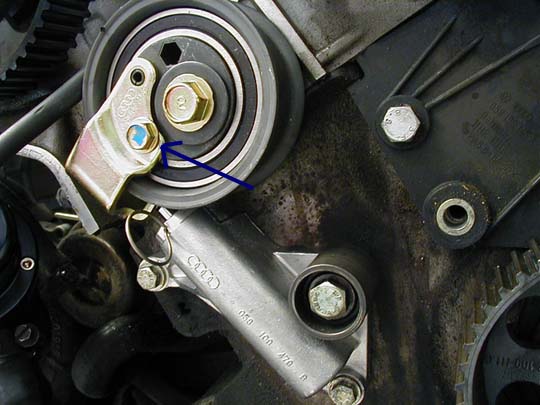
17. Install the timing belt. Carefully slide the belt over the toothed sprockets, making sure that you don't move the sprockets. I found it easier to wrap the large sprocket up top first, then the smaller ones at the bottom, then around the tensioner pulley. Be sure there is no slack in the area outlined in yellow
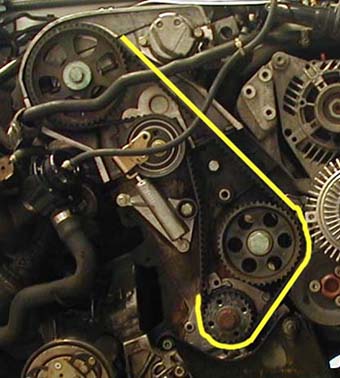
18. Almost done. Now it's time to put that brass-colored piece back onto the pulley. See that hex hole in the pulley? Put an 8 mm allen key in that hole, and pull clockwise. This will allow you to align the hole on the brass piece with the hole on the pulley so you can put the bolt through and tighten it up. Go back and double check all the bolts for the tensioner and pulley, be sure they're all tight (no torque specs at the moment).
19. Make sure your setup looks like below. If so, PULL THE PIN! (BTW, that's Just Dave's finger.....it's the best pic I could get of him; he's very elusive when the camera comes out :-)

20. With the belt and tensioner now properly installed, hand-crank the engine around one full rotation to make sure your MARKS on the top cam sprocket line up at the same time your mark on the bottom crank sprocket. Turn the bottom crank sprocket one full time and get back to your original mark you made earlier, if the bottom and top mark match up = everything is fine
21. That's it...reverse the process and re-install all of the above. You do remember how it all went together, right? It is easier if you but the bolts you had taken off or loosened up back into the whole where they came from to make it easier during reassembly
There, you've just saved yourself roughly $900 in labor @ the stealership. All I ask is that you let me know you've completed it successfully (hey, if you want to send donations that's fine as well ;-)
If you have any problems, questions, etc, you're welcome to email me: andytn.a4@gmail.com. Good luck.
Andy wrote the original timing belt writeup
Stephan (BSK) added the the water pump and thermostat replacement Nov 2005, After using this article to change his own timing belt.
1 comment:
Thanks for sharing this detailed DIY guide! While timing belt maintenance is crucial, many car owners also encounter alternator problems and solutions that can affect overall engine performance. At Kwik Kar Auto Dallas, we offer expert Auto Repair, Car Repair and Maintenance, including Engine Tune Up, Wheel Alignment, Oil Change, DOT Inspection, and more. Our Auto Repair Shop provides reliable Car Repair Services to keep vehicles running safely and efficiently. We proudly serve Dallas and nearby areas of Dallas, helping drivers address both minor and major vehicle issues before they escalate.
Post a Comment