You'll know it's time to change your heater core when your heat starts smelling like coolant, and the interior windows fog up and even the AC won't prevent it. The good news is, there are only 2 screws that hold the heater core into the HVAC box!! The bad news is, it's going to take you about 4 hours to get to those 2 screws.
This writeup is how I did this job, it's not intended to be an exact step by step how to. This job is not for the faint of heart, or small of toolbox.
The first step is to take your car to a shop, to have them purge the AC refrigerant. This is REQUIRED, as you have to open the lines into the AC condensor to make this change. Next, move your car to where you are going to be working on it. You will need access to all 4 doors, with plenty of room on either side of the car for parts storage. Try to have the front wheels point streight ahead. Slide the power seats all the way back, and down. Disconnect the battery. Loosen the spring clamps on the heater core hoses, and slide the hoses off of the heater core lines (DO NOT do this with the coolant hot. Let the car sit and cool off fully before starting.):
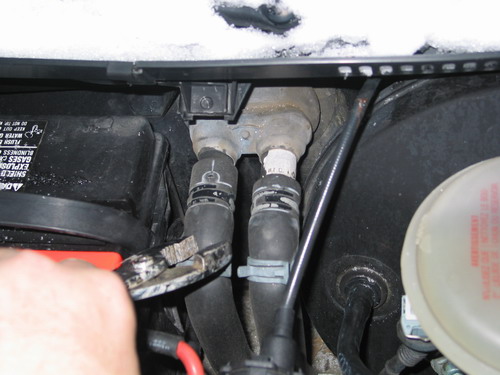
Remove the cover for the pollen filter, and loosen the allen bolt that secures the AC refrigerant lines. Even though you had the refrigerant purged, it may still hiss a little. (at least mine did).
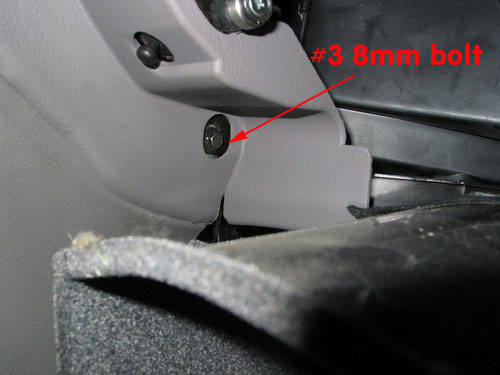
Empty the glove box, center armrest bin, back seat area, etc. Remove the driver's side knee guard. There are 2 8mm bolts in the fuse panel area, one behind each of the snap in covers, and one down below.

Remove the glove box. With the glove box open, squeeze the sides inward, so they clear the stops. Let it drop down to the floor. Remove the 4 bolts that hold it in. 2 are easy, and obvious, they are on the outside edge, you'll see them when you get the cover off the end of the dash.. The 3rd and 4th one are not. The 3rd bolt is near the plunger switch for the glovebox light.
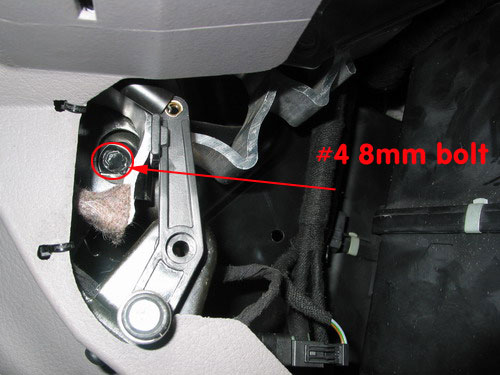
#4 is entirely harder to find.. If you could stick your head into the glovebox cavity, you'd be able to see it. (in this pic, the bolt head still has the electrical tape on it that I used to keep the bolt firmly stuck into my 8mm socket.)
Now, on to the center console. On the B5, to remove the center console, you start in the back seats.
Pull the ash tray out. There are 2 13mm nuts, remove those. You do NOT need to remove the one 13mm lock nut, that one holds the hand brake frame. Under the armrest, there is that little port for the build in phone, pop that out, and look under it. There is another 13mm nut to remove. Pop the trim covers off using a very small, clean screwdriver. Remove the 8mm bolts from each side. Under the hand brake handle is a very small locking tab. You'll need your smal screwdriver again.. just carefully pry it down. What this does is lock the handle to the trim and the lever. Pull the handle and trim off of the lever.
With the handle up as far as you can get it, you should be able to slide the rear part of the center console out over the hand brake handle. Next, remove your shifter knob. Remove Radio head unit. Make sure you have your code handy. Unbolt the center stack trim plate. Unbolt the center stack trim from the carrier unit, which houses the HVAC head, the dash switches etc. On the driver's side of the center stack, down by the driver's foot, there is a cover for a nut, remove the nut. You might have removed it earlier, when you dropped the knee bolster.
On to the dash
Remove the 2 8mm bolts on each end. On the passenger side, remove the airbag module and the 3 brackets you will see under the airbag. One bracket is the one the aribag module attaches to, the other 2 are the L brackets, they hold the air bag to the dash frame. remove the 8mm bolts on either side of the center stack, they attach the bracket to the frame behind the center stack. Under the center vent area, that same bracket is attached to the dash cover by 3 8mm bolts. On the driver's side, remove the steering wheel, steering column trim. remove the upper cover for the instrument cluster screws. remove the lower trim for the column pass through. The top screws are accessed from the front, stick your torx driver through the hole along side the column. Remove the instrument cluster. Under the steering column, there are 4 allen head bolts, which hold the column up to the aluminum dash support. Careful here, the column will be free to fall on your head at this point. You can carefully set the steering column on the floor, after you have removed the vacuum line for the cruise control from the brake pedal. While you are at the brake pedal, remove the allen bolt that holds the top of the hinge to the dash support. (I've not done this on a 5 speed car, but I suspect that the clutch will have a similar setup). The pedals will stay where they are, but you need to free the top of the assys. from the dash frame.
Time to move the center stack stuff. You've unbolted the center stack and removed the trim already. Now, you need to take the electronics, and pull them out, and move the whole deal off to the side. If you look in at the HVAC box, under the area where the center dash vents are, you'll see a duct running from the HVAC up to the dash. There is a single 8mm nut holding this duct to the HVAC box, and a small harness connector. On top of the dash, there is the sunlight sensor. The trim pice comes right off of it, it's a small piece. There is a phillips screw that holds this sensor to the center vent. Remove the screw, lift the sensor up, and unplug the harness connector. (Once you get the dash off, tape a long zip tie to the connector, it will help you fish it through when you put the dash back together.)
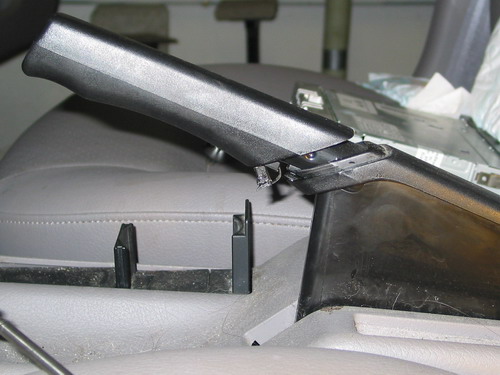
Give it a try.. Try to pull the dash cover forward and up. The only thing that holds the windshield side of the dash down are 2 clips. The dash SHOULD come right out now, and you should now be seeing the aluminum frame, the HVAC box, and a ridiculous amount of wiring.
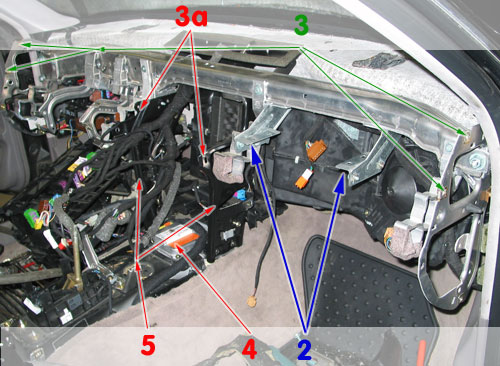
Legend:
2. The airbag bracketes. The airbag sits on these, the dash will not come out with the bag bolted to these.
3. This is where the dash skin bolts to the frame. Not pictured is the center piece, at spot 3a.
4. The airbag module for the seats. Unbolt it from it's perch.
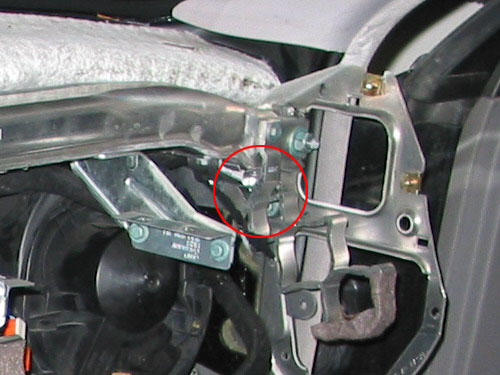
5. Remove these brackets. They hold the HVAC box in place in the center of the car. It's held in place on the far right side by the aluminum bracket. It's difficult to see in the below image, but behind the far impact absorber (in the red circle), there is a 3 angle bracket, which is held on by that impact absorber, and also bolts to the aluminum cross member, and the HVAC box.. Remove this bracket.
Since you are already on the passenger side, remove the 16mm nut which holds the dash support to the frame of the car. Back on the driver's side, remove the nuts that hold the realy panel etc. to the aluminum. frame. also, there are 2 phillips screws that hold the rest of the electrical bits to the long thin aluminum. arms, way under, by the firewall. On my car, they were broken somehow. it's a good idea to check first, before you yank the aluminum dash support out. Also, remove the 2 bolts, and pop the fuse panel out of the dash support.

Remove the 2 16mm nuts on the driver's side, and try to slide the dash support forward. If I haven't forgotten anything here, it should be free to slide forward a bit. The upper dash vent is mounted to the aluminum frame, so you'll want to keep that in mind when you start yanking on the frame. Now you will realize that someone was VERY worried about this huge wiring harness running away, and saw fit to tie it to the aluminum frame every 6 inches or so. Have fun un-doing all of the cable ties. There seem to be 150 of them. Make a mental (or physical) note of it's orinetation around the steering column. This will come in handy when it comes time to put things back together. Once you get the dash support frame free from the wiring, you can take it out of the car completely.
On to the HVAC box!!
With the aluminum dash frame out of the way, you can begin to get the HAVC box moved from it's spot. If you have not already, remove the 2 ducts that route air to the rear seat footwells. These just slip out of place. Remove all of the connectors in sight. Start to pull the HVAC box into the passenger side footwell. Careful to not pull any wores too tight. Basically you want to move it far enough that you can get the heater core out.
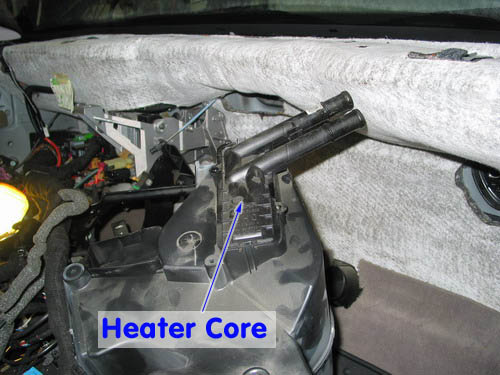
CAREFULLY remove the old core by unscrewing it, and opening the tabs, then lifting it up and out. Take this time to clean all of the coolant out of the heater box. I've got big hands, and big arms, and I could reach right in with paper towells to clean the stuff out.
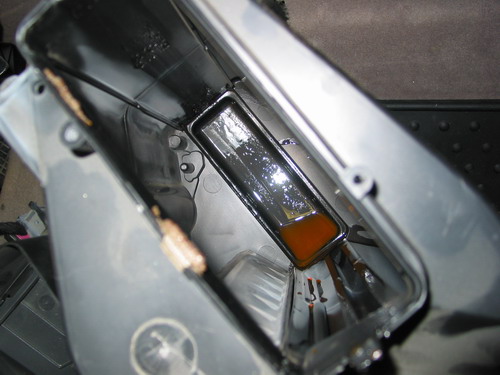
CAREFULLY clean the new heater core, to get any dust and gunk out of the fins. CAREFULLY install the new heater core.
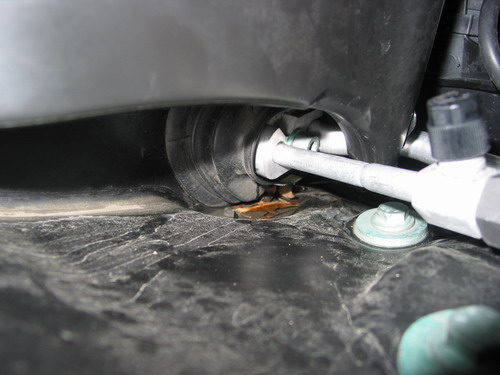
Now, start putting things back together. Make sure that the drain for the AC condensor sits nice and tight to the hole in the floor. (that's the strange foam disc at the bottom of the box, right above the top of the passenger side floormat) Make sure you re-connect all of the plugs you disconnected.
Reinstallation is literally the reverse of this proceedure, plus or minus. I'd really consider this more of a helpful hint article than a full blown how to, but I hope it helps you in some way, even if that is to dissuade you from destroying your car. I'd HIGHLY reccomend having the Bentley manual at the very least before attempting to change your own heater core.
14 comments:
I've just spent the last two weekends stripping my dash out to replace my leaking heater core (b5) - I would not have been able to do it without this incredibly informative document - Thank you!
I have an 2002 Audi A4 that the timing belt and water pump were changed. soom after that I had no/very little heat in the car. the mechanic changed the heater core, after a week of two, no heat again. He then changed the heater core again and checked the water pump. He delivered the car to my home with the heater wroking, the next morning, no heat again. The temperature of the engine gauge is normal and I am not loosing any coolant. It sounds like an "air pocket" to me. Do you have a method to remove this. I tried running the car with the radiator car loose, however no luck.
Thanks!
Can you repost the pics? They are not showing... Thanks!
Hi,
Do you have to release the aircon refrigerent for this job?
I'm just curious does anybody know approximately what this would cost to have a shop do this? Well I'm probably going with a personal mechanic but I'm just curious just in case he isn't able to do it? What a great instruction guide. I was amazed when I first saw this. Thanks.
In Greece this costs about 150 euros (work and core) if you have this done in a shop.
I've the identical ideas on much of this content. I am pleased I'm not the only person who feels such as this. You've genuinely compiled an excellent quality write-up right here. Thank you so very much. Greensboro Audi Repair
My 2000 b5 has a leaking heater core and now the darker nights and colder weather is here I have just started to remove the dashboard this afternoon to replace the core. Thanks for the article, it will be a great help
Yes
By the way, you stole this content from me. Here's the original - https://www.audiworld.com/tech/int54.shtml
I got 01 a4 i did the heater core swap everything went put back together successfully but now it won't start.. is there ay type of resetting to do here
Thanks Kris, I've cited your article many times and added some further information gleaned from various sources. Sometimes people are lax or forget to give credit, where credit is due.
With credit to the original poster krishansen, It's a no brainer to replace the air-con evaporator while you're in there. The cost of one is negligible in comparison with the physical and mental contortions endured in getting in there...
#Heater Core #Blend Doors
Replacing HVAC Blend Door Foam without dismantling.
Couldn't believe my eyes when I saw this comment for B5 A4. No more foam bits hitting us in the face!
Credit: @martinee4901. 4 yr ago
Edited: I have done this on my A4B5. You can remove just the blend box by itself, you need a mirror & screwdriver to remove the clips by the firewall. And remove the actuator motors to give you enough room to pull it out & turn it 90° & pull it right out. I used A4 sheet closed cell foam & ADOS super strength spray glue. It helps to use cardboard to make a template for the foam first so you cover gaps at the flaps edges. Then trim it oversize & assemble partly to gauge it & trim again. Assemble & fit the actuators & test it by putting power to the 2 pins in the socket. The fan box side probably won't need any work & you can remove just the fan + motor by itself. The vent tubing to the centre will need to be cut thru to remove the box, but it's distorted anyway & you will have to fix its flange connection to the box. You will see where n why n how. Use non acetic silicone sealant & or that silver aluminium adhesive tape. Heater Core RHD 8D2819031A
https://ar-demo.tradesoft.pro/search.html?article=8D2819031A&brand=VAG&withAnalogs=1
Check this out.. see why heater core get clogged. Preventative Maintenance for cooling systems.
https://www.audiworld.com/forums/a4-b5-platform-discussion-1/problem-heat-keep-hitting-dead-ends-2860332/page2/#post24538781
Audi B5 S4 Heater Core Replacement
by CIP GAS
https://youtu.be/CygjYaCXsSc?si=Cgo7GlG3KKrg0Hok
Post a Comment