No liability is assumed by the author for the use or interpretation of information contained within this article - all decisions based on the information provided herein are the responsibility of the individual user. The user understands that any modifications to the car can void warranty.
PARTS LIST
1 ea. 48 Plate Mesa oil cooler, part #3080-11.....................................................$59.99
1 ea. Mocal sandwich plate, 3/4 x 16 with 180 degree thermostat, part #10.117.304K..99.95
1 ea. Shorter threaded 3/4 x 16 nipple for oil filter mount, part #1234-3/4 x 16................3.49
3 ft. XRP push-on hoses, size 10, part #340010.....................................................6.00
2 ea. Straight push-on hose ends, size 10, part #230010..........................................7.50
2 ea. 45 Degree push-on hose ends, size 10, part #234510......................................24.00
4 ea. Male size 10 flare to 1/2" NPT pipe adapter, part #98160.....................................5.35
4 ea. Snap type hose clamps, part #81840.............................................................1.46
2 ft. Aluminum L material, part #ALUM 1" X 18" Crown Bolt 1/16" thick
5 ea. Bolts, Nyloc lock nuts and washers, 6mm x 12mm
1 ea. Bolt, 6mm x 20 mm bolt
1 roll Teflon Tape
2 ea. Sheet metal screws, 7mm x 20 mm (approx.)
Total (approx.)............................................................................................. 223.67
SOURCES:
Porterfield : (porterfield-brakes.com) Hoses, hose ends, hose clamps.
Pegasus Racing: (pegasusautoracing.com) Shorter threaded nipple for oil filter installation.
VWParts: (vwparts.net) Mesa oil cooler.
PUREMotorsports: (pure-motorsports.com) Mocal sandwich plate.
Home Depot (homedepot.com) Sheet metal screws, Teflon tape, metric nuts and bolts, aluminum L bracket material.
TOOLS/SUPPLIES LIST:
Floor jack and jack stands
Metric sockets: 10mm, 13mm, 14mm, 19mm (12 point), 26mm (or 1")
Allen sockets: 5mm, 6mm, 8mm
Breaker bar
Torx sockets: T45, T30
Set of metric wrenches
Fresh G12 Coolant (2-3 bottles if you change the coolant)
New Audi filter
5 Quarts of oil
2 Buckets to catch coolant and windshield washer fluid if you want to reuse those
Drill
9/32 drill bit
Screwdrivers, phillips and standard
Hammer
Center punch
Vice grips or channel locks
Hack saw
Dremel with cutting wheel
Step 1 Disassembly
Remove front clip. Although removing the bumper, bumper supports, A/C condenser and radiator may be optional; removing it provides additional room to work.
For a detailed step-by-step procedure on how to review the front clip, follow the first six steps from Andy TN's timing belt replacement on Audiworld's tech articles.
The only difference is that you'll also be removing your FMIC and a few other parts to improve access.
Once you've completed step six of Andy's timing belt tech article and everything is out of the way, proceed with the next steps:
- Drain the oil and remove the oil filter.
- Remove the coolant overflow tank and electrical connector.
- Remove driver's side wheel/tire.
- Remove the driver's side wheel liner.
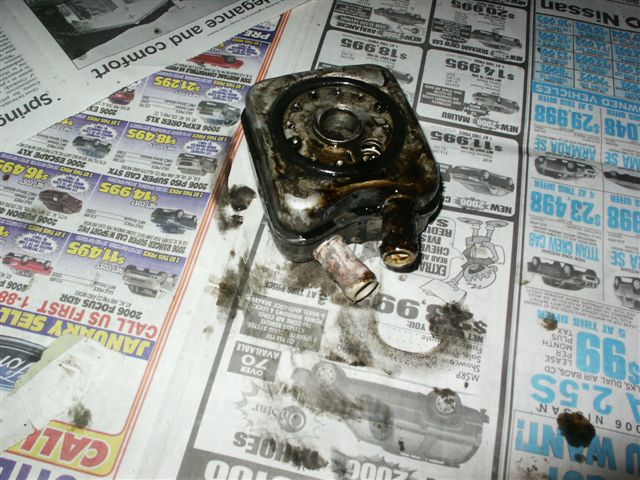
Step 2 Remove existing oil cooler
Remove existing oil cooler and coolant lines.

Remove the jam nut (8) from the threaded tube (5) that goes through the middle of the oil cooler (7). Then unscrew the threaded tube (5) for oil cooler. Use a vice grips or similar tool to unscrew the threaded tube. You can cut and reuse the original tube if you don't damage it. If you plan to cut it and reuse it, use care to not damage the threads when removing. Wrap threads with a towel or similar item to protect.

Remove the feed line and return hoses from the oil cooler. Using pliers, squeeze the clamps and slide them up and off the oil cooler. Then pull off both hoses. You will re-use the hose 058 121 058 A that goes from the throttle valve housing to the oil cooler. To be safe, you can purchase a new hose, although mine looked to be in good condition so I just reused it.
The oil cooler should basically fall off at this point.
Step 3 Prepare oil cooler for installation
Trim oil cooler bracket. The oil cooler on the right hand side must be trimmed to fit; otherwise it will contact the washer fluid reservoir. Trim two inches from the right hand support bracket as shown. You'll also need to drill a 6mm hole on the right hand side, measured 4 1/2" from the bottom.

Wrap the two male flare to pipe adapter fittings with Teflon tape and install them into the oil cooler.

Step 4 Fabricate brackets for oil cooler
Three aluminum brackets must be fabricated to support the oil cooler.
* The first bracket will attach to the left side of the oil cooler to the frame of the car.
bracket 1 Take the angle aluminum and cut it to 8-1/4" in length, slightly shorter than the inlet and outlet on the Mesa cooler. Align the bracket with the oil cooler and mark the holes. They should be 1-1/2" and 6-7/8" from the top of the angled aluminum. Drill two 9/32" holes for mounting the Mesa cooler to the bracket. Mark the holes on the other side of the angle aluminum that will screw into the frame. Mark the first hole 2" from the top and the other 3" from the top. Now, bolt the angle aluminum to the cooler and test fit it to the car frame just to be sure the holes you are about to drill are centered vertically to the frame. The bracket and cooler should be positioned so that the top of the cooler is just below the top edge of the old SMIC mount. If everything looks good, remove the bracket and drill the two holes for the sheet metal screws that will go into the frame.

bracket 2 The second bracket will support the cooler from the top. The overall length is 5-1/2". You'll need to make two cuts to leave a 1-1/2" tab at top and a 45-degree angle. Drill a 9/32" hole in the center of the tab for the bolt.
bracket 3 The third bracket will support the cooler from the back. Cut the aluminum stock 4-7/8", trim 3/4" from each end so that the bracket can have two angled tabs as shown. Drill 1/4" hole in the center of each tab for the bolts.

Step 5 Install the oil cooler and supports
Test fit cooler again with all three brackets loosely attached.
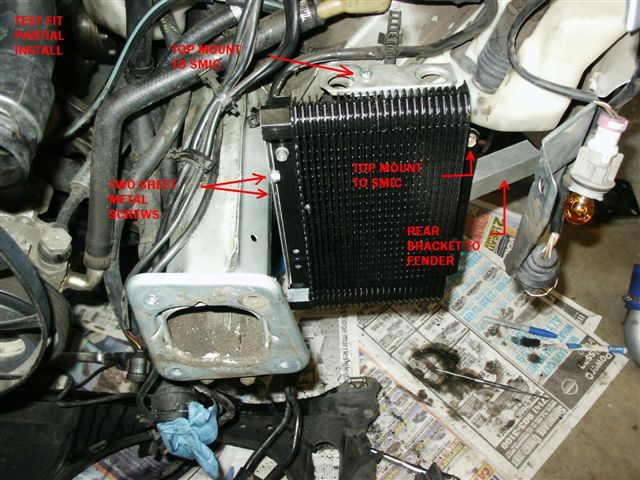
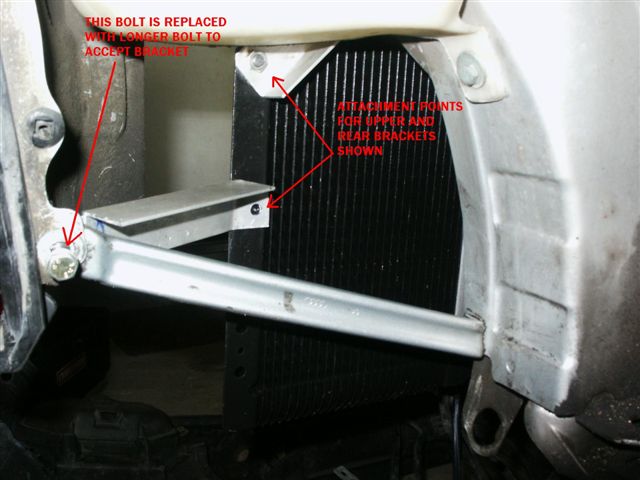

The left-hand bracket should be placed so that the top of the cooler is just below the top edge of the old SMIC mount. Mark the holes from the left side bracket onto the frame. Note where the top and back brackets will be attached. The top bracket will bolt into the old SMIC bracket and the back bracket will bolt into the existing fender mount using a longer bolt in place of the existing bolt.
Install the side mount bracket. Make sure the holes are centered, then use a drill punch to mark the holes and drill holes in frame.
Temporarily mount oil cooler. Attach the left-hand bracket to the frame with two sheet metal screws and bolt the oil cooler to the frame. Recheck the fitment of the cooler and the two other brackets. Mark the hole in the SMIC for the top bracket, use center punch and drill hole.

Loosely bolt in place. Using the longer bolt, attach back bracket. Make sure that the wires that run under the top inlet are clipped in place and won't be damaged by any heat off of the oil cooler. Wrap with thermal wire protection if needed.

Check that all brackets fit properly, then tighten all the bolts and nuts down.
Step 6 Install Mocal Cooler
Install Mocal cooler.
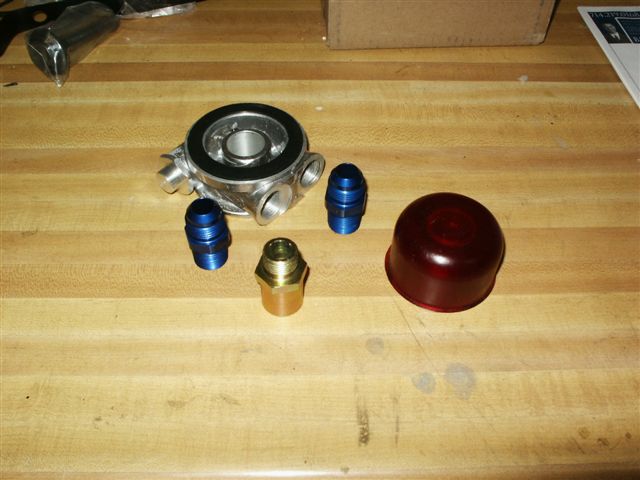
Install the two short blue fittings into the sandwich adapter using pipe thread tape. At this time also wrap the other end with pipe thread tape so it is ready to accept the oil lines from the cooler. Install brass looking threaded tube into the engine block, then the Mocal cooler adapter and the jam nut. (The other red knob unit is a snub mount that I installed at the same time) Tighten jam nut to 18 ft-lbs. Oil the filter gasket on the new oil filter and spin it on tight, plus a half turn. Install the oil drain plug so we are ready to begin adding oil.
Step 7 Assemble oil lines
Double check length. Take the lines and check that they are the correct lengths. They should have some slack and be routed so they won't rub on other existing lines. Once you are satisfied that the line length listed above is correct, cut the lines and install the hose ends.


Assemble bottom line. Using 17 1/2" line, push the oil line onto one of the straight ends with washer. Then slide both clamps onto the hose and install the 45-degree end with washer. Recheck fit.
Assemble top line. Using 12 1/2" line, assembly will be same as the bottom line. Recheck fit. Then clamp all the fittings to the lines. Use a vice grips or channel locks to secure the clamps. I wasn't sure exactly where to clamp the lines in relation to the ridges on the hose ends. I tried both positions, one right on the highest point of the ridge and the others in the lowest point. So far, no difference and no leaks.

Step 8 Install Line Sets
Install oil lines. The male fittings should already be wrapped with pipe thread tape. Install the bottom line set. The 45-degree fitting goes on the oil cooler and the straight fitting goes to the sandwich plate.

I didn't torque the fittings, but they are very tight. Install the top line to the cooler only. Holding the line up, prefill the lines and cooler with oil. Once the lines and cooler are full of oil, install the other end of the line to the sandwich adapter.
Step 9 Reinstallation of all other components
Install coolant lines. Since the coolant lines will bypass the oil cooler they need to be rerouted. Using the long line, route it from the upper coolant hose to the lower heater core coolant hose. Clamp both ends of the hose. Reuse existing clamps or purchase new screw clamps. (I reused OEM clamps)
Fill with system with coolant. Be sure to purge the air from the system.


Step 10 Final Preparation
Fill engine with oil. New capacity is roughly 5 quarts of oil. Check dipstick as you fill.
Start the car and check for leaks. Since the oil cooler lines won't be carrying any oil until the thermostat reached 180 degrees (the preset temp for the Mocal thermostat) be sure to recheck the system for leaks the first time the engine oil reaches 180 degrees.
There you go, nice clean install. Looks nearly stock.
11 comments:
Hey man, this blog is awesome, you have to keep doing this. It really helps a lot. If you need some more info I have been working in my 97 A4 quattro 2.8L here and there. I have change rotors and brakes, tie rod ends, coolant sensor, heater core, and now heater hoses for my car. I appreciate this blog.
I value the post.Much thanks again. Awesome.
Cooler Installation in altona
Hi, can you contact me via my website ;
www.carbasics.co.uk/blog
Please include the following in the subject line ;
http://audi-diy.blogspot.co.uk
Regards,
Carl.
Very Nice write up I agree with a lot of the info you've compiled. I'll need to read this again. Greensboro NC Audi Servive
I highly appreciate this blog,as I have a 2.8l v6 that is also mixing water with oil on the water reservoir tank. But what confused me is the fact that even the transmission oil is milky, so how do I flush it?
If you own an Audi A4 (B5), then you know that it's important to keep your car in good working condition. One way to do this is to regularly check and change your oil. But what if your oil cooler starts to leak?
Luckily, there are plenty of reputable Audi repair services that can help you fix the problem. All you need to do is find a reputable one in your area and schedule an appointment.
During your appointment, the mechanic will first inspect the oil cooler for any leaks. If they find any, they'll then replace it with a new one. They may also recommend changing your oil filter at the same time.
After the replacement is complete, be sure to ask the mechanic about any other maintenance tips that can help keep your Audi A4 (B5) running smoothly.
Very Nice write up I agree with a lot of the info you've compiled. I'll need to read this again: Bmw repair dubai
Nice Post Thanks for Sharing: Luxury car workshop dubai
Carzilla is one of the best car repair and service center in Dubai. We maintain every type of branded car and automobiles in Dubai.
Audi TT Repair Dubai
Maintaining top-notch performance in your Audi is essential, especially when navigating the roads of Dubai. At Dar Al Madina Garage, we specialize in Audi suspension services, ensuring your vehicle delivers a smooth and safe driving experience. Whether you're facing bumpy roads or just need a routine check, trust our expert team to keep your Audi in perfect condition. Visit us in Dubai for premium care!
Great walkthrough on the oil cooler installation! At Kwik Kar Auto Dallas, we know that even small upgrades or repairs require a reliable vehicle repair shop to ensure quality and safety. Our Auto Repair Shop provides expert Car Repair Services and Vehicle Repair solutions, covering everything from routine Car Maintenance to complex Car Repair and maintenance tasks. Whether you need trusted Automotive Repair Services, professional Auto Care, or a dependable Car Repair Workshop, having a skilled vehicle repair shop like ours can keep your car performing at its best.
Post a Comment