I finally got around to fixing it. Here's how:
1. Remove the fuel pump fuse (fuse location 28 - bank of fuses nearest the front of the car, 3rd from the bottom).
2. Start the car and let it run out of gas (take a few seconds).
3. Disconnect the battery
4. Locate the 3-screw fuel tank access panel directly behind the rear passenger side seat under the trunk matting.
5. Remove the 3 philips screws to expose the Fuel pump cover. It will look like this:
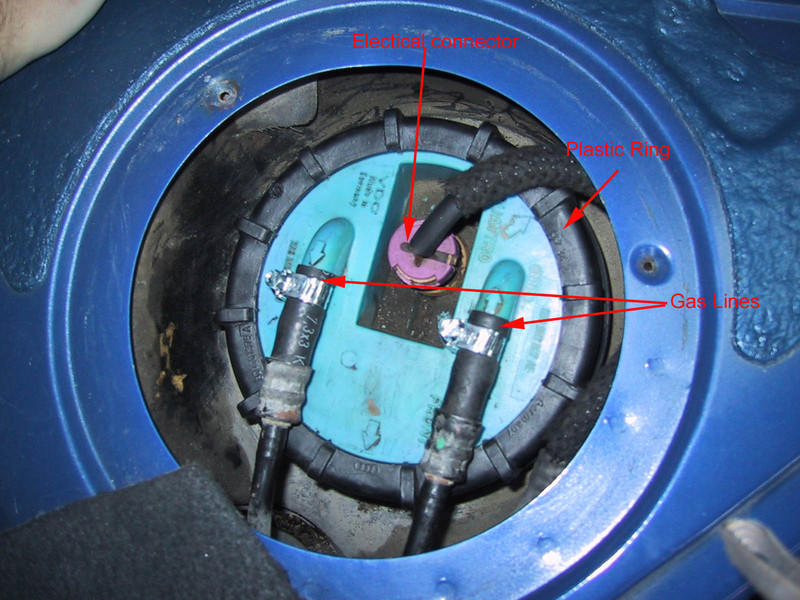
6. Remove the electrical connector by firmly lifting it straight up (it should pop off easily).
7. Clean the area up with a soft brush and vacuum cleaner.
8. Losen the factory hose clamps by working them open with a screw driver (or some such tool). These are a pita to pull off - do not use excessive force and be patient! Place a rag under the hose as there may be a small amount of fuel leakage.
9. Work both hoses off by pushing on the hose from the connector side - while pulling from the other side.
10. Once both hoses are off, use a hammer and screw driver to gently drive the black plastic ring counter-clockwise (put screw driver on an angle on the 'nubs') until you can losen it by hand. Remove the black plastic ring completely.
11. Pull up the fueld pump cover plate and locate the large rubber gasket seal. Remove the rubber gasket by working it free from the fuel pump cover (note the gasket orientation).
Here's what mine looked like:

12. Intall the new gasket making sure its in the correct orientation (the gasket is only about $20 and is usually stocked by Audi).
13. Carefully replace the fuel cover. MAKE SURE THE SEAL BETWEEN THE GASKET AND THE FUEL TANK FITS PERFECTLY by working the gasket in place in a circular manner. Make sure there is no binding or pinching of the rubber material.
14. Replace the black ring by hand while you're pushing down on the fuel pump cover until it bites cleanly. Tighten it up by hand - then give it a few taps with a hammer/screw driver to make sure its snug.
15. Replace the hose clamps with new 1/2 inch galvanized clamps and secure firmly.
16. Replace the electrical connector.
17. Reconnect the battery and reinsert the fuel pump fuse.
18. Start the car and look for leaks before replacing the fuel pump service cover.
19 Once you've verified there are no leaks, replace the cover.
Gasket part number:

3 comments:
For those that are having trouble with the part number, its 1J0-919-133A.
where did you get your parts
where did you get your parts
Post a Comment