I have had several people ask me how difficult it is to change a Quattro fuel filter.
Well Today one of my customers, Gopal, was nice enough to loan me his BRAND NEW digital camera for some pictures of a change and Andrew was nice enough to host them for me! Thanks Gopal and Andrew!
The car is a 1999 A4Q with APR Stage III. It was NickS's old A4. This car has 30,000 miles on it and I must say that the filter is VERY plugged--it was VERY difficult to blow thru it.
The filter has most likely been restricted for 15k miles.
CHANGE YOUR FILTER AT 15k intervals! :)
FUEL SUPPLY IS CRITICAL!!
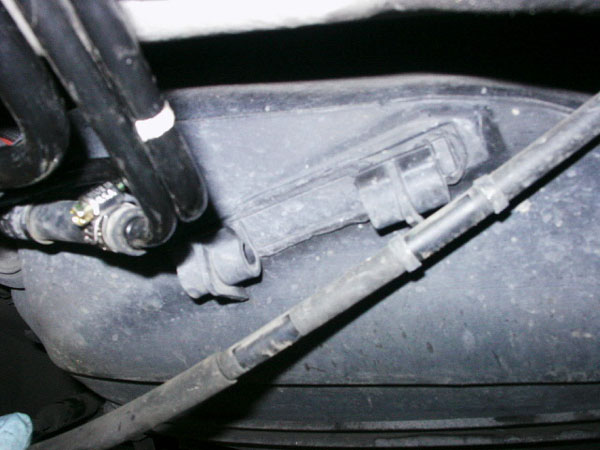
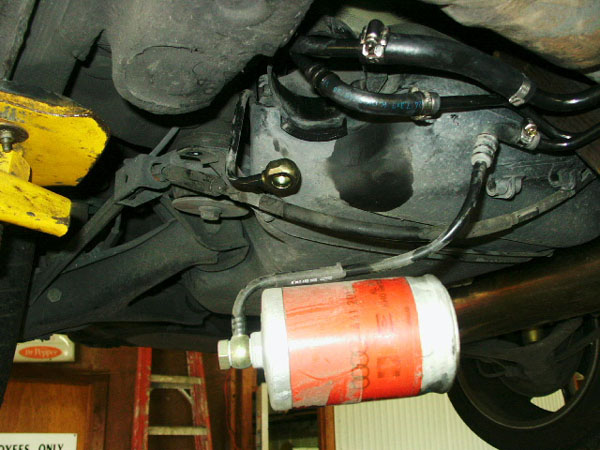
The fuel filter is located on the passengers side, rear of the car on the front/side of the fuel tank. (see photo)

*STEP 1*
There are 4 13mm bolts that hold the tank straps to the body. remove them. No need to remove the straps.

*STEP 2*
Disconnect the cable from the front of the tank. There are 2 plastic clips on the tank.
*STEP 3*
Using a pry bar or something like it GENTLY pry the front of the gas tank down enough to slip a 2x4 up and kind of on top of the tank. this will hold the tank in the downward position.
*STEP 4*
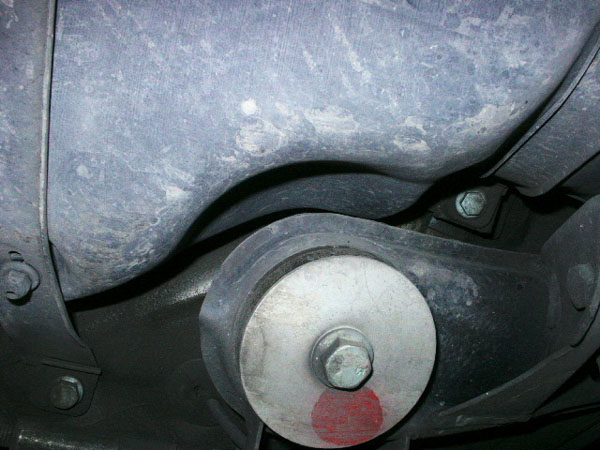
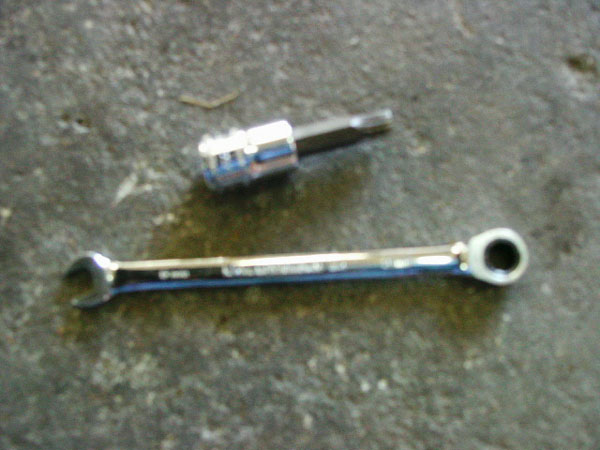
I use a 8mm 12pt 3/8 drive allen and a 8mm ratcheting gearwrench to remove the bolt that holds the filter strap to the side of the tank.
REMOVE THE BOLT (see photos) IT IS VERY CLOSE. there is not enough room for a ratchet on the end of the socket.
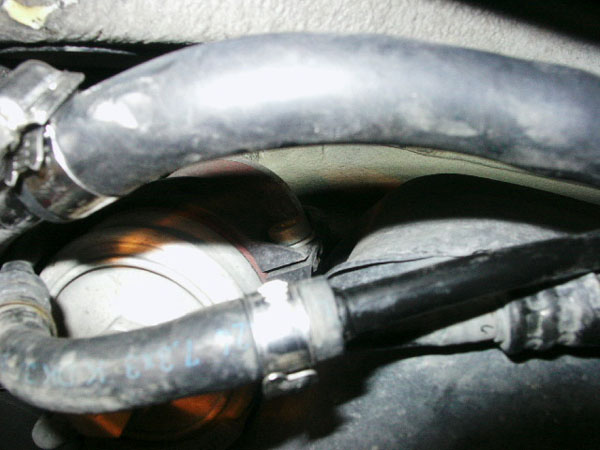

*STEP 5*
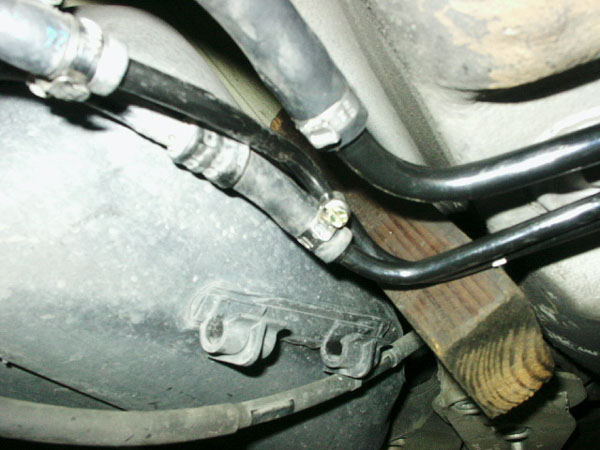
Remove the lower banjo bolt attaching the fuel line to the filter. 19mm socket. CAUTION: THE FUEL SYSTEM MAY BE UNDER PRESSURE AND FUEL WILL SPRAY OUT AND LEAK FOR A MINUTE WHEN YOU LOOSEN THIS BOLT (MAYBE A PINT OF FUEL). HAVE RAGS HANDY. Pull the line out of the way.

*STEP 6*
You will now be able to grab and pull the filter down and out. and be able to disconnect the 17mm banjo attaching the other line to the filter.
There is no way possible to reverse the lines or the filter. They have one large and one small hole where the lines attach.
*STEP 7*
Make sure to replace the sealing washers when you replace the filter. Your local dealer SHOULD have them in stock. Replace filter in reverse order!
GOOD LUCK!
LASTLY, if you want to tell just how plugged your filter was simply blow thru the new one to get a baseline good reference then clean the old filter and blow thru it in the direction of fuel flow. Test this for yourself and see how plugged they can be.
15 comments:
Wow great write up. Worked for my 2000 Audi S4. In a pinch I used a T40 3/8 drive instead of the 8mm 12 point with the 8mm ratchet wrench.
Thanks!
Great work! I am hoping the same best work from you in the future as well. In fact your creative writing abilities have inspired me to start my own Blog now.
Gas Placement
I used a 6mm 90 degree allen but ended up tearing the nut on the opposite side loose from its stationary housing. I had to use a hacksaw to remove the bolt for the plastic holding bracket (I live in Wisconsin so it was very rusty especially with 150,000 on my 99 a4; I'm going to use a heavy duty zip tie in place of the bolt).
The 19mm bango was a rusted hassle too, I had to use a bench grinder to slim down a 22mm wrench to fit on the collar of the filter to give me leverage. I ended up having to hold the collar with the 22mm and use an impact wrench set on the lowest setting to knock the 19mm collar bolt loose, used a bunch of PB Blaster with plenty of tapping.
Oh yeah; thanks for the write up, great work!!! :)
OK, I just completed this tonight as well and I really appreciate the write-up. Two things: Step 4: Forget it. I had to get out the sawzall and saw that bolt off of there too. I initially replaced it with a zip-tie, but after having to take the filter down a second time, I busted the plastic strap, so, I'll be fashioning some sort of a keeper to restrain the filter. Also: My original filter had a simple metal washer at the banjo bolt, one of the attachments to the after market filter was secure, the second one sprayed gas like a sprinkler under pressure. I bought nylon washers to install as shown in the write-up and stopped the leak. Good luck with this. It made all of the difference and my A4 has it's "zip" back!
OK, I just completed this tonight as well and I really appreciate the write-up. Two things: Step 4: Forget it. I had to get out the sawzall and saw that bolt off of there too. I initially replaced it with a zip-tie, but after having to take the filter down a second time, I busted the plastic strap, so, I'll be fashioning some sort of a keeper to restrain the filter. Also: My original filter had a simple metal washer at the banjo bolt, one of the attachments to the after market filter was secure, the second one sprayed gas like a sprinkler under pressure. I bought nylon washers to install as shown in the write-up and stopped the leak. Good luck with this. It made all of the difference and my A4 has it's "zip" back!
Good job! I have some post about fuel filter symptoms.
The triple square bolt turned no problem using 6mm allen wrench. Probably because it was just turning the nut on the other side. So bent the crescent shaped rib of plastic out of the way and grabbed the filter with a slip joint wrench and twisted it out. Problem then became the upper fuel like has to come down through the same strap, and all my twisting kinked the plastic fuel line. Now I'm shopping for the repair kit for the fuel line, or for the par from the dealer. But when I saw how clogged the old filter was, and the dirt that came out, this project is worth it, car got to 152k miles on orig filter (barely).
If you lube filter housing use a ratchet to wiggle back and forth the filter will slide down without removing bolt install just as easy
The clamp bolt was completely seized and rusted on my car.
Instead I decided to bend the lower lip of the bracket with some big pliers.
Then grab the filter with wide jaw pliers and yank it down gently.
I still had to loosen the fuel tank straps so that I had enough room to get a good grip on the filter.
After installing the new filter i was able to bend the lip nearly back into position so that it would still support the filter.
what size are the sealing washers that go on either side of the fuel filter?
Thanks alot for this information, it's great! I had just started taking fuel tank straps off and the tank is still not removable. I have it jacked up on jack stands on floor and that's really hard to work under there. Now I know the trick you showed, it's gonna be a life saver! Thanks buddy!
What a pain in the ass this was! It took me 4 weeks to change it out. I was given the wrong filter from Napa, then I couldn't loosen the straps, the fuel line cracked so I had to finger out a way to connect a 6 inch fuel line to the old line, then the copper washers kept leaking... I'm bolting the tank back but am having more issues with that! Audi can kiss my ass! I want to lite it on fire!!!
Great DIY guide, this Audi A4 fuel filter replacement walkthrough is clear and practical for anyone serious about proper car care. For drivers who prefer expert help instead of DIY, finding a kwik kar near me makes routine Auto Repair and Car Repair and maintenance much easier. A trusted kwik kar near me offers complete Automotive Repair Services, from fuel system work to Car Maintenance and inspections. Choosing a professional Auto Repair Shop or Car Repair Workshop ensures long term reliability and safety. Many vehicle owners search kwik kar near me when they need dependable Auto Care, fast Vehicle Repair, and honest Car Repair Services from a reliable Vehicle Repair Shop like Kwik Kar Auto Dallas that understands real world driving needs.
Your collision repair in Hollywood Florida approach looks professional and efficient, making repairs stress-free for car owners. collision repair in Hollywood Florida
Post a Comment