Audi DIY, Audi A3, Audi 100, Audi Convertible, AudiCoupe, Audi RS6, Audi S2, Audi A4, Audi S4, Audi A6, Audi S6, Audi A8, Audi TT, Audi Q7, Audi Allroad

Audi A8 Retrofitting Tiptronic Controls to a 97 A8

1997 U.S. bound A8's did not come with Tiptronic transmission controls. They were suppose to come with them, but due to EPA fuel standards, the 1997 model year did not come to the states with Tiptronic.

Owning a 97 A8, I really wanted to have Tiptronic after I purchased my car. Thinking that it was almost impossible, I had researched putting a six speed manual transmission in the car from Europe. While studying all the wiring diagrams, it was determined that the wiring diagrams for the 97, 98 and 99 were all the same. They all showed the tiptronic controls in the schematics. So I researched the project and determined that the transmission control unit (TCU) was already wired for the tiptronic controls.

The following article is a step-by-step procedure to retrofit tiptronic controls to a 1997 A8. This is not a difficult task, but it's not easy. This article gives you all the information that you will need. However, if you don't know how to read a schematic or don't understand how electricity works, there is a possibility of doing something wrong. If attempting to do this upgrade, please study this procedure in detail multiple times before attempting.

Special Tools Required

Parts Required

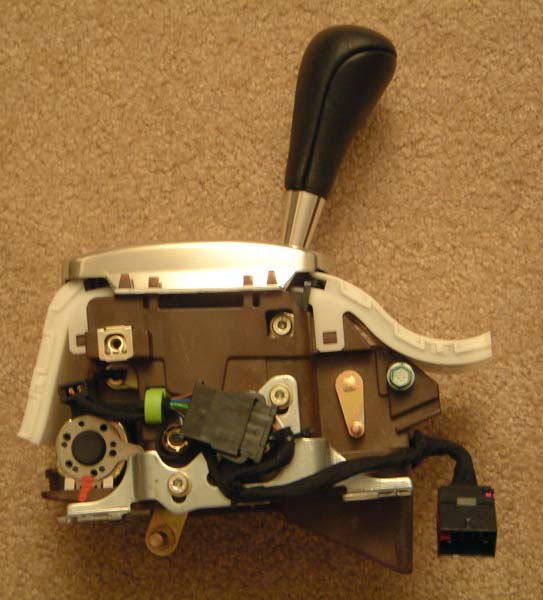
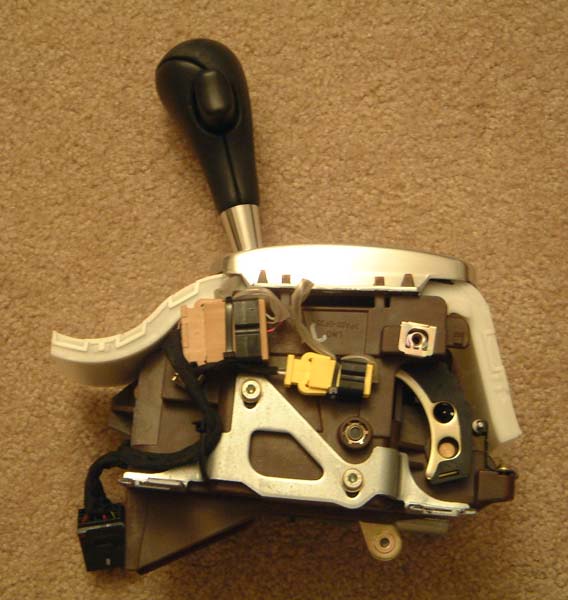
  • Complete Tiptronic shifter from a 1998 or 1999 parts car
  • RJ-45 computer network cable


Used tiptronic shifter. This should cost about $150 - $250 from a parts recycler.


Running the RJ-45 Cable
Three wires will need to be run from the transmission control unit which is located in the electronics box under the hood to the tiptronic shifter in the console. To accomplish this, a RJ-45 computer network cable is run. It has eight conductors, only three will be used.

The cable will be passed through the firewall to the electronics box from the passenger compartment. This is accomplished by fishing a hanger from the electronics box to passenger compartment, attaching the RJ-45 cable to it and pulling it through.

First remove the passenger side floor mat and carpet. You won't have to remove the console side panel until you are ready to install the new shifter assembly. Remove the four screws on the relay panel cover. This is the pressboard plate on the forward section of the passenger footwell.

Open the hood of the car and open the electronics box. The electronic box has phillips head screws holding it in place. There is one screw under screen, this screw can be removed by popping the plastic piece out of the screen right above it to gain access to the screw.
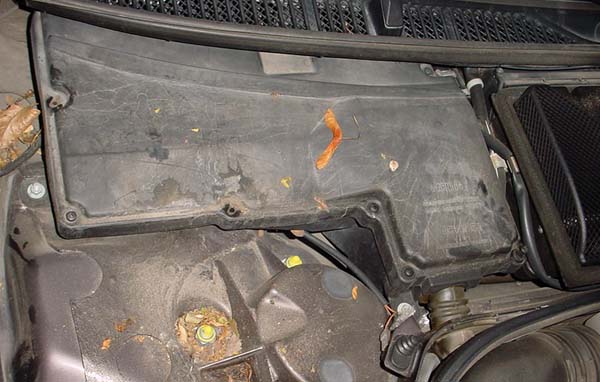
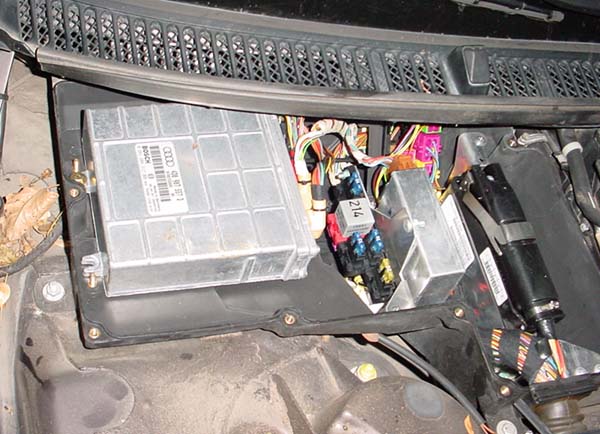


Electronics box cover removed. Remove 10 mm nut holding silver box
just to the right of the 214 relay to allow working room.


It is best to have two people to run the wire. Cut a coat hanger to be used as a fish. Ensure you remove the any sharp edges from the coat hanger to prevent damage to installed wiring. Remove the 10 mm nut holding the silver box to the right of the 214 relay seen in the picture above. Unbolt the support plate that has the stud on it for more working room, you'll need it.

Using a lubricant such as diluted dishwashing liquid or hand cleaner, lubricate the hanger. Insert the hanger into the location shown below in the back of the box. Be very careful and slide it along the installed wiring harness into the passenger compartment. This is where a second person is helpful. Make sure each person has a flashlight or drop light. The hanger will come out at the top of the relay panel. You'll have to peel the trim back to see it come through.
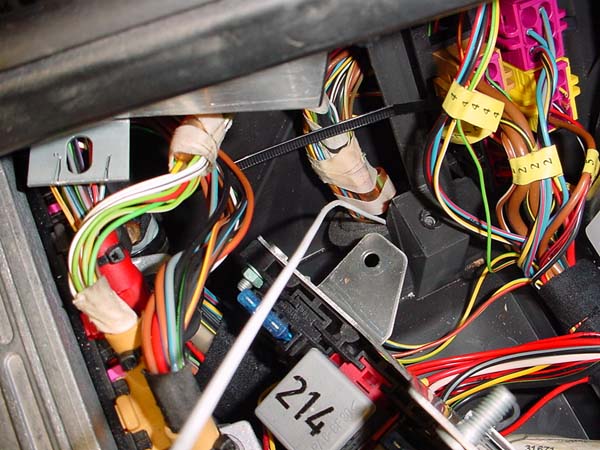


Insert the hanger through the wiring harness in the back of the box.
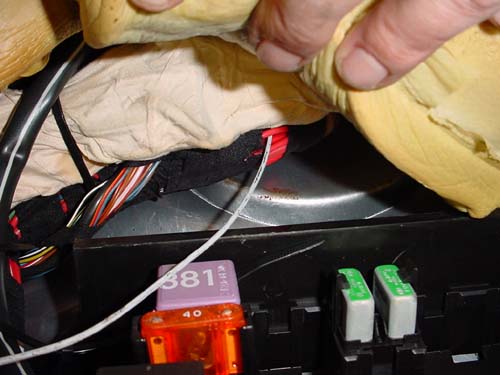


Hanger will come through at the top of the relay panel. You'll have to push the trim back to see it come through the installed wiring harness. Be extremely careful when pushing the hanger through.


Once it has been pulled through, attach the RJ-45 cable to it by securely taping it up. Lubricate the RJ-45 cable with hand cleaner or other type solution and have one person pull from the electronics box and the other should feed it from the passenger compartment. Pull it through to the electronics box. You will need no more than 12" of cable.
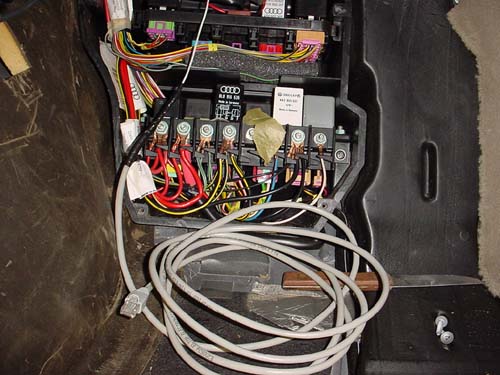


Attache the RJ-45 cable securely to the hanger and lubricate
before pulling through to the electronics box.
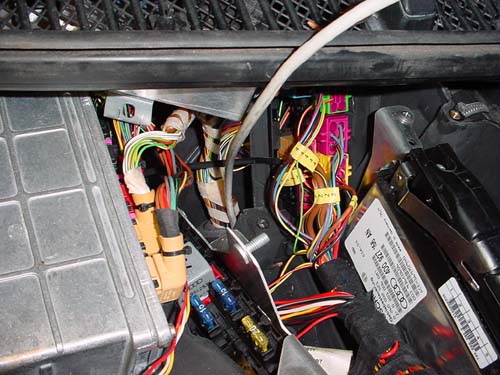


Pull the RJ-45 cable through into the electronics box


Connecting the RJ-45 Cable in the Electronics Box
Three wires will need to be cut in the electronics box and soldered to three conductors in the RJ-45 cable.

The three wires control:
  • Ground connection to switch into tiptronic
  • Ground connection to upshift while in tiptronic
  • Ground connection to downshift while in tiptronic
The following diagram shows these three ground paths. When the shifter is moved over into tip, the switch labeled "engage" moves over and grounds the path from the TCU to ground, energizing tiptronic. When the operator moves the shifter to upshift or downshift, it grounds that leg of the circuit from the TCU to ground, causing the shift.

These three wires are terminated in the electronics box at two 10 pin connectors, T10b (10-Pin Connector, yellow, connector station electronic box plenum chamber) and T10 (10-Pin Connector, blue, connector station electronic box plenum chamber).
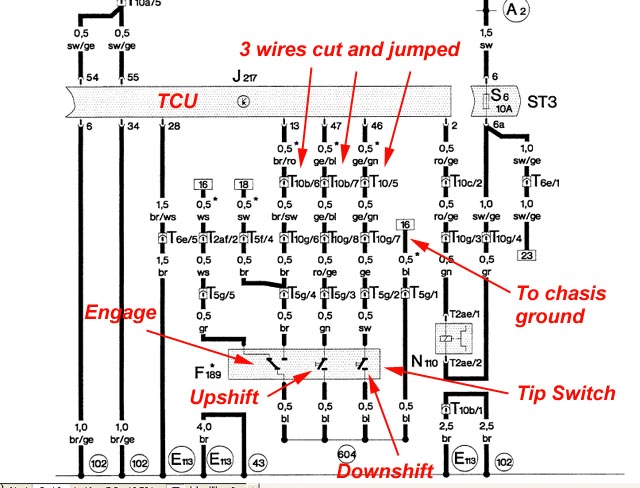


If you look at the wiring diagram, the wires on T10b (yellow connector) position 6 is br/ro (brown/red) and position 7 is ge/bl (yellow/blue), and the other wire is located on T10 (blue connector) position 5 is ge/gn (yellow/green).

Pull the yellow and blue connectors. Find positions 6 and 7 on the yellow connector and make sure you have the correct wires above. You will notice that on the other side of the connector there is no terminal in these positions, the wires are terminated at this connector. Snip the wires close to the connector so you'll have the longest wire possible to work with.

Do the same thing for position 5 on the blue connector.
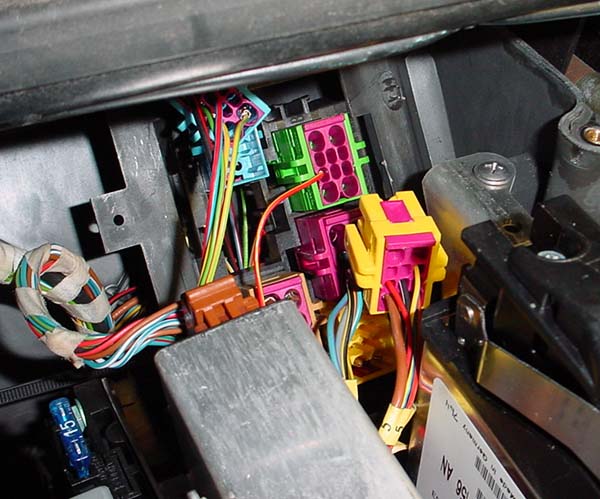


Disconnect the blue and yellow connectors and find the correct wires to cut.


EDITORS NOTE: I soldered the wires together, another alternative method is to crimp the wires together. However, if doing this, the proper crimper and lugs must be used. These wires are very small and require the correct size lugs and crimping tool for a reliable joint.

Once the wires are cut, reconnect the yellow and blue connectors. Strip the wires back in preparation for soldering them to the RJ-45 cable. Strip the RJ-45 cable back and strip three conductors. If you'd like to follow the wiring diagrams I did, strip the solid green, blue and orange wires of the RJ-45 cable.

Slide a piece of heat shrink tubing over one of the wires and connect the other wire to it. Solder the two wires together and heat shrink the tubing. Repeat for all three wires. Connect as follows:

- Yellow/Blue wire to Solid Green on RJ-45

- Brown/Black wire to Solid Blue on RJ-45

- Yellow/Green wire to Solid Orange on RJ-45
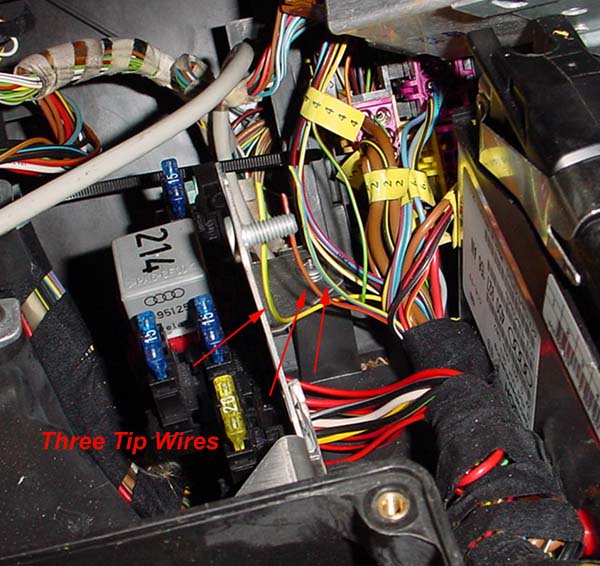


Three tip wires cut and ready to be soldered.
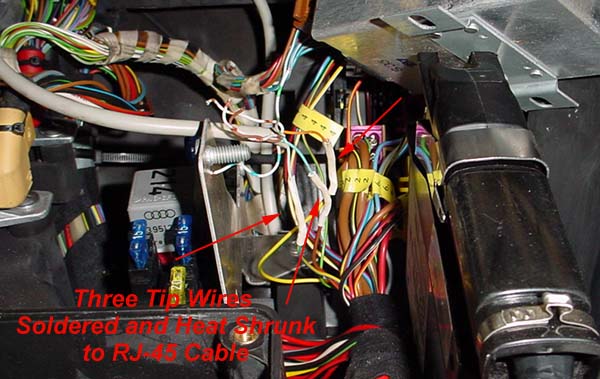


Three tip wires soldered and heat shrunk.


Once these wires are all soldered and the heat shrink tubing is shrunk, tape the wire up with electrical tape. Reconnect all the relay panels and put the silver box back in place. Tie wrap the RJ-45 cable in place. Do not place stress on the soldered connections, relieve the stress on these connections by tie wrapping around them.
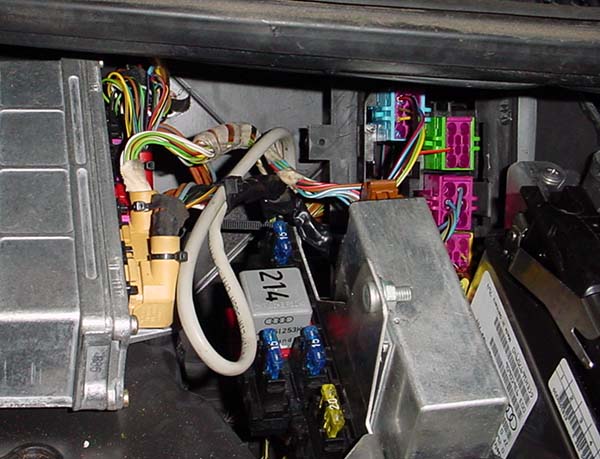


Tip wires connected, taped and secured.


The work in the electronics box is now complete. Put the cover back on the box. Ensure the gasket on the cover is properly seated.

Wiring the New Shifter
Once I pulled the console and removed the old shifter, I discovered that the shifter assembly wire connector and wire colors are different on the 97 non tiptronic shifter and the 98 tiptronic shifter.

I decided to determine which wires are needed to connect the 97 electrical connector to the 98 tiptronic wires. These wires would be cut and the 97 electrical connector spliced in. The 3 new wires will be connected seperately to the RJ-45 cable.

If you are not comfortable with reading the Bently wiring diagrams and performing this to your car, STOP NOW! I found that the wiring diagrams and the actual shifters didn't match. After studying it for a while, I figured out what everything is and matched it up. The following table is what worked for me. I cannot guarantee that your used shifter will match the one that I did.

Tiptronic Wire Connections for 1997 to 1998 Electrical Connectors
Wire Function 1998 Shifter Wires 1997 Wire Connector Wires
Shift Lock Solenoid Black/Yellow Gray
Shift Lock Solenoid Red/Yellow Green
Tip Backlight Grey/Blue Black
Ground Double Brown Double Blue
Tip Selector Light Double Grey/Green Purple
Tip Shift Yellow/Blue Green (RJ-45 Cable)
Tip Engage Brown/Black Blue (RJ-45 Cable)
Tip Shift Yellow/Green Orange (RJ-45 Cable)


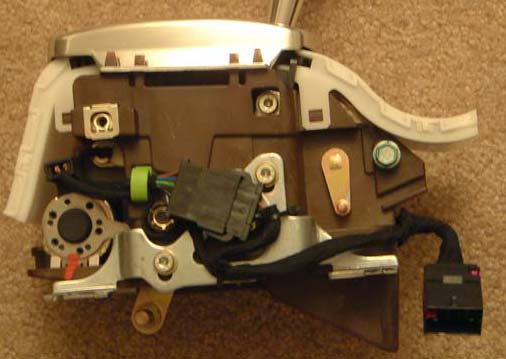
1998 Tiptronic shifter with electrical connector shown in bottom right of picture. This electrical connector is different than the 1997 non tiptronic shifter. It will be cut off and the 1997 electrical connector spliced on.


1998 Tiptronic shifter with electrical connector cut off. Cut it right at the connector so the wires are the longest. Notice the electrical connector in the bottom left of the picture.


Cut the electrical connector off the 1998 tiptronic shifter. Cut it as close to the electrical connector so the wires will be as long as possible. Pull the electrical tape off that wraps the wires. Verify that your shifter assembly has the same color wires as in the table above. If so, you can proceed, if not, you'll need to create a new table by tracing the wires.

Cut the electrical connector off the 1997 non tiptronic shifter, cut the wires as close as possible to the shifter to make the wires as long as possible.

Strip the wires and connect per the table above. Prior to connecting the wires, ensure the heat shrink tubing is on the wire. After connecting the wire, solder it and move the heat shrink tubing over it and shrink it in place. Perform the first 5 wires, leave the 3 tiptronic wires alone for right now. Tape up the wiring with electrical tape in a similiar fashion to the factory taping.
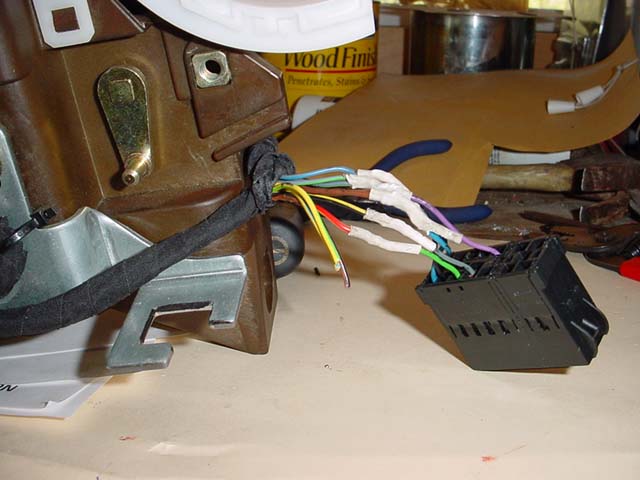


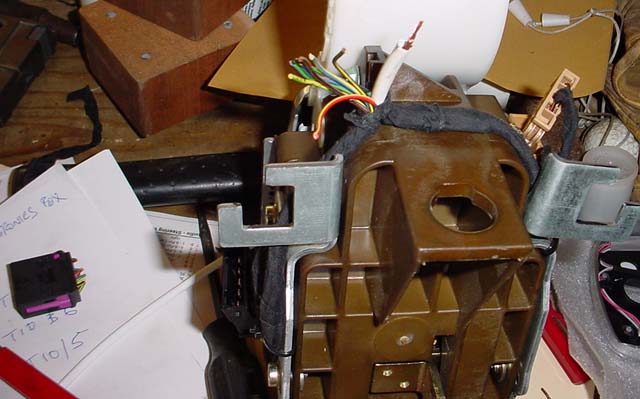
1998 tiptronic shifter with 1997 electrical connector attached. Note that the three tiptronic wires are not connected at this time, they will be connected to the RJ-45 cable later.


Reinstall the shifter to the car. Attach the shifter cable and shift lock cable. They shouldn't require any adjustment.

Mount the shifter back into the transmission tunnel. Be careful not to push the transmission cable gromet out of place! If so, you'll be sucking fumes after you shut down the car. Just make sure you look at where the cable passes through the transmission tunnel prior to installation. Make sure the gromet stays in place.

After the shifter is in place mechanically, you will need to make up the 3 tiptronic wires to the RJ-45 cable. If you use the wire configuration in the electronics box that was outlined above, connect the wires as in the table above. If you didn't use the same wiring method that I used in the electronics box instructions above, determine which wires need to be connected.
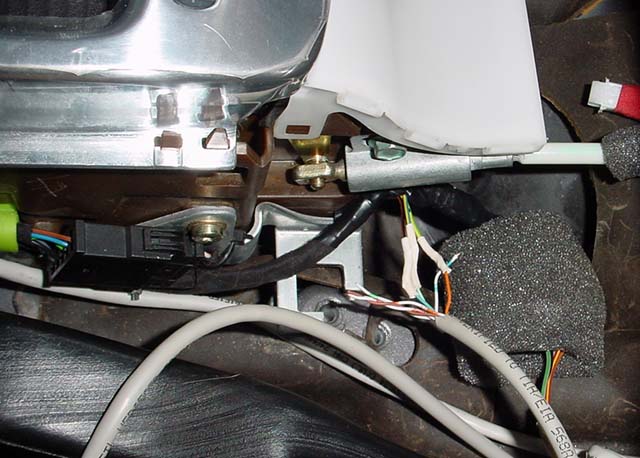


1998 Tiptronic shifter installed. Electrical connector is made up under foam, RJ-45 cable is wired (soldered and heat shrunk) to the three tiptronic wires. A nice upgrade to this installation would be an electrical connector for the RJ-45 cable wires.


Now that the tiptronic shifter is installed and wired up, it's time to test it. Start the car, with your foot on the brake, shift into drive, ensure the shifter shifts and the dash lights are correct. Move the shifter into tiptronic and ensure the dash lights change to tiptronic mode. If so, your transmission appears to be working correctly! Run the shifter through all the standard gears. It won't shift out of first gear in tiptronic unless the car is moving.
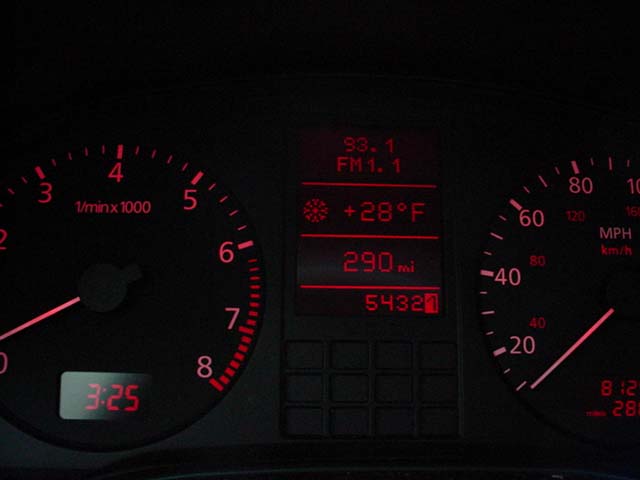


The dash should shift to 54321 when the shifter is placed in tiptronic.


Reassembly the console assembly and take the car for a test drive!

Audi A8 ZF Remanufactured Transmissions

ZF Vernon Hills Facility

If you are an A8 (or other type Audi) owner with the misfortune of a transmission that went bad and need a replacement, this article can help you out to get a quality rebuilt transmission at a reasonable price. This article is based on a personal visit to the ZF facility in May, 2003.

The manufacturer of the transmission, ZF Industries, has started an aftermarket remanufacturing program. This includes the 4 speed models found in the 92-94 100's, 95-97 A6 and V8 models. Five speed automatics include all transmission found in the A4's, A6's and A8's.

Click here to see a complete listing of ZF remanufactured transmissions (170K PDF file).

The remanufacturing is being performed at the ZF facility in Vernon Hills, Illinois. It's about 40 minutes Northwest of Chicago. This facility previously built new transmissions and did some remanufacuturing, but it is now solely dedicated to remanufacturing. Besides the Audi transmissions, ZF rebuilds BMW and other make transmissions at the Vernon Hills facility.

ZF is Supporting the Aftermarket
This is a new program for ZF, started in June 2003. Why is ZF now getting into this market? Because ZF feels this is the best way to service the market. To date (May 2003) most of the transmissions supplied to customers as rebuilt units are supplied through Audi's dealer network. They actually get rebuilt units from ZF in Germany. They are shipped overseas and then go through a distribution channel to the dealers. There are multiple mark ups, transportation costs, plus the core has to go back overseas. This leads to high prices.

ZF is also aware that many of these Audi's and VW's (they will be doing the Passat transmissions too, same as the A4 transmissions) are out of warranty now and there will be a greater need for a more economical repair method.

ZF will distribute the transmissions through key distributors and they will resell to transmission shops. In other words, you will only deal with your transmission shop. ZF will have rebuilt transmissions in stock and ready to be drop shipped to your transmission shop. The core goes back and it is rebuilt.

ZF has a test stand (input power and inertia loading) to test all transmissions. It has three loading devices, one for each axle plus one for the rear output shaft that would couple to the drive shaft. It is a required piece of test equipment to ensure a proper repair is completed.

The facility is extremely clean and organized. It has a HUGE amount of spare parts ready to go into transmissions, and some really neat ways to house them.

Audi A8 Automatic Transmission Noises and Troubleshooting


Symptoms of Noise
Two problems have been reported by A8 owners regarding their transmission.

One is a high pitched squeal, normally heard right after start up, and it can go away within 2-10 seconds, but sometimes it doesn't go away. If it does not go away, it usually gets barely audible once the transmission is at normal operating temperature.

If you have experienced this high pitched squeal from the transmission (it's usually very hard to determine if it's coming from the transmission, it almost sounds like a high pitched metallic noise), HAVE YOUR TRANSMISSION OIL AND FILTER CHANGED IMMEDIATELY! Do not drive the car any further than you have to. This could save you a huge expense.

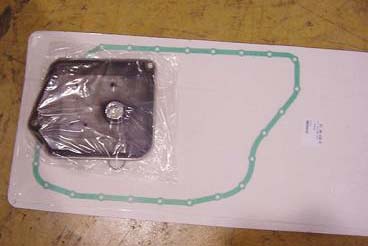
Do not use anything but transmission oil from the Audi dealer. Part numbers for the oil, filter and pan gasket for a 1997 are as follows. Make sure you verify your car's year with the dealer for the correct parts, the transmission changed after 1997, and during 1997, three versions were supplied.

  • 01L-325-429-A Filter
  • 01L-325-443 Drain plug gasket o-ring
  • 01L-321-371 Pan Gasket
  • G-052-162-A2 ATF Fluid (6-7 quarts required)


Here is the kit you will need. Buy it from Wendy Hager by emailing her. She use to be a parts manager at an Audi dealer, now on her own. Very knowledgeable person!

She sells it for $23.95 plus shipping for the filter, pan gasket and drain plug o-ring. Dealer list price (what I paid when I had it done): $80.64.


Here is the procedure to change the fluid and filter on the A8. The pan does not have to be dropped if you follow the procedure and get the right tools.

Symptoms of Thump
Prior to the transmission squealing, you will most likely notice a change in the transmission operation. This can happen for months before the noise.

The transmission produces a "thump" in the drive train, normally most noticeable on flat ground when at very low throttle positions in 5th gear (around 65 MPH). Once the driver lifts off the gas for traffic, the engine RPM's lower approximately 500-1000 RPM, followed by an increase in RPM, causing the transmission to "thump" the drive train.

Essentially, the torque converter is dropping out of lock out, then picking up again. It will continue to do this two or three times if the gas is not pressed after lifting.

If your car starts experiencing this, have the transmission serviced as above IMMEDIATELY!

The following is a very informative post from Dommi3 of Audiworld. He had all of the above symptoms and thought he had to have his transmission replaced. Please read carefully. Have the service completed if you have any of the symptoms.

NOTE:
The follow is regarding a 1997 A8. In 1997, Audi supplied cars with three separate transmissions. The type of transmission can be determined by the date code of the car:

  • 7/96-11/96 DPZ
  • 11/96-2/97 DSM
  • 3/97-1998 DTE
This transmission was of the DSM type.

Dommi3's Problems and Solutions
Today I picked up my car after getting a major transmission flush using the factory Audi mineral based transmission fluid and changing the transmission filter, pan gasket and O-ring. I was very close to having to replace the transmission or should I say junk the car. Instead, doing a good transmission flush and filter replacement using the proper fluid does seem to have at least temporarily, solved my problem. I'm grateful for that. Here's what I learned.

I feel the people that know these transmissions best are the few companies I spoke with (thanks to your responses) that rebuild the ZF transmission piece by piece. That is something that Audi does not do. Hands down, those companies are in agreement that the transmission on these vehicles take one type of fluid and one type only. It's very easy to hear a different story from the fluid manufacturers themselves. Swepco will tell you that their 714 fluid is as good or has even better properties and will easily work in your transmission and do it no harm. In many ZF transmissions that's quite possibly the case however the A8 transmission, is very unique and even very few authorized ZF Transmission rebuilders don't and won't get near them because of their unique design and characteristics.

I say no way don't do it!!!

I saw and heard what had happened only 3K miles after I had my system flushed and replaced with the Swepco 714 fluid, also quite an expensive fluid. Red Line apparently also makes a product that is compliant with the A8 transmission needs and specs. I personally would be really afraid to use it. The transmission is too damn expensive of an item to take a chance in my opinion and believe me, I'm all for saving a buck.

Next is the other important information I got from the ZF A8 transmission rebuilders and that is; although Audi makes the claim that it is a life time fluid, the rebuilders say they highly disagree with that idea of any fluid being life time fluid. They highly recommend at 50K mile intervals to drop the pan and replace the filter and the fluid even though it is very expensive fluid. They both agreed that doing this, it will prolong the life of this apparently bullet proof transmission. I will be following that program from now on religiously. One of the rebuilders for A8 Transmissions said by accident he discovered that the Audi mineral based fluid is in fact exactly the same product as the Esso product # LT 71141. Unfortunately, I think it's possible it's even more scarce than the Audi Fluid and even quite possibly more expensive. Audi right now is selling the fluid retail for approximately $14 per qt. Not cheap but in my opinion after what I just went through, well worth it.

Also, I found anyone that is authorized as a ZF transmission rebuilder for the Audi A8 transmission were willing to sell me what ever part I needed such as the pump if that was in fact my problem part. That part sold for approximately $250. Audi will not do that, they won't sell you just that part. Needless to say $250 beats the hell out of $7500 for a new transmission, that is your only option by having Audi trying to solve it. Unfortunately if it is the pump, it's just as labor intensive to get that one part replaced as replacing the entire transmission so labor won't be cheap. Both Audi ZF rebuilders made the claim that there are countless transmissions that have been replaced unnecessarily on these cars because of dirty filters causing further issues.

I hope this information comes in handy.

If anyone hears that transmission pump making a hydraulic squeal on cold starts, bring it in immediately and get this service, you'll more than likely save yourself somewhere between $9-11K replacing your transmission. Even if you don't hear that squeal, and have 50K miles or more on the car, I think it's an excellent idea to have the above mentioned service done, it can't hurt.

Once again, thanks to all of you for all of your input, the information you gave me on this forum helped immensely. Thanks!! Thanks!!! Thanks!!! I'm smiling again thanks to you.