skip to main |
skip to sidebar
Symptoms of Seal Replacement
The transmission output seal is the seal that seals between the rotating output flange (which is bolted to the drive shaft) and the distributor gear chamber. This distributor gear is filled with gear lube, it has the gears that drive the the transmission output flange and the final drive - front, on the forward bottom side of the transmission.
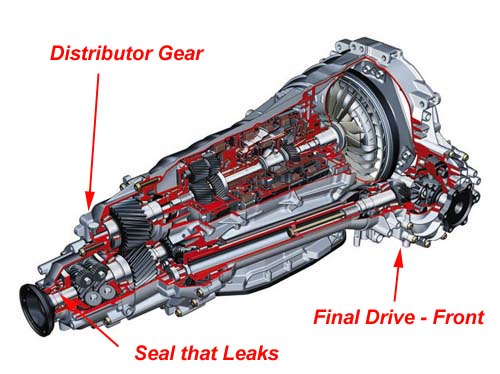
The seal that rides on the output flange can leak gear lube across it. Once it drips out, it falls on the left side catalytic converter. This produces a nasty gear lube oil smell when it burns off. It is most noticeable during hot weather after shutting the car down. If you smell gear lube burning (it has a very distinct smell), this is most likely your problem.
If you get under your car, you'll be able to see burned oil on the left hand catalytic converter. That will confirm your problem.
Parts Needed
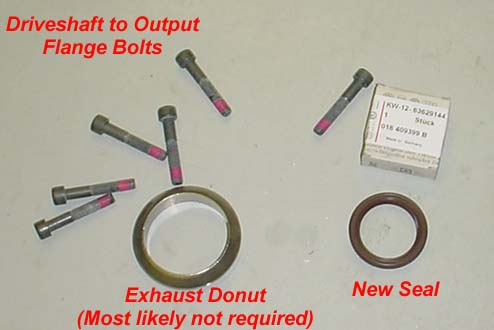
- 018 409 399 B Seal (about $20)
- 1 litre of gear lube (use only Audi product)
- (6) Output flange to drive shaft bolts (or you can reuse if you'd like, I replaced mine)
- (4) 8 x 40 mm high grade bolts
- (4) 8 mm high grade nuts
- (8) 8 mm washers
The 4 nuts, bolts and washers are to be used on the left hand side exhaust flange. The old hardware will be rusted and in need of replacement. I also purchased the exhaust donut which sits between the two flanges on the left hand exhaust, but it is most likely not needed. I did not use the replacement, the part is manufactured from steel, so it doesn't wear out.
Special Tools Required
- T40 torx (3/8" socket drive)
- T45 torx (3/8" socket drive)
- 8 mm (3/8" socket drive)
- 6 mm (3/8" socket drive)
- Rubber mallet
- 3/8" metric socket set with extensions
- 12 mm, 13 mm combination wrenches
Procedure
If you don't have a lift, or access to a lift, you can complete this procedure, but it will be much more difficult. Find somebody with a lift to help you out!
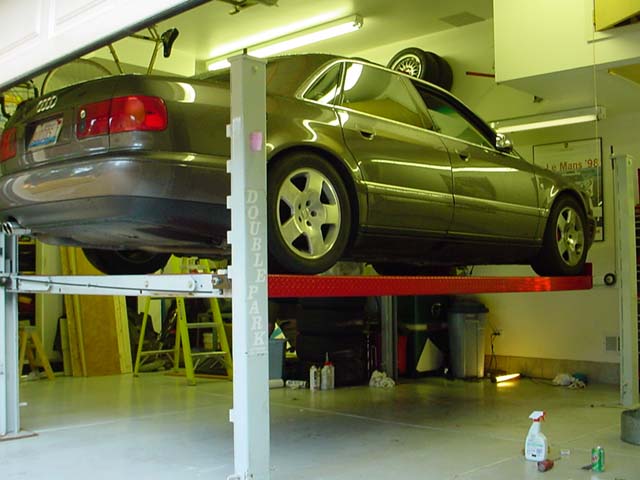
Paul Waterloo's A8 on the way up to perform the job. If you don't have a lift, you'll need to put the jack up on four jack stands so you'll have clearance to drop the exhaust and fill the distributor gear.
Put the car up on a lift or jack the car up and place on four jack stands.
Pull the exhaust system from converters to tail pipes as an assembly. Disconnect at crossover immediately behind catalytic converters.
Using penetrating oil, spray all four nuts. Loosen nuts about 5 or 6 turns, but don't remove from bolts. Make sure you loose all four nuts, the pipes will seperate where they want to. Use smooth, even, torque on the nuts so they break loose, then let them stand for a minute or so before unscrewing them. This will prevent excessive heat build up in the bolt causing it to break.
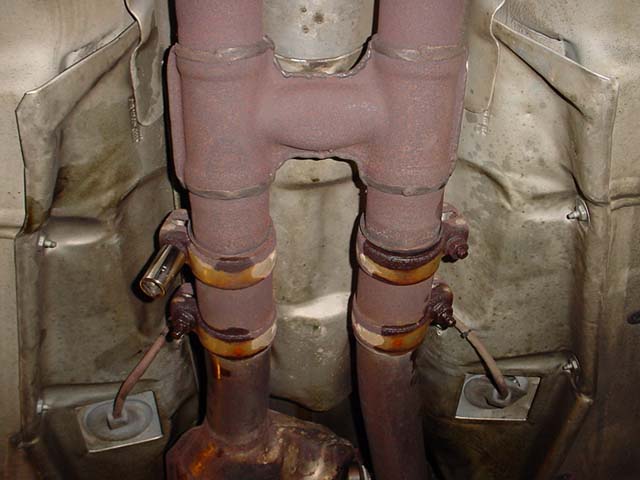
Loosen all four nuts, this allows the exhaust to come off any of the four pipes when removing the exhaust.
Once all four nuts are loosened, open the clamps with a large screwdriver. With help of a friend, drop the exhaust by removing towards the rear. It is held up by four rubber hangers, it's best to spray with a soap solution and they just pop off with via hand pressure if you push up on the exhaust. If you are doing this on jack stands, place a jack under the exhaust and support it.
Pulling exhaust towards the back of the car, the exhaust pipes should pull out and move it out of the way.
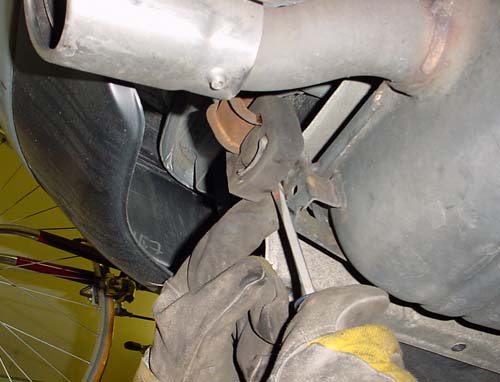
The exhaust hangers just pop off with a little force. It's easiest to remove/install them by pushing up on the exhaust and sliding them off. Lubricate them with some soap solution for best results.
Remove the four left hand exhaust flange bolts. On the 97's it was a 13mm bolt head and a 12 mm nut, on the 98 it was 13 mm on both sides. If they strip, you can cut them with a sawsall. Use penetrating oil on the threads. The exhaust donut will fall out when they are removed. Move the cat off to the side and rest on something suitable so the O2 sensor does not have to be removed.
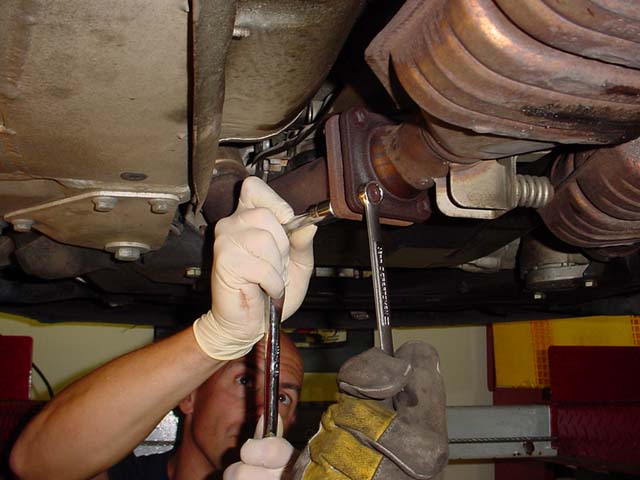
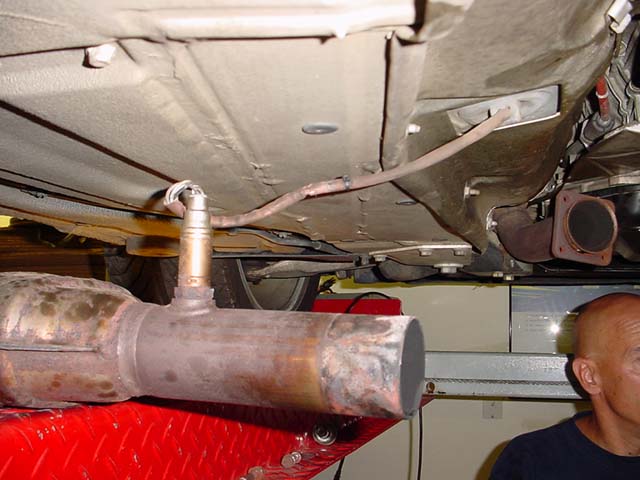
Left hand catalytic converter removed. What a nice design lift to do this job on! Rest it out of the way so the O2 sensor wire does not have to be removed.
Remove three heat shields, with the most forward one shown in the picture below first. They overlap forward to back. So when removing, remove the forward shield first. When installing, install the rear shield first. They are held in place with 13 mm nuts over studs, just bend them over the studs.
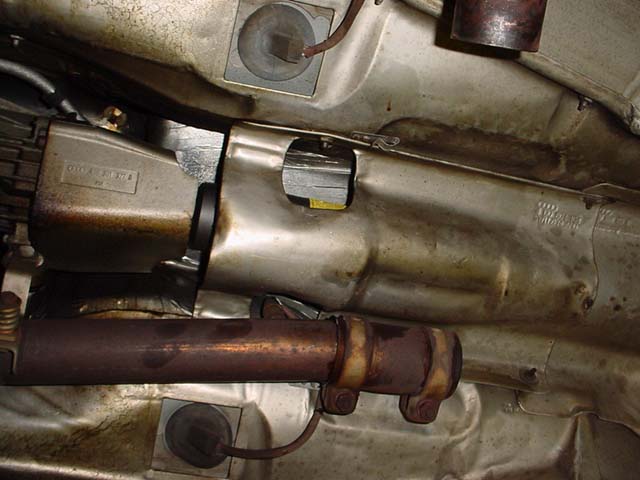
Remove heat shields (3) forward to back, install back shield to front. Note all the burnt oil on the bottom of the shaft output shield.
Remove the alloy front CV joint splash shield shown in the picture above. It is a Torx 45. Use a long extension to get to the two screws. Loosen one side, then loosen the other side, then remove the bolts, this will prevent movement of the shield protecting it from breaking during removal.
Loosen the driveshaft to output flange bolts, using a 6 mm hex on a 3/8" socket. If the wheels are in the air, use the parking brake to hold the drive train still.
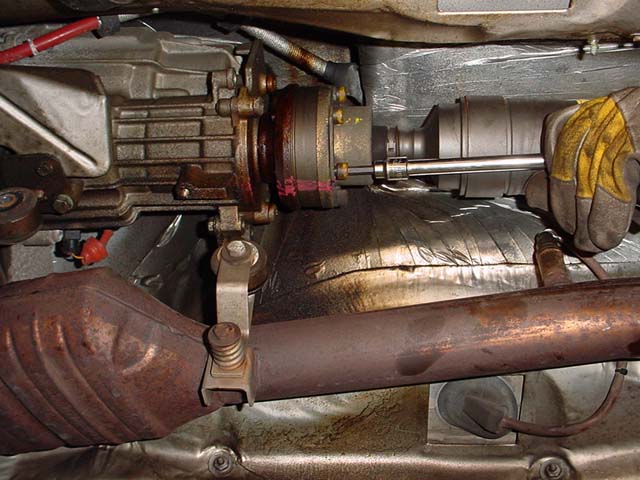
Removing driveshaft to output flange bolts. Use the parking brake to hold the drive train in place if the wheels are in the air. The forward end of the drive shaft is actually a CV joint.
Gently tap the CV joint (forward end of drive shaft) with a rubber mallet to unseat it. Take care not to damage the flange gasket.
Remove the shield just aft of the drive shaft center bearing. Remove the center bearing shaft support, noting position of mounting and very carefully remove the drive shaft rearward. Support it with a piece of wire to the forward right exhaust hangers so it doesn't get damaged. It is carbon fiber and must be handled carefully. Keep exposed CV joints and flanges absolutely clean. Cover them with plastic bags if they will be left open for an extended amount of time. Do not wipe off the CV joint grease.
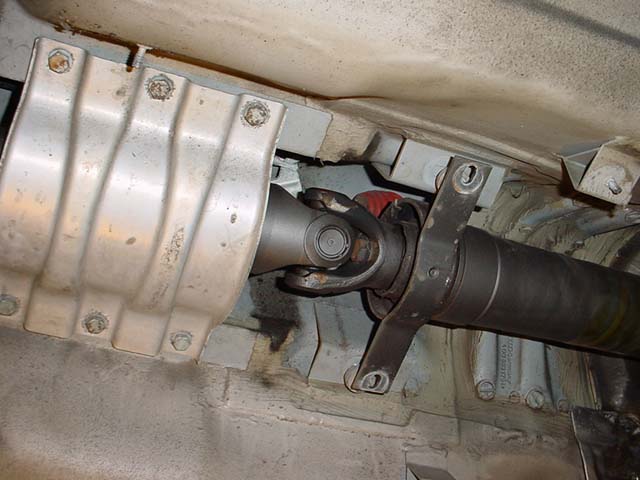
Remove shield and center support bearing. The center support bearing location should be noted prior to removal. You should be able to see the washer marks after removing it. Support it with a piece of wire to the forward right exhaust hangers so it doesn't get damaged.
Remove the final output flange using a Torx 40 socket. To hold the flange still while removing it, install two flange bolts and use a large screwdriver to hold the flange still. Before removing the flange, make sure you have an oil catch pan below, about 5 oz of gear lube will dribble out.
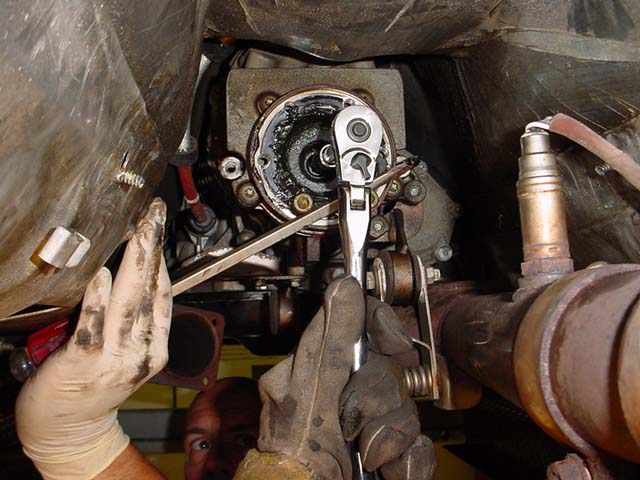
Use two bolts to hold output flange with a screwdriver when removing Torx bolt.
Pry out the seal using a screwdriver, take care not to score housing. Just bang on the screwdriver handle with your hand, using the housing as a fulcrum point.
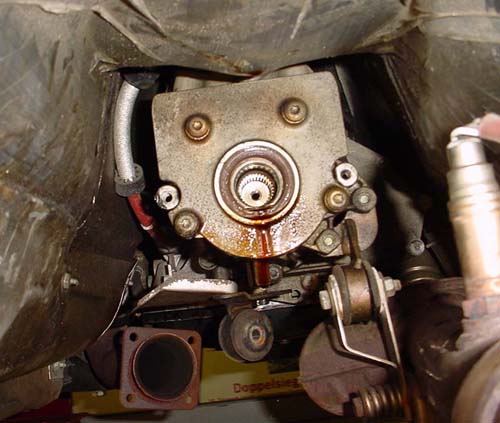
Transmission output shaft seal after removing output flange. Make sure an oil catch pan is in place.
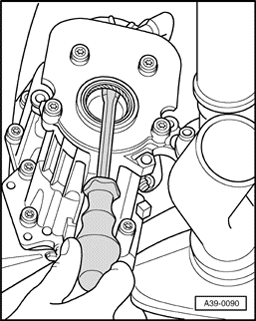
Remove the seal with a screwdriver.
Install the new seal flush to the housing. Tap in with a small hammer and seat with a large socket (1.5" or something suitable). Lube the inside diameter of the seal with a small amount of gear lube after it is installed.
Inspect drive flange. Polish seal surface with 1000 grit sandpaper or 0000 steel wool. Clean well. Reinstall flange and install center retaining bolt. Use lock tite on threads.
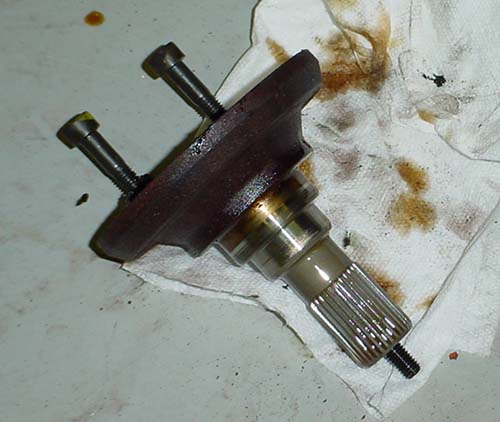
Clean the seal running area with 1000 grit sandpaper or
0000 steel wool to remove burnished area.
Remove the gear lube fill plug on the right hand side of the distributor gear with a 8 mm hex wrench. Open the gear lube bottle, it has a long nipple built in. Put the nipple in the distributor gear and fill the cavity until oil starts coming out, probably about 8 oz or less. Put the fill plug back in place and torque.
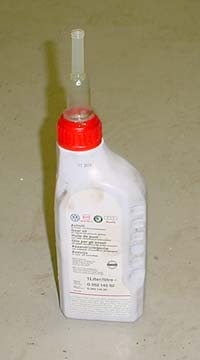
The Audi gear lube bottle has a built in nipple,
just squeeze the bottle and fill the distributor gear cavity.
Installation is reverse of removal. Torque the Torx bolt holding the output flange to 18 lb-ft of torque. Use new output shaft to drive shaft bolts. If using the old bolts, use loctite on them. Torque to 45-50 lb-ft.
Mount the rear support bearing in the same place as where it was removed.
When hanging the exhaust, first mount the left hand catalytic converter, and hand tighten the four flange nuts/bolts using new hardware. Then hang and mount the exhaust before tightening anything. After everything is in place, tighten all exhaust bolts. Use soap solution on hangers. Start car and ensure there are no exhaust leaks.
Problem
The F125 switch is a multi-function, multi-wafer electrical switch mounted on the side of the transmission. It is in the following circuits: gear selection through the TCU, cruise control, back up light, mirror dipping circuit and maybe more. This procedure was developed because the transmission was going into "limp home mode" on occassion. The fault code showed that it was a problem with the F125 switch. It can corrode over time or get soaked with oil.
Time
There was plenty of trial and error since I do not have a Bentley, but I have worked on cars throughout my life and I was able to figure it out. I started pulling tools and jacking the car up @ 4:30pm and was done putting tools away @ 12:30am. I did have take a few brakes and had some dinner during this time. Working with my step by step procedure it should take no more than 5 hours total.
Parts Required
The part is about $300 and can be bought from www.ecstuning.com.
Tools Required
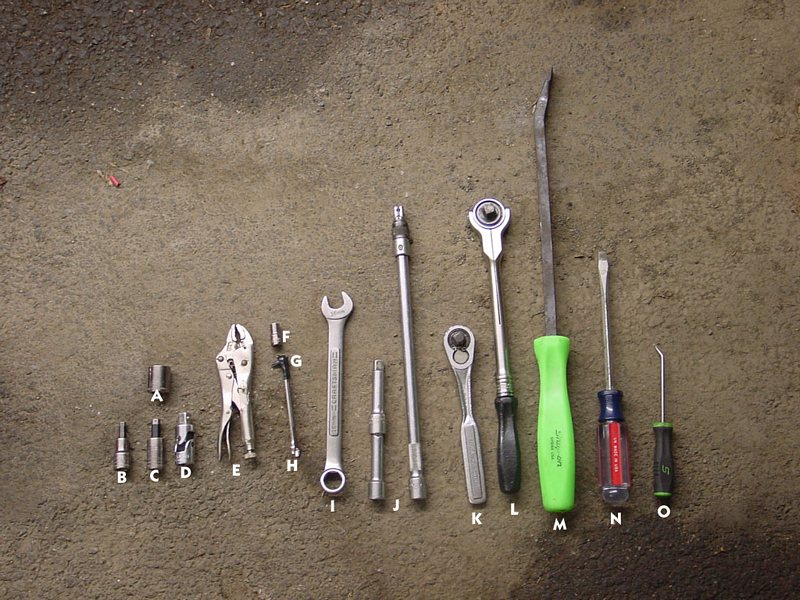
A= 16mm socket
B= 6mm hex head socket
C= 8mm hex head socket
D= 3/8 universal
E= vise grips to hold G (ground down torx)
F= 1/4 socket to hold G (ground down torx)
G= ground down torx (in open end wrench)
H= 1/4 open end wrench
I= 16mm open end wrench
J= extensions
K= 3/8 craftsman ratchet
L= 3/8 snap-on ratchet
M= pry bar
N= regular screw driver
O= pick
Procedure
Ok, so after I cleaned all of the oil out of the connector. I noticed a lot of corrosion on the contacts within the plugs.
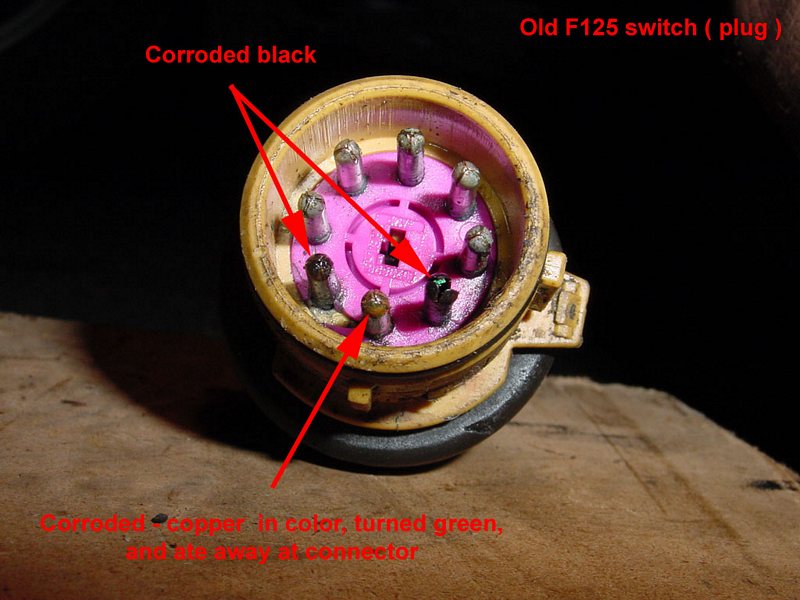
Old F125 switch, notice the corrosion on the contacts.
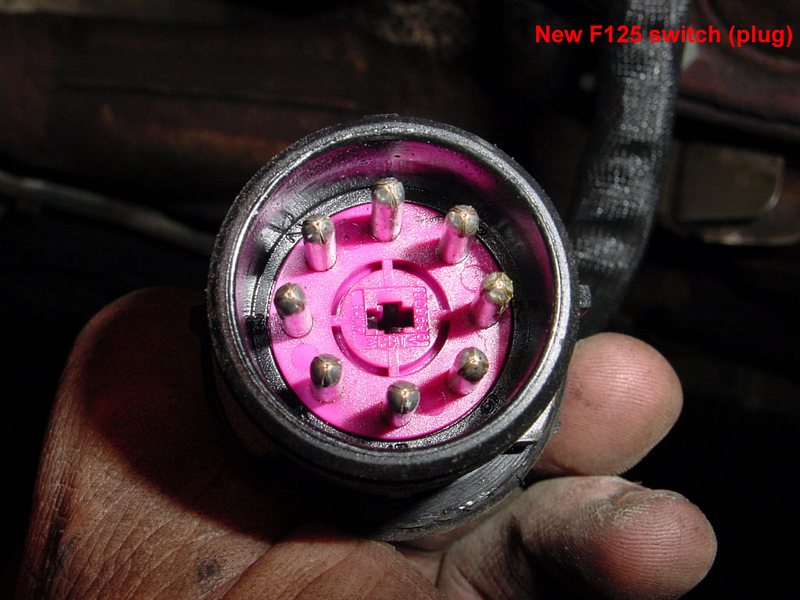
New F125 switch.
I plugged in the new F125 switch and tried it using a screwdriver to turn the switch, while my assistant sat in the drivers seat and told me what I was doing. The old unit did not work after I cleaned it very well, and the new unit worked 100%.
For bolt torque, please refer to your Bentley, or ask someone with a Bentley.
1) I did this on the ground, jacking the car up. The F125 switch is on the driver side of the car, so make sure to jack up that side.
2) Place jack stands at the rear and front locations.
3) Take off front wheel. This will make access to the areas much easier.
4) Turn the wheel to the left which will help with access as well.
5) Remove the CV joint shield:
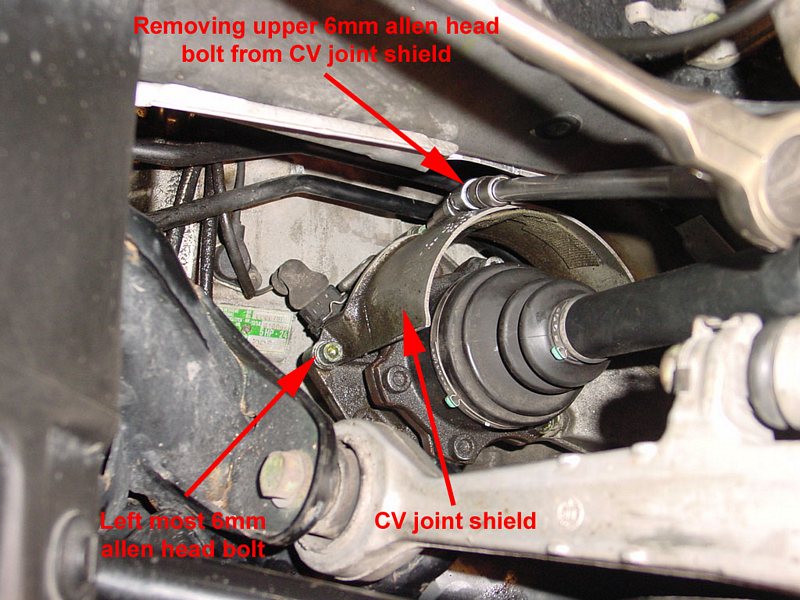
There are three 6mm hex head bolts. Using the 6mm hex head socket (tool B) remove them. The left and right ones are very easy, but use a long extension (tool J). The top most one is slightly blocked so I used a universal joint (tool D) at the bolt location which worked perfectly.
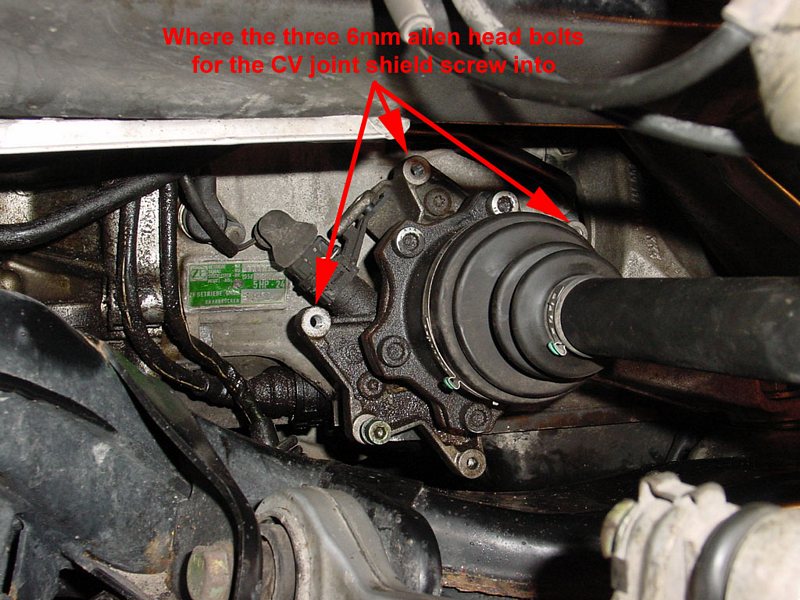
Remove shield. Access to the transmission support bracket will now be easier from the wheel well now.
6) Support the drivers side of the transmission with a small jack.
7) Remove the 16mm nut that holds the transmission mount to the transmission bracket:
This is a tight fit. I removed it with a (tool I) 16mm open end wrench, 1/6 of a turn at a time. Turn it as far as possible, then flip the open end over to change its angle, turn is again. Repeat over and over.
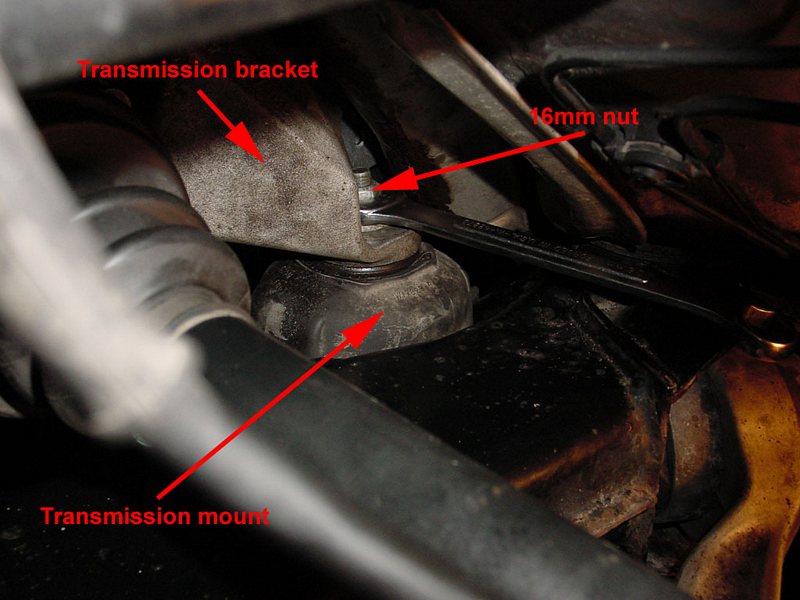
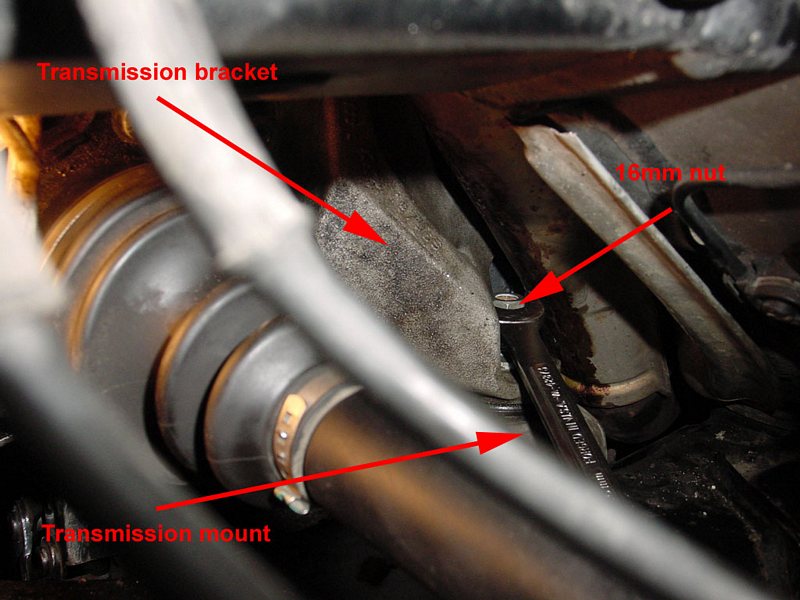
Once it is loose you can turn it with your fingers. Remove the washer under the nut you just removed. The transmission mount stays here for now.
8) Removing the transmission bracket:
There are three 8mm hex head bolts on the bracket but before we get to removing the transmission bracket, I want to let you know the top most bolt is a huge PITA. It is very far up, and it can barely see it. This requires patience, but is completely possible.
Top one:
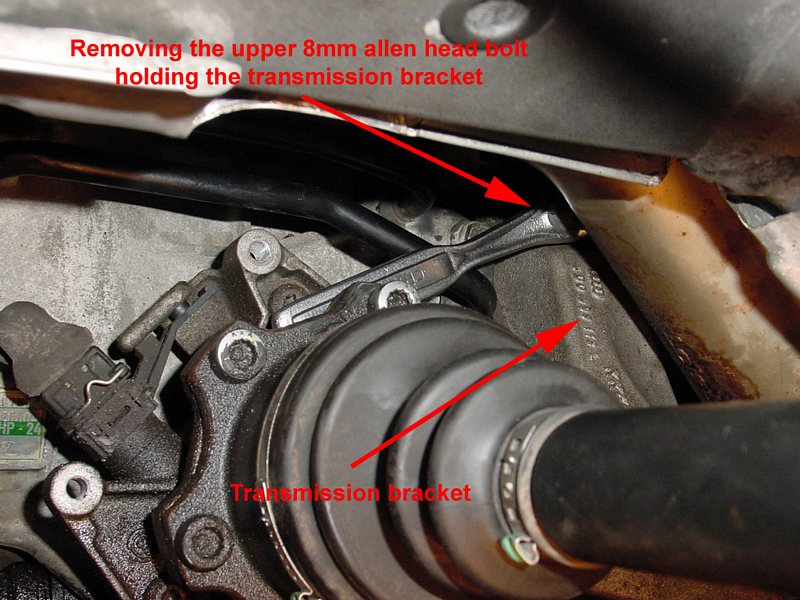
With just the 8mm hex head socket (tool C) in hand, I reached up and placed it into the bolt. Then I stuck my shorter craftsman 3/8 drive ratchet (tool K) on it. The motion to remove it is pretty easy, just pull it down to loosen it. Once it gets loose you can unscrew it with your fingers.
**This is harder to put back in and tighten than it is to remove. Be very careful when reinstalling it because if you drop the bolt, or the socket, you have to remove the bracket to find it (it always fell onto the top of the F125 behind the transmission bracket). I recommend when putting the bracket back in, do the top most bolt FIRST, so if you drop it, you do not have a lot of work to remove it to find the socket (I dropped the socket twice). Also, when putting it back in, screw in the top most bolt with your fingers as far as possible. Then stick the 8mm hex socket into the bolt, and turn it in further with your fingers. This will save time when reinstalling. BE CAREFUL NOT TO DROP IT. **
Right and left:
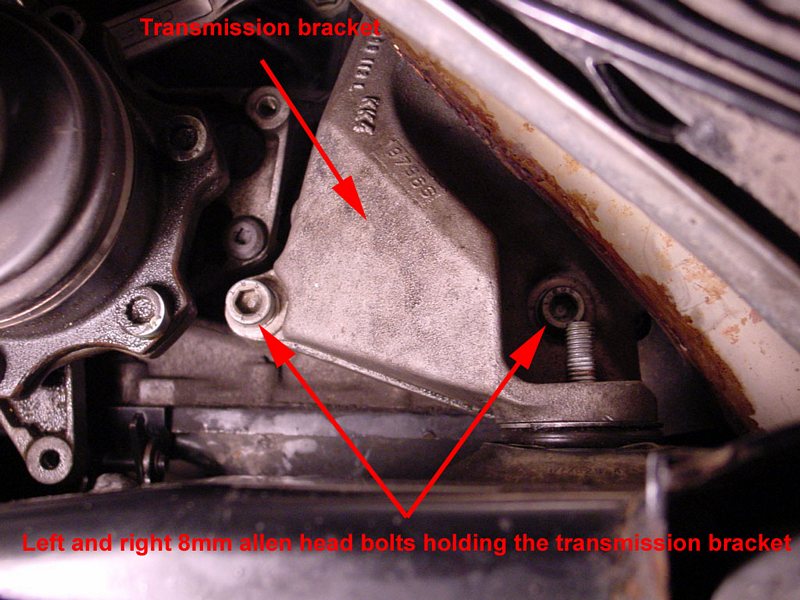
These are simple. Remove the left one with the same 8mm hex head socket (tool C)on your long extension (tool J). Note the left one is longer than the others. The right most hex bolt is right above the transmission mounts threaded shaft.
Once all three are removed the bracket will be loose, push it UP and out of the way.
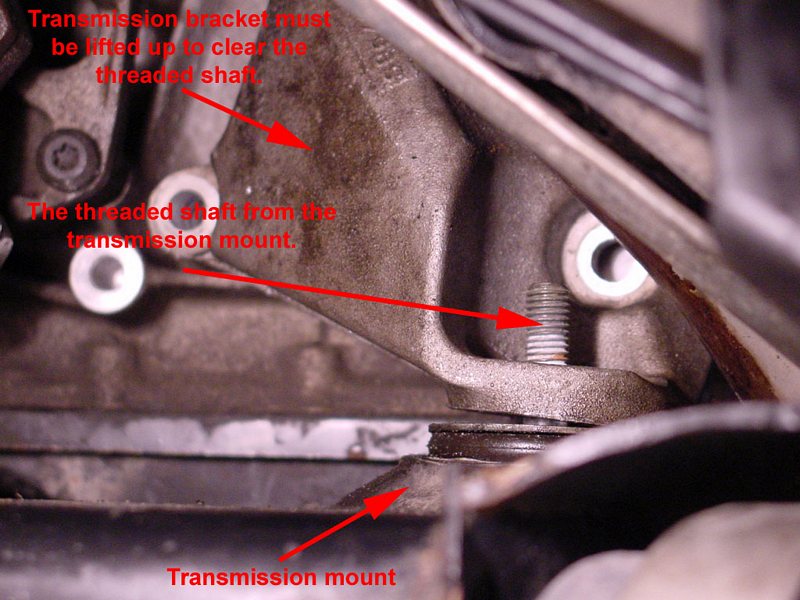
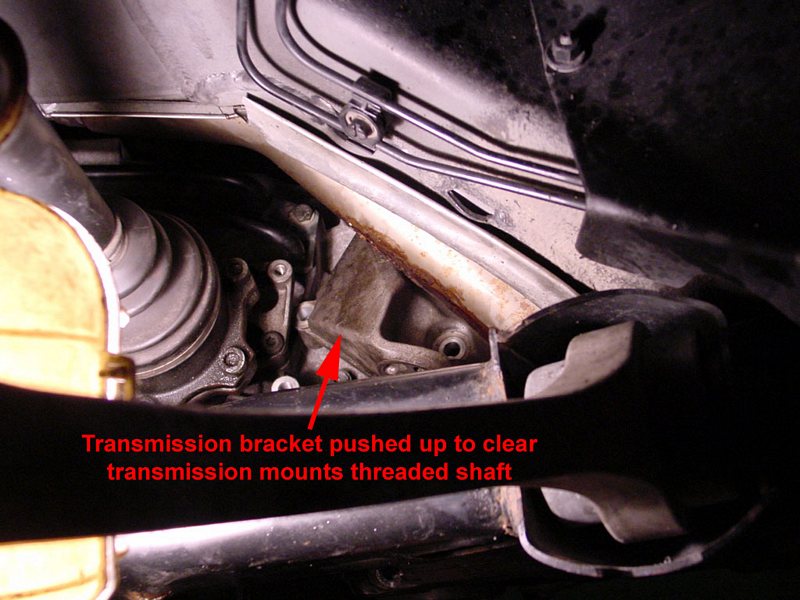
There is a way to place it so it will be out of the way, so you can remove the transmission mount easily during the next step.
9) Remove transmission mount:
Below the transmission mount there are two 16mm bolts you need to remove.
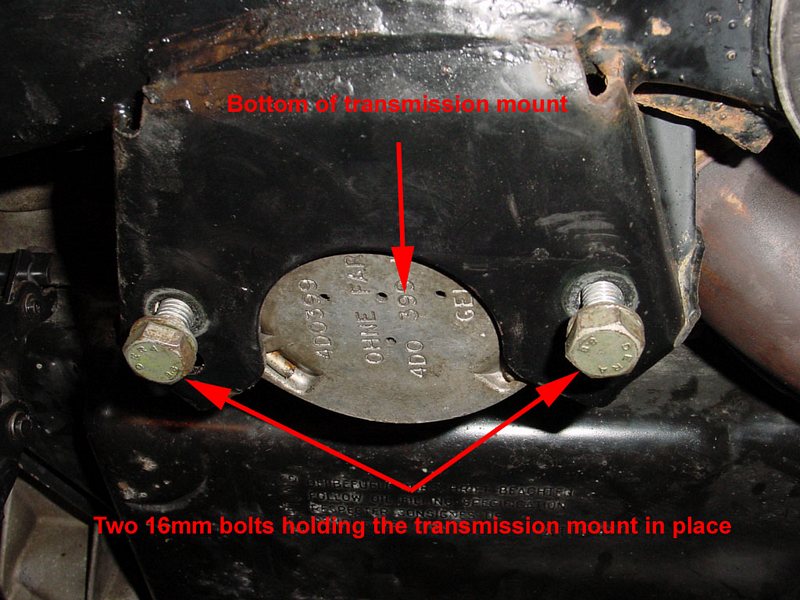
Once both are removed (using either tool A or tool I), and if the transmission bracket is out of the way, you can angle the transmission mount down and out of the car.
10) Remove the Transmission bracket:
Now that the transmission mount is removed, the transmission bracket will come out through the same place.
11) Remove the F125 switch:
There are two small torx bolts holding the switch against the transmission. Each bolt has a bracket to keep the wiring for the F125 away from the exhaust, NOTE the way they face before you remove them.
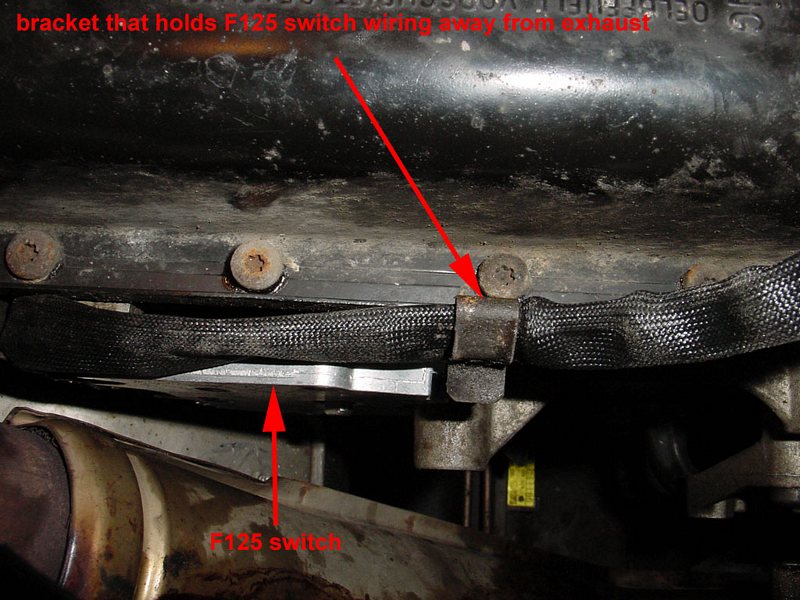
Front most torx:
The front most one is easy, just remove with torx (tool G with tools H, or F or E). I am unsure of this size, only because I ground it down past the size written on the torx to work on the rear torx. Sorry:O
The rear most one:
This is very close to the exhaust.
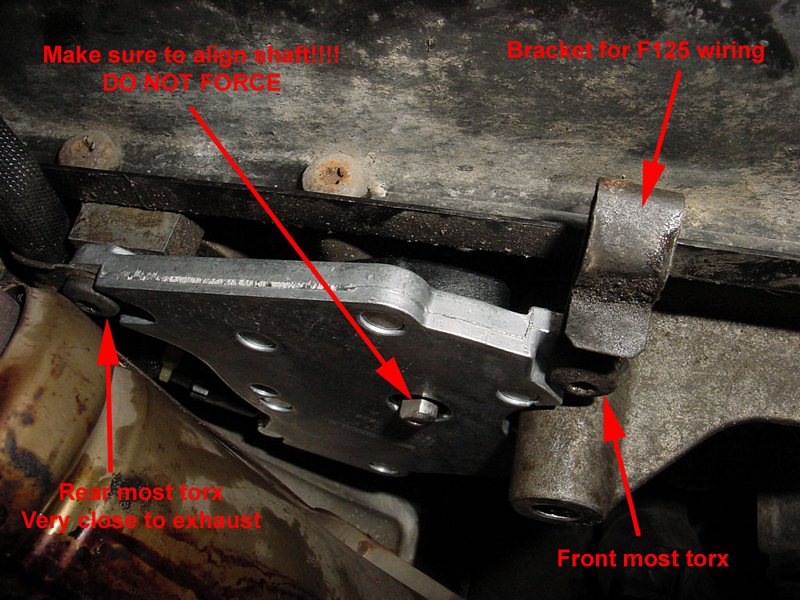
I chose to grind down the correct size torx instead of removing the exhaust header. I spent 2 minutes on the grinder, much easier than taking the exhaust off.
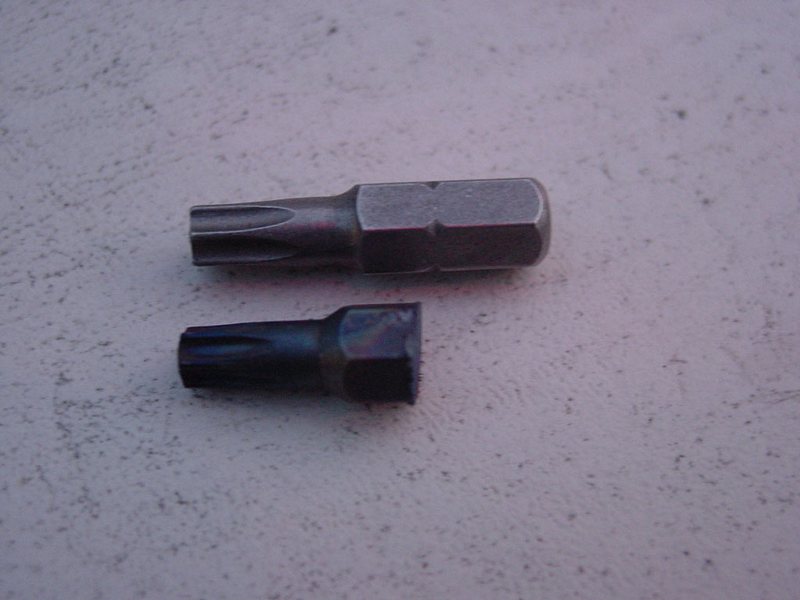
Removing it from here is easy (tool G with tools H, or F or E), but you might swear a few times. I also used a pry bar to give me a little more room to work on this by moving the exhaust over a little.
** When reinstalling the new F125 switch, be SURE TO NOT DAMAGE THE NEW SWITCH BY FORCING THE NEW ONE ONTO THE TRANSMISSION SHAFT!!! ALIGN IT BEFORE, AND TAKE YOUR TIME.**
12) Unplug the f125 and remove from car. I used a screw driver and pick to get the plugs apart (tools N and O).
All of the parts I removed to access the F125 switch:
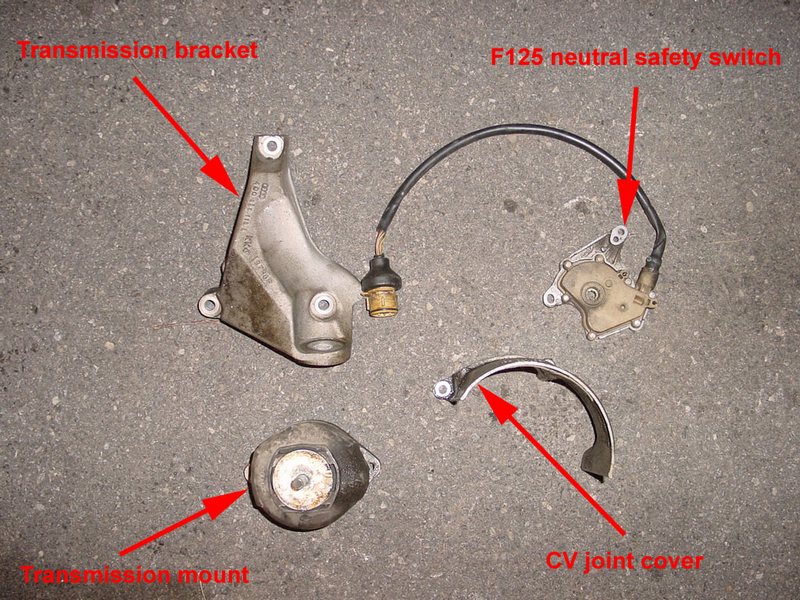
Installation is reverse of removal. Pay attention to step 8 for helpful hints when reinstalling.
There are several reasons why you might want to remove the shifter and surrounding wood trim in an A8. Possibilities include:
- Removal of the wood trim to polish and remove scratches. This area usually takes the most abuse from items getting placed on top of it.
- Removal of the aluminum shifter trim for polishing.
- Repairing /replacing LED backlighting for the shift indicator lights.
- As part of doing a Tiptronic upgrade on a 1997 US bound A8.
- Cleaning of the rubber “tractor” shift guide. If your shifter is getting harder to move through the gears, cleaning might help. In my case, this was necessary due to a spilled drink, but I'm sure they all get a gunk build up over time.
The main objective of this procedure is to show you how to get the shifter assembly apart so that you can do any of the above. I'll share some of the polishing techniques that I used in my project as well.
Time
Varies widely depending on what you do. Figure 45 minutes or so to get it opened up.
Tools Required
- “T” handle 6mm hex works best although an Allen wrench would work too
- Trim removal tools
Procedure
You can find the instructions on how to remove and reinstall the side panels here. If you have a facelift car, you'll need a 5mm allen wrench to remove the switch under the gas pedal.
Remove both the driver and passenger floor mats AND the sound insulation underneath. The sound insulation is the same shape as the floor mat only it's much thicker and heavier.
On the driver's side, remove the two plastic inserts in the knee bolster below the steering wheel. They pop right out and will expose 6mm hex screws. Remove those screws and the whole piece will tilt down out of the way. Carefully prop it against the floor. You don't really need to remove it entirely for this project. Don't break the OBD harness, it will still be attached. Pictures and detailed description can be found here.
On the passenger side, look for a rectangular Velcro section on the transmission hump carpeting. It's around ankle height on the left side as you are sitting in the seat. Pull that back, remove the small plastic cover (pry off with a screwdriver) and remove the Philips screw.
In order to get the shifter assembly apart, you now need to remove the side panels to expose 6mm hex screws. Two of them secure the wood trim and two secure the aluminum shifter piece. Pull the side panels down and out on both the driver and passenger sides. They have tabs that catch behind the center console.
Once the side panels are out of the way (get them out of the car), look on each side, behind where the side panels were installed, for the 6mm hex screws and remove them. If you are taking out BOTH the shifter and wood trim, remove all four.
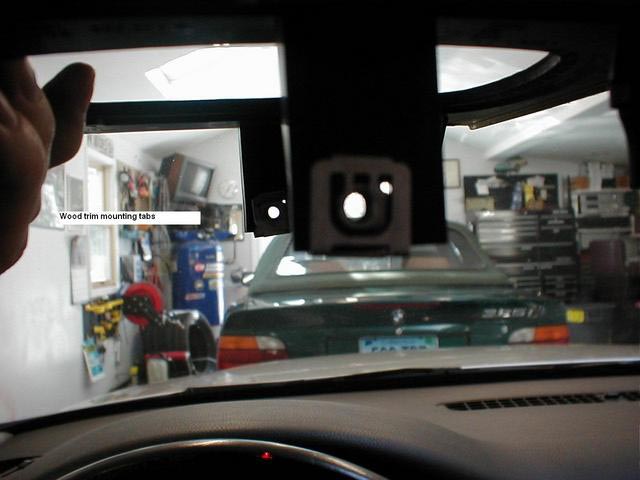
What is being shown in this picture are the tabs that are attached to the wood trim. Some of you have been successful in just “prying” this piece out. PLEASE check and see if the 6mm screws are installed (and remove them) before you try and pry it out. Otherwise, you will break it for sure and something tells me this isn't a $10 part J
Once the screws are removed, you can pry up on the wood trim and remove it. There will be some friction from the rubber gasket but it will come straight up and out.
If you have removed the screws for the aluminum shifter, it will pull straight up as well but will NOT come out until you do two more things. Depending on what you're doing, this might be far enough do get what you need done. If you want to completely remove it, go to the step below.
Completely Removing the Shifter
If you are at this step, the wood trim has been removed and the aluminum shifter should be loose but still connected. If you want to remove it completely, do the following.
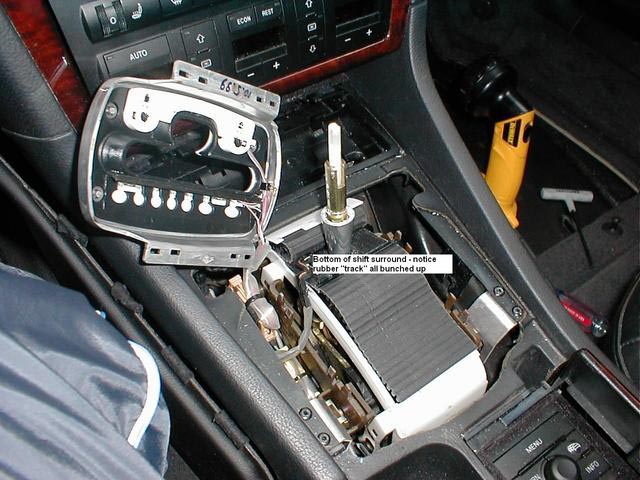
Disconnect the two wiring harnesses on the left hand side. You'll probably need to cut the zip ties that hold the connectors in place.
Remove the shifter. This can be a little tricky but let me explain. Just below the leather part of the shift knob, there is an aluminum collar that you need to loosen. Carefully wedge a screwdriver between the bottom of the leather and the top of the collar and press down. It's pretty tight but mine came off right away. I don't think you can “pull” it down with your hands so I came up with the screwdriver method. It goes without saying to do this carefully in case the screwdriver slips. I did it in one shot so hopefully it's no big deal.
Once that's done, pull the shift button OUT and pull UP to remove the shifter. Just to clarify, the shift selector button is the one you push in with your thumb before selecting the gear. Note when reinstalling: you will need to use a pair of needle nose pliers to “grab” the shift button in order to pull it back out so you can reinstall it.
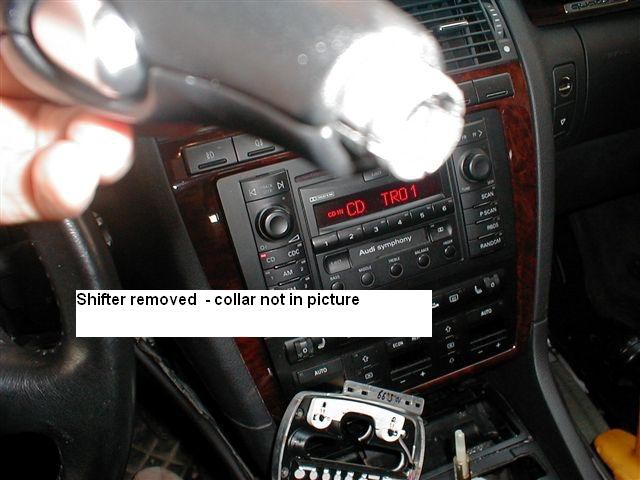
At this point the disassembly is complete and you can access pretty much everything related to the center console and shifter. Assembly is the reverse for all steps.
A couple of notes that might be helpful:
- I used a combination of wet sanding and 3 grits of polish on the wood trim. If yours is in pretty good shape you might be able to just polish or use Meguairs scratch remover. This is probably trial and error until you are happy with the results. The clearcoat looks pretty thick so there's a lot of material to work with. Reinstalling with the 6mm screws is optional. The rubber surround holds it tightly in place. This also means you'll be able to pop it right back out without all of the disassembly the next time.
- If you're polishing the aluminum trim, I would recommend removing the shift indicator buttons by peeling off the white tape and pushing them out. You will also need to remove the white plastic piece on the back by prying out the four circle clips that hold it on. If you got this far, you won't get stumped with these details. At this point, you be left with just a machined piece of aluminum. I started with 240 grit sandpaper (deep scratches), 320, 400, 500 and then #00, #000, #0000 steel wool. There's either an anodized coating or clearcoat that you will need to get through before you hit the aluminum. I think any of the grits of sandpaper will get through this pretty fast. I did mine in more of a brushed aluminum look by making the #000 steel wool the last step. If you want to get back to a highly polished finish, you will need to do some buffing too. I replaced these screws but you will notice that this piece is keyed when you reinstall it. You could probably get away without these too, which would eliminate most of this procedure if you wanted to this again.
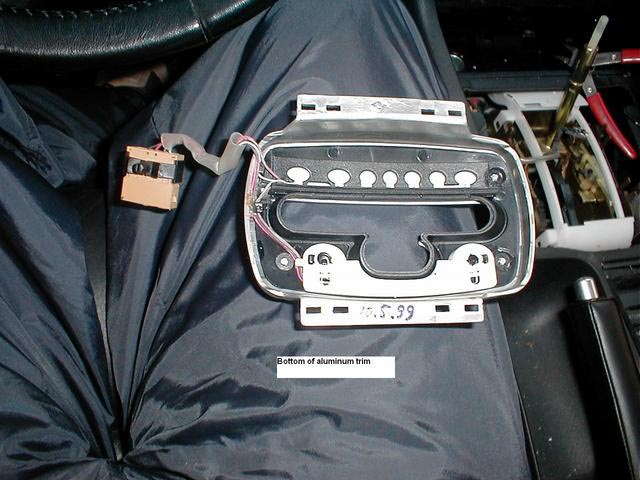
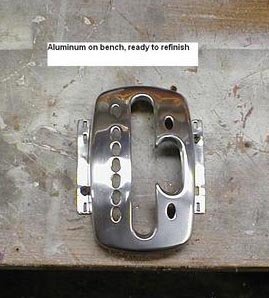
- The rubber “tractor” looking piece has a pretty tight tolerance and needs to be clean in order to work smoothly. While you have everything opened up, clean it well and use some armor all so that it's slippery. I had to do a more extensive cleaning on the plastic guides as it kept getting stuck. Unfortunately, you can't really “test” it until the shifter is reassembled. It needs to be held down in order to work correctly.
